00 8802 97, 09/19 (Rev. 6.0)
- 7 -
©
T
un
st
al
l G
m
bH
, O
rk
ot
te
n
66
, 4
82
91
T
el
gt
e,
G
er
m
an
y,
w
w
w
.tu
ns
ta
ll.
de
FR - Mode d'installation
EN - Installation Instructions
ComTerminal Flamenco, réf. 77 0510 00
ComTerminal-F Flamenco, réf. 77 0530 00
Terminal de communication avec phonie duplex. Touche d'ap
-
pel rouge, touche d'alarme bleue, touche de présence 1 verte,
de présence 2 jaune, 4 touches de fonction avec affectation
en fonction de la situation, microphone et haut-parleurs.
Le ComTerminal commande et surveille toutes les fonctions
de chambre selon la norme allemande DIN VDE 0834. Rac
-
cord au bus de groupe (OSYnet) et le bus de chambre (RAN).
ComTerminal Flamenco, order no. 77 0510 00
ComTerminal-F Flamenco, order no. 77 0530 00
Communication terminal with two-way speech communica
-
tion. Red call button, blue alarm button, green presence but
-
ton (staff 1), yellow presence button (staff 2) and 4 function
keys as soft keys. Microphone and loudspeakers.
Control and monitoring of all room functions in compliance
with DIN VDE 0834. Connection to the group bus (OSYnet)
and the room bus (RAN).
REMARQUE !
L'installation complète du système est
décrite dans le manuel technique.
ATTENTION!
Le circuit imprimé est pourvu d'éléments
sensibles à l'électrostatique. Évitez tout contact direct.
ATTENTION verre – fragile!
Le panneau frontal du
ComTerminal 77051000 est constitué de verre véri
-
table.
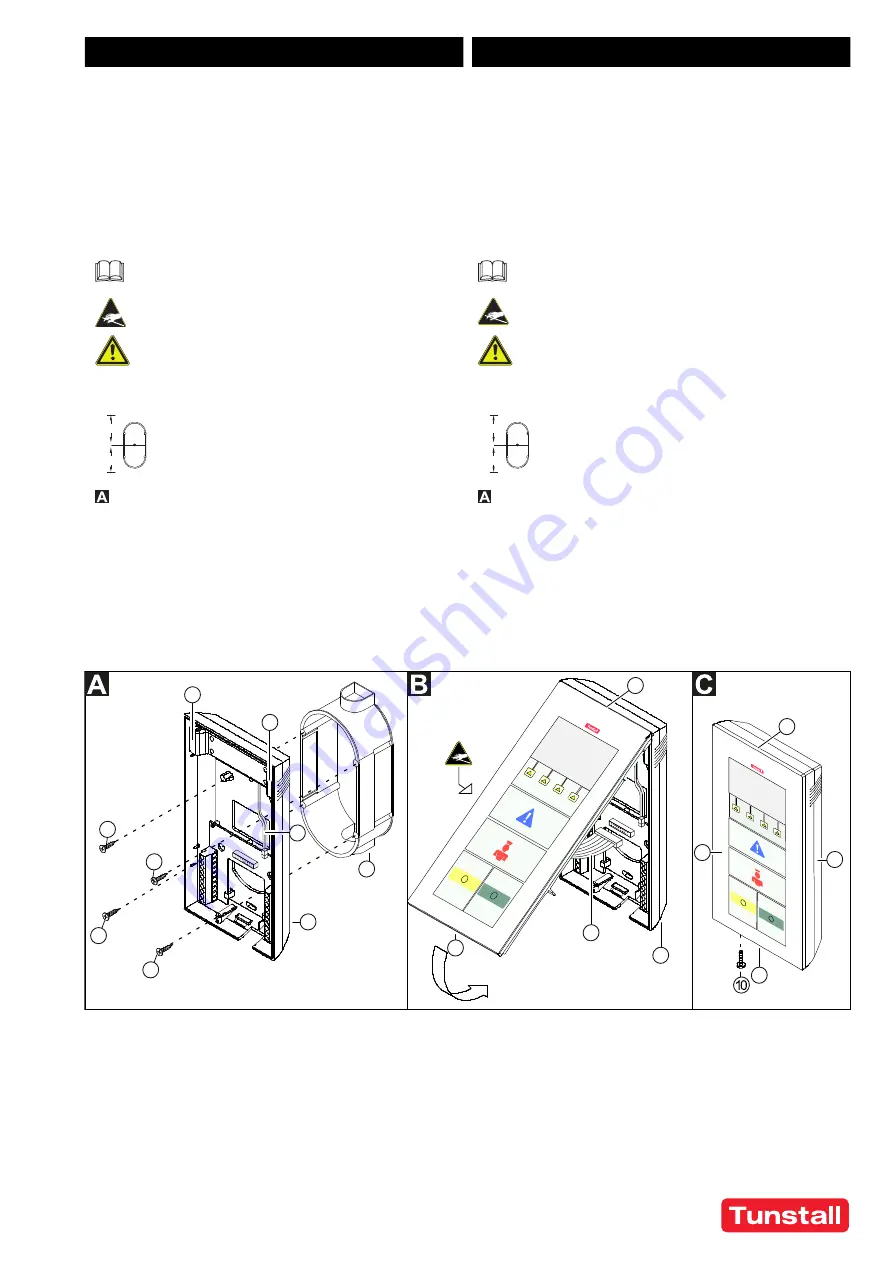
Poser le boîte d‘encastrement
Tenez compte du besoin de place du terminal lors
de la pose de la boîte d'encastrement. Il convient
de prévoir un espace d'au moins 120 mm du point
central de la boîte vers le haut et le bas.
NOTE!
The complete installation of the system is de
-
scribed in the Technical Manual.
CAUTION!
The printed circuit board includes electro
-
static sensitive components. Avoid touching.
Glass – fragile!
The operating front cover of the
ComTerminal 770510000 is made of glass. Handle
with care!
Back box installation
When installing the back box consider the space re
-
quired for the ComTerminal. Measuring from the
centre of the box, the available space must be at
least 120 mm above and below.
Montage du panneau arrière du terminal
1. Passer les conduites de raccordement par l'ouverture
dans le panneau arrière du terminal [2].
2. Visser le panneau arrière [2] avec les vis [1] de la boîte
d'encastrement [5] sur cette dernière.
REMARQUE !
Si le montage sur une boîte d'encastrement
s'avère impossible, le ComTerminal peut être fixé au mur avec
des vis et des chevilles et le vissage s'effectuera par les
mêmes perçages dans le panneau arrière du terminal.
Mounting the pattress
1. Insert the connection cables through the outlet in the pat
-
tress [2].
2. Fix the pattress [2] using the back box screws [1] to the
back box [5].
NOTE!
If mounting on a back box is not possible, the ComTer
-
minal may be fixed to the wall with dowels and screws using
the same holes in the pattress.
1 -
*
Quatre vis de la boîte
d'encastrement
2 - Panneau arrière du ter
-
minal
3 - Deux conduites de rac
-
cordement vers les haut-
parleurs
4 - Deux haut-parleurs
5 -
*
Boîte d'encastrement
6 - Panneau frontal
7 - Câble plat
8 - Charnière
9 - Ergot
10 - Vis de blocage (option)
1 -
*
Four back box screws
2 - Pattress
3 - Two connections to the
two loudspeakers
4 - Two loudspeakers
5 -
*
Back box
6 - Front panel
7 - Flat cable
8 - Hinge
9 - Catch
10 - Security screw (optional)
*
Non fourni avec le ComTerminal
*
Not included with ComTerminal delivery
120 mm
120 mm
120 mm
120 mm
1
1
1
1
2
8
4
4
3
5
9
7
2
9
2
6
8


