‼ NOTE
• Small parts can be hidden/ packed in hollow
spaces in the Styrofoam product protection
• If a part is missing, contact your dealer.
Description illustration C
The illustration shows the hardware kit that comes
with your product.
The hardware kit contains bolts, washers, screws
, nuts etc. and the required tools to properly fit
your trainer.
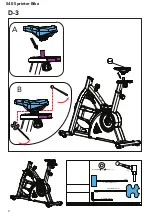
Description illustration D
The illustrations shows you in the correct following
order how to assembly your trainer best.
‼ NOTE
• Part numbers shown in the assembly steps
are commencing with the spare part drawing
that can be found in the online version user
manual.
⚠ WARNING
• Assemble the equipment in the given order.
• Carry and move the equipment with at least
two persons.
⚠ CAUTION
• Place the equipment on a firm, level surface.
• Place the equipment on a protective base to
prevent damage to the floor surface.
• Allow at least 100 cm of clearance around
the equipment.
• Refer to the illustrations for the correct
assembly of the equipment.
Additional assembly information
D2 How to fit the pedals correctly�
‼ NOTE
• Right and left side are determined from an
exercising positions perspective.
Right hand pedal
Find the “R” or “L” mark on the pedal axle
- Fit the right hand pedal “R” into the right hand
crank.
- Firstly turn the pedal axle in clockwise direction
by hand.
- Use the wrench to fully tighten the pedal.
Left hand pedal
- Fit the left hand pedal “L” into the left hand
crank.
- Firstly turn the pedal axle in counter-clockwise
direction by hand.
- Use the wrench to fully tighten the pedal.
Click to see our supportive YouTube
video
https://youtu.be/Devel2ZhCAc
‼ NOTE
• Save the tools provided with this product,
after you completed the product assembly,
for future service purposes.
Additional information
Packaging disposal
Government guidelines ask that we reduce the
amount of waste material disposed of in land fill
sites. We therefore ask that you dispose of all
packaging waste responsibly at public recycling
centres.
End of life disposal
We at Tunturi hope you enjoy many years of
enjoyable use from your fitness trainer. However,
a time will come when your fitness trainer will
come to the end of its useful life. Under ‘European
WEEE Legislation you are responsible for the
appropriate disposal of your fitness trainer to a
recognised public collection facility.
Use
Adjusting the support feet
The equipment is equipped with adjustable
support feet.
If the equipment feels unstable, wobbly, or not
levelled well, these support feet can be adjusted
to make the required corrections.
- Turn the support feet in/ out as required to put
the equipment in a stable and as well possible
levelled position.
- Tighten the locknut’s to lock the support feet.
15
English
Summary of Contents for 17TBS40000
Page 2: ......
Page 3: ...A 3 S40 Sprinter Bike...
Page 8: ...A B P 8 Box Spanner 1 P 7 Allen Key 1 P 6 Screwdriver 1 D 3 8 S40 Sprinter Bike...
Page 9: ...6 5 4 3 2 1 P 8 Box Spanner 1 P 7 Allen Key 1 P 6 Screwdriver 1 D 4 9 S40 Sprinter Bike...
Page 12: ...E 12 S40 Sprinter Bike...
Page 50: ......
Page 51: ......
Page 52: ...20220420 P...


