background image

13 


CHILD-LOCK (LOCK) 

Long press 3 seconds to turn on/off the child lock function. 
 

  WATER TANK FULL ALARM 


Water Tank Indicator 

When the tank is full, it sets the alarm for 5 seconds. The full tank LED indicator turns red 
and the unit buzzes for 5 times. This LED can be found on the control panel just above the 
POWER LED. 


Clear the alarm 

When the buzz is on, press any button to stop it. The compressor and the fan shut down and 
all the functions freeze until the water tank is emptied and back in right position.                     

A.


Drainage 

There are two ways of removal collected water produced by the unit. 
A. Manual draining: the water tank is removed manually. 
B. Continuous draining: attach  a drain hose  to the unit so that the condensed water is 
drained by using gravity.   

B.


Emptying the water tank


The unit will shut down once the water tank is full. It will run again once you have emptied 
the water tank and reinstalled it properly. When the tank is full, the unit will make a buzzing 
sound, and the “Water Full” LED will turn on.   


Press the POWER button to turn off the unit.   


Pull on the water tank and slide out of the body of the dehumidifier. 


Empty the water into an area with a drain or outside. 


Clean the inside of the tank, if necessary, as well as the outside. 


Replace the empty tank back into the unit. 


Press the POWER button to restart the unit. 


If the “Water Full” LED is still on, check if the water tank float is 
correctly placed and free from any blocking. 


Summary of Contents for SENSO 12

Page 1: ...DEHUMIDIFIER DEZUMIDIFICATOR LUFTENTFEUCHTER DESHUMIDIFICADOR D SHUMIDIFICATEUR DEUMIDIFICATORE Instruction manual EN RO DE ES FR IT...

Page 2: ...OVERVIEW 8 4 INSTALLATION 10 5 OPERATION 11 6 MAINTENANCE 15 7 TROUBLESHOOTING 16 8 DECOMMISSIONING 17 Thank you for selecting our dehumidifier Be sure to read this manual carefully before using it P...

Page 3: ...ouse effect GWP and is available worldwide Because of its efficient energy properties R290 is highly suitable as a coolant for this application Special precautions must be taken into consideration due...

Page 4: ...ir It collects first in low areas but can be circulated by the fans If propane gas is present or even suspected do not allow untrained personnel to attempt to find the cause The propane gas used in th...

Page 5: ...let or the aluminum fins of the unit Do not operate the unit if it is dropped damaged or showing signs of product malfunction Do not clean the appliance with any chemicals Ensure the unit is far away...

Page 6: ...e local area shall be instructed on the nature of work being carried out Work in confined spaces shall be avoided The area around the workspace shall be sectioned off Ensure that the conditions within...

Page 7: ...obstructed If an indirect refrigerating circuit is being used the secondary circuit shall be checked for the presence of refrigerant Marking to the equipment continues to be visible and legible Marki...

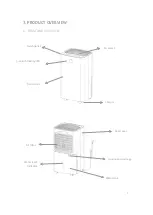
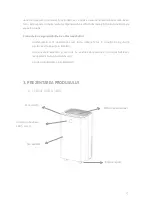
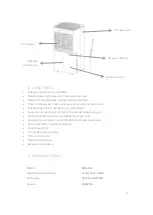
Page 8: ...8 3 PRODUCT OVERVIEW A FRONT AND REAR VIEW Touch panel Air outlet 3 color himidity LED Front cover Castors Rear cover Continuous drainage Air filter Water level indicator Water tank...

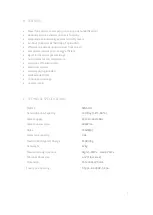
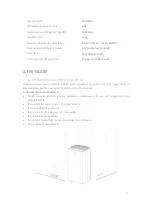
Page 9: ...Defrost at low temperature Auto shut off auto restart Electronic control Laundry drying function Antibacterial Filter Continuous drainage 2L water tank C TECHNICAL SPECIFICATIONS MODEL SENSO 12 Dehum...

Page 10: ...ht Mechanical vibration or shock Excessive dust Lack of ventilation such as cabinet or bookcase Uneven surface WARNING Install the unit in rooms which exceed 4 m Do not install the unit in a place whe...

Page 11: ...starts up in the mode selected when the unit was last used The dehumidifier starts dehumidifying if the room humidity is 3 higher than the selected humidity There is a protective 3 minutes time delay...

Page 12: ...midity cannot be adjusted under SLEEP mode TIMER Press the timer button to set the 0 12 hour timing function The interval is 1 hour Each time you press this button the value increased 1 hours and then...

Page 13: ...k is removed manually B Continuous draining attach a drain hose to the unit so that the condensed water is drained by using gravity B Emptying the water tank The unit will shut down once the water tan...

Page 14: ...t Securely and properly connect the drain hose and make sure it is not obstructed Place the outlet end of hose into a drainage hole or bucket and ensure that water can freely drain out of the unit Do...

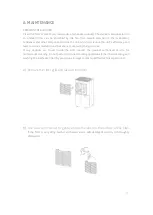
Page 15: ...ns that are not covered by the guarantee If any deposits are found inside the unit contact the nearest authorized service for professional cleaning Do not perform internal cleaning operations other th...

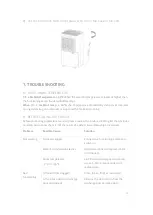
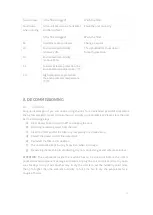
Page 16: ...rofessional service please review the trouble shooting list that includes common occurrences that are not the result of a defect in workmanship or materials Problem Possible Cause Solution Not working...

Page 17: ...clean the unit and dry it out completely Please store the unit per the following steps a Press power button to switch off and unplug the unit b Drain the remaining water from the unit c Clean the filt...

Page 18: ...into the groundwater and get into the food chain damaging your health and well being Declaration of conformity Intax Trading SRL A1 A3 Libert ii Street 140017 Alexandria Teleorman Romania certifies t...

Page 19: ...ULUI 25 4 INSTALARE 27 5 FUNC IONARE 29 6 NTRE INERE 33 7 DEPANARE 34 8 ELIMINARE 35 V mul umim c a i ales dezumidificatorul nostru Asigura i v c citi i cu aten ie acest manual nainte de utilizarea de...

Page 20: ...ii speciale datorit nivelului ridicat de inflamabilitate a agentului frigorific B SIMBOLURI FOLOSITE PE UNITATE I N MANUAL Avertisment Acest aparat utilizeaz agent frigorific Dac agentul frigorific se...

Page 21: ...t la nivelul solului dar poate fi circulat i de c tre un ventilator Dac suspecta i prezen a gazului propan nu permite i persoanelor necalificate s ncerce s repare instala ia Gazul propan utilizat n in...

Page 22: ...loaie umiditate sau orice alt surs de lichide Nu l sa i aparatul nesupravegheat atunci c nd func ioneaz Nu l nclina i i nu l ntoarce i cu susul n jos Nu deconecta i aparatul n timpul func ion rii Nu d...

Page 23: ...AN PRIVIND REPARA IILE V rug m s lua i n considerare aceste avertismente nainte de a efectua opera ii de ntre inere la un dezumidificator cu R290 i Verific ri n vecin tatea aparatului nainte de nceper...

Page 24: ...a trebuie s fie adecvate scopului i s urmeze specifica iile corecte n orice moment trebuie respectate instruc iunile produc torului privind ntre inerea i opera iile de service n caz de ndoial consulta...

Page 25: ...iale se efectueaz c nd condensatorii sunt desc rca i acest lucru trebuie f cut n condi ii de siguran pentru a evita apari ia sc nteilor componentele electrice i cablurile nu se afl sub tensiune i n t...

Page 26: ...ficient din punct de vedere energetic Ventilatorul este silen ios av nd dou trepte de vitez Decongelare automat n cazul func ion rii la temperatur joas Oprire automat repornire automat Control electro...

Page 27: ...SAREA DEZUMIDIFICATORULUI A eza i unitatea pe o suprafa stabil plat i p stra i cel pu in 30 cm de spa iu liber n jurul acesteia pentru a permite circula ia adecvat a aerului Nu instala i niciodat unit...

Page 28: ...lui libere de obstacole Dac a fost este nclinat la un unghi mai mare de 45 l sa i unitatea s stea n pozi ie vertical cel pu in 24 de ore nainte de pornire P stra i u ile i ferestrele nchise pentru o m...

Page 29: ...re continu Mod repaus ap sa i o dat pentru a schimba de la un mod la altul iar indicatorul corespunz tor se va aprinde Mod automat c nd umiditatea nc perii umiditatea setat 3 ventilatorul porne te i c...

Page 30: ...acest buton i pentru a seta nivelul de umiditate dorit Intervalul de setare a umidit ii dorite pas cu pas este de 30 35 40 45 50 55 60 65 70 75 80 Dup setarea nivelului dorit sistemul confirm valoarea...

Page 31: ...ce rezervorul se va umple cu ap Dezumidificatorul va reporni doar dup ce goli i rezervorul de ap i l reinstala i corect C nd rezervorul este plin dispozitivul va emite un sunet acustic iar indicatoru...

Page 32: ...ta i corect furtunul de scurgere i asigura i v c nu este obstruc ionat Introduce i cap tul de evacuare al furtunului ntr o gur de scurgere sau g leat i asigura i v c apa poate curge liber din unitate...

Page 33: ...r defec iuni care nu fac n acest caz obiectul garan iei Dac se constat depuneri de impurit i n interiorul unit ii contacta i cel mai apropiat service autorizat n vederea cur irii profesionale a aceste...

Page 34: ...ze b NAINTE DE A SOLICITA SERVICE nainte de a contacta centrul de service consulta i lista de posibile probleme care pot ap rea n timpul func ion rii unit ii i care nu sunt rezultatul unui defect de m...

Page 35: ...toproteja HI Nivelul umidit ii din camer a crescut peste 90 CL Protec ie la temperatur sc zut c nd temp camerei este 5 C CH Protec ie la temperatur ridicat c nd temp camerei este 35 C 8 ELIMINARE 8 1...

Page 36: ...e separate Contacta i administra ia local pentru informa ii despre sistemele de colectare disponibile n zon Dac aparatele electrice sunt aruncate mpreun cu gunoiul menajer substan ele periculoase se p...

Page 37: ...45 5 BETRIEB 46 6 INSTANDHALTUNG 51 7 FEHLERBEHEBUNG 52 8 ENTSORGUNG 53 Vielen Dank dass Sie sich f r unseren Luftentfeuchter entschieden haben Lesen Sie dieses Handbuch sorgf ltig durch bevor Sie den...

Page 38: ...tel Aufgrund der hohen Entflammbarkeit des K ltemittels sind jedoch besondere Vorke hrungen zu treffen B SYMBOLE DIE AM GER T UND IM HANDBUCH VERWENDET WERDEN Warnung Dieses Ger t verwendet K ltemitte...

Page 39: ...ann aber auch von einem L fter umgew lzt werden Lassen Sie bei Verdacht auf Anwesenheit von Propangas nicht zu dass Unqualifizierte versuchen die Anlage zu reparieren Das bei der Einrichtung dieses Ge...

Page 40: ...Sie das Ger t w hrend des Betriebs nicht unbeaufsichtigt Kippen Sie es nicht und drehen Sie es nicht um Trennen Sie das Ger t nicht w hrend des Betriebs vom Stromnetz Trennen Sie das Ger t nicht durch...

Page 41: ...werden unter Aufsicht einer Person durchgef hrt die f r die Verwendung brennbarer K ltemittel zust ndig ist Treten Probleme auf die Sie nicht verstehen oder wenn Sie Hilfe ben tigen wenden Sie sich b...

Page 42: ...Bereich um die Anlage herum auf brennbare Produkte und Entz ndungsgefahren zu berpr fen Das Rauchen verboten Schild muss angebracht sein vii BEL FTETER BEREICH Stellen Sie sicher dass der Arbeitsberei...

Page 43: ...nstellend behoben wurde Wenn der Fehler nicht sofort behoben werden kann der Betrieb jedoch fortgesetzt werden muss wird eine geeignete vor bergehende L sung verwendet Dies wird dem Eigent mer des Ger...

Page 44: ...nger Energieverbrauch energieeffizient Der L fter ist leise mit zwei G ngen Automatische Abtauung bei Niedertemperaturbetrieb Automatisches Herunterfahren automatischer Neustart Elektronische Steuerun...

Page 45: ...eine stabile ebene Fl che und lassen Sie um das Ger t herum mindestens 30 cm Freiraum um eine ordnungsgem e Luftzirkulation zu gew hrleisten Installieren Sie niemals das Ger t Neben W rmequellen wie H...

Page 46: ...g aufrecht stehen Halten Sie T ren und Fenster geschlossen um die Effizienz des Luftentfeuchters zu verbessern Verwenden oder lagern Sie das Ger t nicht in direktem Sonnenlicht oder im Regen Es ist no...

Page 47: ...it 3 stoppt der Kompressor und mit 30 Sekunden Nachlauf auch der L fter Sowohl die L ftergeschwindigkeit als auch die Luftfeuchtigkeit k nnen im Automatikmodus eingestellt werden Kontinuierlicher Entf...

Page 48: ...n Niveaus best tigt das System den Eingabewert verl sst dann den Einstellmodus und kehrt zum aktuellen Feuchtigkeitsniveau zur ck Im Entfeuchtungsmodus kann die Luftfeuchtigkeit nicht ge ndert werden...

Page 49: ...l Tank voll leuchtet auf Dr cken Sie die POWER Taste um das Ger t auszuschalten Ziehen Sie den Wassertank heraus und er wird aus dem Entfeuchtergeh use herauskommen Lassen Sie das Wasser aus dem Tank...

Page 50: ...Sie das Ablaufende des Schlauchs in einen Abfluss oder einen Eimer und stellen Sie sicher dass das Wasser ungehindert aus dem Ger t abflie en kann Tauchen Sie das Schlauchende nicht in Wasser da dies...

Page 51: ...verschiedener Fehler die nicht von der Garantie abgedeckt sind Wenn sich im Inneren des Ger ts Verunreinigungen befinden wenden Sie sich zur professionellen Reinigung an die n chstgelegene autorisiert...

Page 52: ...Konsultieren Sie die Liste der m glichen Probleme die w hrend des Betriebs des Ger ts auftreten k nnen und die nicht auf einen Arbeitsmangel oder Materialfehler zur ckzuf hren sind bevor Sie sich an...

Page 53: ...bst zu sch tzen HI Die Luftfeuchtigkeit im Raum stieg um mehr als 90 CL Schutz bei niedriger Temperatur wenn die Temp im Zimmer 5 C ist CH Schutz bei hoher Temperatur wenn die Temp im Zimmer 35 C 8 EN...

Page 54: ...l sondern verwenden Sie getrennte Sammelr ume Informationen zu den in der Region verf gbaren Sammelsystemen erhalten Sie von Ihrer rtlichen Verwaltungsbeh rde Wenn Elektroger te mit dem Hausm ll entso...

Page 55: ...1 4 INSTALACI N 63 5 FUNCIONAMIENTO 64 6 MANTENIMIENTO 68 7 SOLUCIONAR LOS PROBLEMAS 70 8 ELIMINACI N 71 Gracias por elegir nuestro deshumidificador Aseg rese de leer este manual detenidamente antes d...

Page 56: ...o a sus propiedades energ ticas eficientes R290 es muy adecuado como refrigerante en la situaci n dada Sin embargo precauciones especiales se deben tener en cuenta debido al alto nivel de inflamabilid...

Page 57: ...ble y pesa m s que el aire R290 se puede identificar al nivel del suelo pero tambi n puede ser distribuido por un ventilador Si sospecha la presencia de gas propano no permita que personas no califica...

Page 58: ...rando el cable de alimentaci n No utilice un cable de extensi n ni un adaptador No coloque objetos sobre el dispositivo No suba ni se sienta sobre el dispositivo No inserte los dedos u otros objetos e...

Page 59: ...mantenimiento en un deshumidificador con R290 i Controles en la proximidad del dispositivo Prior to beginning work on systems containing flammable refrigerants safety checks are necessary to ensure t...

Page 60: ...sfera viii Controles en la instalaci n con refrigerante Si se cambian los componentes el ctricos stos deben ser adecuados al prop sito y seguir las especificaciones correctas Las instrucciones del fa...

Page 61: ...para que todas las partes tomen cuenta de esta situaci n Los controles de seguridad iniciales se llevar n a cabo cuando los condensadores est n descargados esto debe hacerse de forma segura para evita...

Page 62: ...a energ tica El ventilador es silencioso y tiene dos marchas de velocidad Descongelaci n autom tica en caso de funcionamiento a temperatura baja Apagado autom tico reinicio autom tico Control Electr n...

Page 63: ...ue la unidad sobre una superficie plana y estable y mantenga al menos 30 cm de espacio libre a su alrededor para permitir una circulaci n de aire adecuada Nunca instale la unidad Cerca de fuentes de c...

Page 64: ...puertas y las ventanas cerradas para una mejor eficiencia del deshumidificador No utilice ni almacene la unidad bajo la luz solar directa o bajo la lluvia Es normal que la salida de aire se caliente d...

Page 65: ...la humedad establecida de 3 el compresor se detiene y el ventilador tambi n despu s de 30 segundos de retraso Tanto la velocidad del ventilador como la humedad se pueden ajustar en el modo Auto autom...

Page 66: ...vel de la humedad actual En el modo de deshumidificaci n el nivel de humedad no se puede alterar Pulse el bot n correspondiente a la humedad durante 3 segundos para visualizar la temperatura ambiental...

Page 67: ...dad Tire del tanque de agua y ste saldr del cuerpo del deshumidificador Vac e el agua del tanque Limpie el interior del tanque si es necesario as como el exterior Vuelva a insertar el tanque vac o en...

Page 68: ...ar bloqueo del aire en la manguera Para evitar fugas de agua Dado que la presi n negativa del recipiente de drenaje del agua condensado es alta incline la manguera de drenaje abajo hacia el suelo Es n...

Page 69: ...ngase en contacto con el servicio autorizado m s cercano para una limpieza profesional No realice operaciones de limpieza interna excepto limpiar y lavar el filtro lavable salvo en presencia de perso...

Page 70: ...namiento de la unidad y que no son el resultado de un defecto de labor manual o de los materiales utilizados Problema Causas posibles Soluti n El dispositivo no funciona NO hay poder Conecte el dispos...

Page 71: ...peratura alta cuando la temperatura de la habitaci n es de 35 C 8 ELIMINACI N 8 1 ALMACENAMIENTO DE LA UNIDAD Almacenamiento a largo plazo Si no va a utilizar la unidad durante mucho tiempo m s de una...

Page 72: ...nformaci n sobre los sistemas de recolecci n disponibles en la zona Si los dispositivos el ctricos se descartan junto con la basura dom stica las sustancias peligrosas pueden infiltrarse en las aguas...

Page 73: ...RODUIT 79 4 INSTALLATION 81 5 FONCTIONNEMENT 82 6 ENTRETIEN 86 7 D PANNAGE 88 8 ELIMINATION 89 Merci d avoir choisi notre d shumidificateur Assurez vous lire attentivement ce manuel avant d utiliser l...

Page 74: ...SUR L UNIT ET DANS LE MANUEL AVERTISSEMENT Cet appareil utilise du r frig rant Si le r frig rant fuit et entre en contact avec une source de flamme ou de chaleur il va cr er des gaz nocifs et il y a...

Page 75: ...r l installation Le gaz propane utilis dans l installation de cet appareil n a pas d odeur Le manque d odeur n indique pas le manque de gaz vacu Si une fuite est d tect e vacuez imm diatement tout le...

Page 76: ...n tirant le c ble d alimentation N utilisez pas de rallonge ni d adaptateur Ne placez pas d objets sur l appareil Ne montez pas et ne vous asseyez pas sur l appareil N ins re pas les doigts ou d autre...

Page 77: ...ons au voisinage du dispositif Avant de commencer travailler sur des syst mes contenant des r frig rants inflammables ils sont n cessaires des contr les de s curit pour r duire au minimum le risque d...

Page 78: ...ac s ils doivent tre adapt s l utilisation pr vue et de respecter les sp cifications correctes Les instructions du fabricant concernant la maintenance et les op rations en ce qui concerne la maintenan...

Page 79: ...urit initiaux sont effectu s lorsque les condensateurs sont d charg s ceci doit tre fait en toute s curit pour viter la formation d tincelles les composants lectriques et les c bles ne sont pas sous t...

Page 80: ...n faible d nergie efficacit nerg tique Le ventilateur est silencieux deux vitesses D givrage automatique en cas de fonctionnement basse temp rature Arr t automatique red marrage automatique Contr le l...

Page 81: ...l sur une surface stable et plane et laissez au moins 30 cm d espace libre autour de lui pour permettre une circulation d air ad quate Ninstaller jamais lunit c t de sources de chaleur telles que chau...

Page 82: ...r une meilleure efficacit du d shumidificateur N utilisez pas et ne stockez pas l unit la lumi re directe du soleil ou sous la pluie Il est normal que la sortie d air se r chauffe apr s un fonctionnem...

Page 83: ...t tre r gl e en mode Auto automatique Mode de fonctionnement de d shumidification continu L unit continue de fonctionner mais l humidit ne peut pas tre r gl e Mode Sleep Veille le voyant correspondant...

Page 84: ...le bouton pour passer de la vitesse lev e la vitesse lente l indicateur LED correspondant s allume En mode de d shumidification continu en mode veille et en mode d givrage la vitesse du ventilateur n...

Page 85: ...Nettoyez l int rieur du r servoir si n cessaire et aussi l ext rieur Ins rez le r servoir vide dans l unit Appuyez sur le bouton POWER pour reprendre le fonctionnement de l appareil Si l indicateur du...

Page 86: ...n gative du r cipient de drainage des condensats tant lev e inclinez le tuyau de drainage vers le sol Il est n cessaire que l angle d inclinaison d passe 20 Serrer le tuyau pour viter de le plier 6 E...

Page 87: ...fectuez pas de nettoyage interne autre que le nettoyage et le lavage du filtre lavable qu uniquement avec du personnel sp cialis a Retirez la grille du filtre et enlevez le filtre b Utilisez un aspira...

Page 88: ...l mes pouvant survenir pendant le fonctionnement de l unit et ne r sultant pas d un vice du travail ni des mat riaux utilis s Probl me Causes possibles Solution L appareil ne fonctionne pas Il n y a p...

Page 89: ...se temp rature quand la temp de la chambre est 5 C CH Protection haute temp rature quand la temp de la chambre est 35 C 8 ELIMINATION 8 1 STOCKAGE DE L UNIT Stockage long terme Si vous n utilisez pas...

Page 90: ...mais utilisez des espaces de collecte s par s Contactez votre administration locale pour obtenir des informations sur les syst mes de collecte disponibles dans la r gion Si les appareils lectriques so...

Page 91: ...LAZIONE 99 5 FUNZIONAMENTO 100 6 MANUTENZIONE 105 7 RISOLUZIONE DEI PROBLEMI 106 8 SMALTIMENTO DEL PRODOTTO 107 Grazie per aver scelto il nostro deumidificatore Assicurarsi di leggere attentamente que...

Page 92: ...azione a causa dell alta infiammabilit del liquido di raffreddamento B SIMBOLI SULL UNIT E NEL MANUALE D USO Attenzione Questa unit utilizza un refrigerante infiammabile Se il refrigerante esce fuori...

Page 93: ...dica una mancanza di gas fuoriuscito Se viene rilevata una perdita evacuare immediatamente tutte le persone dal negozio ventilare la stanza e contattare i vigili del fuoco locali per avvisare che si v...

Page 94: ...ntana da fuoco oggetti infiammabili o esplosivi L unit deve essere installata in conformit con le normative nazionali sul cablaggio Non utilizzare mezzi per accelerare il processo di scongelamento o p...

Page 95: ...a natura del lavoro svolto Il lavoro in spazi ristretti deve essere evitato L area intorno allo spazio di lavoro delimitata Assicurarsi che gli spazi nell area sono stati messi in sicurezza mediante i...

Page 96: ...one indiretto verificare la presenza di refrigerante nel circuito secondario La marcatura sull apparecchiatura continua a essere visibile e leggibile Contrassegni e segni illeggibili devono essere cor...

Page 97: ...ZIONE DEL PRODOTTO A VISTA ANTERIORE E POSTERIORE LED umidita a 3 colori Pannello a sfioramento Uscita dell aria Allegiamento Ruote Allogiamento posteriore Drenaggio continuo Filtro Indicatore del liv...

Page 98: ...matico riavvio automatico Controllo elettronico Funzione di asciugatura della biancheria Filtro antibatterico Drenaggio continuo Serbatoio dell acqua da 2 litri C SPECIFICHE TECNICHE MODELLO SENSO 12...

Page 99: ...d esempio armadio o libreria Superficie irregolare ATTENZIONE Installare l unit in stanze che superano i 4 m Non installare l unit in un luogo in cui potrebbero fuoriuscire gas infiammabili NOTA Il pr...

Page 100: ...ificatore inizia la deumidificazione se l umidit della stanza del 3 superiore all umidit selezionata C un ritardo di 3 minuti al termine del quale il compressore riprende a funzionare Attendere 3 minu...

Page 101: ...funzionare e la ventola si spegne dopo 30 secondi di ritardo Quando lumidit ambientale 63 la ventola inizia a funzionare e il compressore inizia a funzionare dopo 3 secondi La velocit e l umidit dell...

Page 102: ...spengono e tutte le funzioni si bloccano fino a svuotare il serbatoio dell acqua e riportarlo nella posizione corretta A Drenaggio Esistono due modi per rimuovere l acqua raccolta prodotta dall unit...

Page 103: ...una superficie orizzontale e stabile Spegnere l unit prima di metterla in funzione Uscita di drenaggio continuo Collegare saldamente e correttamente il tubo di scarico e assicurarsi che non sia ostrui...

Page 104: ...filtro sporco possono essere assorbiti dal ventilatore quindi rimanere attaccati all evaporatore al condensatore e ad altri componenti all interno dell unit il che pu ridurre l efficienza dell unit e...

Page 105: ...iente inferiore o superiore alla temperatura di funzionamento il deumidificatore si arresta When 5 C Temperatura Ambiente 16 C il compressore si scongela automaticamente a determinati intervalli duran...

Page 106: ...aria Il filtro bloccato Pulire il filtro L unit emette rumori durante il funzionament o L unit posizionata su una superficie piana e orizzontale Posizionare l unit correttamente Il filtro bloccato Pu...

Page 107: ...t ambientale per forzare la ventola ad asciugare l evaporatore per alcune ore 8 2 SMALTIMENTO AVVERTIMENTO Non rilasciare il refrigerante in atmosfera severamente vietato Non gettare le apparecchiatur...

Page 108: ...www turbionaire com...

Reviews: