background image

The 

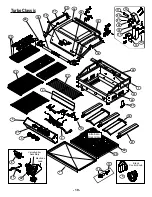
Turbo Elite Barbecue

(

Figure 17

) has been

designed and manufactured from heavy gauge porcelain
steel for long life. Daily weathering and high heat associat-
ed with grill cooking can cause the hood’s exterior stainless
surfaces to ”tan”.

To clean the stainless steel surfaces of your grill, follow

these directions;

1.

NEVER clean a grill while hot.

2.

Shut off gas supply at source and disconnect fuel line

from gas valve manifold. Protect fuel line fitting.

3.

Remove dirt or grease using a soft cloth, then polish

stainless surfaces with a Foam Spray cleaner designed
for stainless steel. Never use an abrasive cleaner or
scrubber that may scratch your stainless surfaces.

4.

Dry with a soft cloth and let air dry before restarting grill.

Cooking Tips & Care Of Your Gas Grill

Food Preparation

Preparing food to be cooked  on your gas grill requires

no more effort than if you were preparing it to be cooked on
your indoor range.  The following tips will help you get the
best results right from the start. 

1.

Trim off excess fat from meat, leaving a thin strip

round the edges.  To prevent meat from curling up while it
cooks, slash the remaining fat at two-inch intervals, taking
care not to cut into the meat.  Trim off all excess fat from
poultry before cooking.

2

.

Use tongs instead of a fork when turning meat or

poultry. The prongs of a fork pierce the meat or poultry,
causing it to lose it's natural juices.

3.

If you use a tomato or sugar base sauce for basting,

do not apply until the last five or ten minutes of cooking
period. Use over a longer period of time will result in over-
browning or charring.

4.

Poultry, fish and natural lean meats should be brushed

with cooking oil, butter, or margarine several times during
the cooking period to avoid their drying out.

5.

Meats and poultry should be brought to room tempera-

ture before cooking. Frozen foods such as fish and vegeta-
bles should be put on the grill without thawing.

6.

Salt meat, fish or poultry after cooking, not before or

during cooking periods. Other spices including pepper and
garlic may be freely applied.

SMOKE COOKING

Smoke cooking is an exceptionally slow method of

cooking in which a flavoring source is added to the barbe-
cue in order to impart its own delectable flavor to the meal
for a deep smoke flavor.

Soak a flavoring source such as hickory chips, green

twigs of apple-wood or wild cherry, garlic cloves or bay
leaves in water for 30 minutes prior to use. Loosely wrap in
a single layer of aluminum foil, leaving one end slightly open
and place on top of the Flame Tamer assembly at the
beginning of the cooking period.

For a lighter smoke flavor, add the pre-moistened

wrapped flavor source during the last half hour of the
cooking period.  Remember, smoke cooking is slow cooking.
You can't hurry it along without unsatisfactory results.  Keep
the heat control knobs set at LOW and the lid closed.

- 8-

Warming Rack

Figure 17

Summary of Contents for CG3TCBN

Page 1: ...n use which will prolong the life of the barbecue and protect it from the elements FOR YOUR SAFETY IF YOU SMELL GAS nWARNING Failure to comply with these instructions could result in a fire or explosi...

Page 2: ......

Page 3: ...must also be equipped with A A collar to protect the Propane gas valve B A shutoff valve terminating a Propane gas cylinder valve outlet QCC 1 Quick Connect Coupling Type 1 as spec ified in the Americ...

Page 4: ...lls Steel and Wood Carts 2 years Porcelainized Steel Frame Housing Solid Porcelain Coated Cast Iron Burners 5 years Solid Cast Stainless Steel Burners 15 years All Stainless Steel exterior parts 15 ye...

Page 5: ...th heat control knobs still at OFF position turn on Cylinder valve USING SOAP SOLUTION TEST THE GAS CONNECTION FOR LEAKS See Page 2 for information on mixing and applying soap solution If bubbles appe...

Page 6: ...MBLING HOOD TO BBQ FRAME TO MAKE CART ASSEMBLY EASIER 6 Place the hood section onto the barbecue in the closed position Align holes on Top and Bottom Hinges and insert Hinge Pivot Pins into position y...

Page 7: ...ed down onto the back bracket locat ing the cast peg into the appropriate hole Figure 7 Note Air Adjustment The bolt on the side of each burner should be screwed half way in and secured with the locki...

Page 8: ...ptible to winds that will decrease the performance of your rotisserie cooking For this reason you should not operate the back burner during windy weather conditions 1 Open the Grill Lid Failure to do...

Page 9: ...ps and the resulting smoke are what give meat cooked over an open flame the delicious outdoor flavor so expect and encourage some flare up However excessive flare ups can be caused by cooking extra fa...

Page 10: ...e meat or poultry causing it to lose it s natural juices 3 If you use a tomato or sugar base sauce for basting do not apply until the last five or ten minutes of cooking period Use over a longer perio...

Page 11: ...tense heat sears in the natural juices and nutrients found in quality cuts of meat The cooking times on a rotisserie will be approximately the same as for oven cooking Balancing the Food In rotisserie...

Page 12: ...rner gently on a hard surface to dislodge any rust etc inside To visually check that the burner is operating look at the burner flame between the tray and BBQ frame The flame should be approximately 1...

Page 13: ...nt of the regulator it has been preset and tested Allow the LP tank to lie on its side Keep in an upright position Turn a control knob on until a lighted match is inserted in the lighting hole Use pla...

Page 14: ...attachments is not recommended by the manufacturer and may cause injuries Do not use this Rotisserie for other than its intended use 9 When Rotisserie cooking place a Cooking Pan under the food to be...

Page 15: ...t Collar 4 with long end towards handle as shown in Figure 24 6 Slide Holding Forks 2 onto Spit Rod 1 Place food onto Spit and secure with Holding Forks Secure with Thumbscrews 3 Place Spit assembly o...

Page 16: ...lso cause pinholes if they come in contact with these connectors and MUST be washed off immediately with water NOTE When installing a barbecue equipped for liquid propane in an island the propane tank...

Page 17: ...lied CSA approved Natural Gas Regulator included Figure 29 Stainless Steel Flex line not included Teflon Pipe Thread Sealant is recommended for use on all threaded connections Gas Inlet Natural Gas Bu...

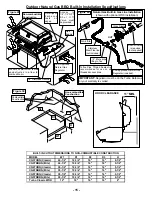
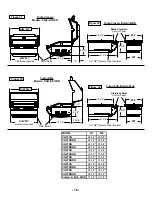
Page 18: ...ic Built in WOK 21 3 4 Figure 34 1 2 NPT Female Pipe Gas Inlet 8 3 8 W1 W2 19 1 2 Turbo Elite Built in Wok 21 3 4 Black Porcelain Control Panel Stainless Steel Control Panel 16 MODEL W1 W2 CG3TCN 24 1...

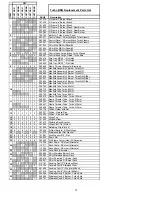
Page 19: ...1 269738 Manifold Tube Turbo 5NG 1 1 1 1 1 1 269613 Flame Thrower Tube Turbo 150mm 1 1 1 1 1 1 269621 Flame Thrower Tube Turbo 210mm 1 1 1 1 1 1 269639 Flame Thrower Tube Turbo 310mm 1 1 1 1 269647 Fl...

Page 20: ...elain Enamel 1 269787 26 Warming Rack Stainless Steel 1 269795 31 Warming Rack Stainless Steel 1 269803 39 Warming Rack Stainless Steel 46 2 2 2 269811 Handle Brackets for S Steel Hood 1 269829 Handle...

Page 21: ...o Classic Alternate Rock Grate 14 17 15 20 21 22 18 16 19 5 10 31 32 33 35 36 49 39 44 34 1 40 43 63 2 27 29 23 3 37 5 24 7 50 9 25 41 12 13 48 11 8 Valve Igniter Assembly Electrode Lead Black Control...

Page 22: ...15 20 21 22 18 16 19 1 40 41 43 63 26 7 50 37 6 9 10 2 28 23 47 46 42 30 38 51 52 45 53 61 6 12 13 48 11 8 Valve Igniter Assembly Electrode Lead Chrome Control Knob 20 4 59 54 56 60 55 62 59 58 57 Sa...

Page 23: ......

Page 24: ...Barbeques Galore z 949 597 2400 z 10 Orchard Road Suite 200 z Lake Forest CA 92630...

Reviews: