10
TP9KAC-TUX
Mar 2019
1.
Raise and lock each carriage on the first
safety latch engagement, approximately 30
”
high.
2.
Make sure that the safety locks on each
column are fully engaged before attempting
to route equalizer cables.
3.
Be sure each carriage is at the same height
by measuring from the top of the base to the
bottom of the carriage. This difference
should be within 1/4
”.
4.
Route the first cable.
(See Figs 11 & 12)
Screw the nut on the cable stud so that half
thread pass through the nut. Pull the other
end of the cable and screw the nut on it also.
Then tighten both nuts.
Fig. 11 Fig. 12 (Cable Route Diagram)
5.
Repeat above for the second cable on opposite side carriage.
6.
Adjust each equalizer cable to approximately 1/2
” side-to-side play. Ensure that each cable has equal
tension. Also, check the carriage height to ensure both carriages are sitting on the same latch.
STEP 8
:
(Installing / Routing HYDRAULIC HOSES & HYDRAULIC FITTINGS)
1.
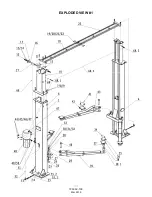
Install & connect the hydraulic hoses and fittings, as noted below and detailed in the Exploded View
#1 diagram on page 20.
Note: Ensure Not To Overtighten Hydraulic & Hose Fittings!!
a) Remove red cap plug from high pressure port on side of power unit
’s valve block.
b) Install & secure hydraulic straight fitting (w/ O-ring) into the power unit
’s high pressure port.
c) Install hydraulic T-fitting to the straight fitting. Tighten to secure.
d) Install short hydraulic hose (w/ curved end) to
‘run’ end of T-fitting. Secure other hose end to the
90 degree fitting at the base of column. Tighten to secure.
e) Install long hydraulic hose to top of T-fitting. Route long hose up & across the overhead beam
through guide rings, then down to 90° fitting at base of opposite column. Tighten to secure.
Summary of Contents for TP9KAC-TUX
Page 4: ...TP9KAC TUX Mar 2019...
Page 20: ...TP9KAC TUX Mar 2019 EXPLODED VIEW 1...


