background image

KNOW YOUR TVS JUPITER FI

KNOW

 YOUR

 TVS

 JUPITER FI

-16-

*  The fuel tank is not a measuring instrument and the 

capacity  of  the  fuel  tank  may  slightly  vary  from  the 
indicated capacity.

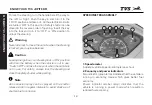
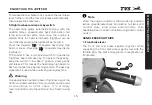
2. Throttle grip

Engine  speed  is  controlled  by  the  rotation  of  the 
throttle  grip.  Twist  it  towards  you  to  increase  the 
engine speed and twist it away from you or release it 
to decrease the engine speed.

3. Electric starter switch

Press  the  starter  switch  ‘          ’  to  start  the  engine 
electrically along with the application of either front or 
rear brake.

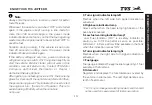
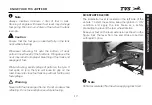
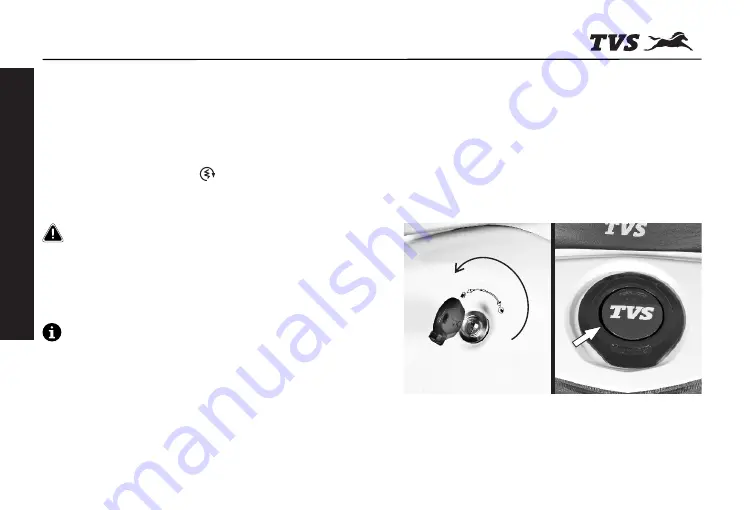
FUEL TANK* CAP

Fuel  tank  is  located  at  the  rear  end  of  the  vehicle 
below the pillion holder.
To open the fuel tank cap, insert the control key into 
the  ‘seat  /  fuel  tank  cap  lock’  and  turn  it  in  anti-
clockwise  direction.  The  fuel  tank  cap  opens 
automatically. To close the cap, gently press the cap in 
its  position  and  ensure  locking  by  hearing

  ‘click’


sound.

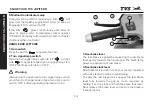
For  cold  starts,  avoid  using  electric  starter.  Use 
kickstarter. A typical example is early morning start. 
This would reduce load on the battery and prevents 
quick drain.

Caution

Do  Not  accelerate/Throttle  when  applying  Electric 
Start.

Note

Summary of Contents for Jupiter Fi

Page 1: ...OWNER S MANUAL E X P O R T ...

Page 2: ...ful especially while overtaking Refer page no 15 for details EXTERNAL FUEL FILL No other Scooter offers you this unique facility You can get petrol filled without even getting out of your seat RETRACTABLE BAG HOOKS Your scooter has two retractable Bag Hooks to carry light luggage like carry bags weighing upto 3 kg One hook is located below the handle bar on the rear panel and the other one is loca...

Page 3: ...DICATOR Low Fuel Indicator is yet another unique feature of your scooter which indicates you to refill the fuel when the fuel in the tank goes below minimum safe level Refer page 13 for details PATENTED E Z CENTRE STAND E Z Centre Stand of your scooter reduces the effort required to place the scooter on stand Refer page no 18 for operating procedure ALL BLACK LARGER ALLOY WHEELS All Black Larger B...

Page 4: ...ter Security shutter protects the use of key other than the original supplied along with your vehicle Refer page no 11 for operating procedure UNDER SEAT STORAGE UTILITY BOX Your scooter has a 17 litre under seat storage space to carry your luggage belongings full face helmet etc refer page no 20 for details HELMET HOOKS Your scooter has two helmet hooks under the seat assembly at the front end of...

Page 5: ...an open the fuel tank cap without even getting down from the scooter refer page no 16 19 for operating procedure SMART PHONE CHARGER Smart phone charger is supplied as an optional accessory for your scooter Location for fixing the socket is provided inside the utility box INDICATOR BUZZER Your scooter has an electronic buzzer which alerts you that the turn signal indicators are ON ...

Page 6: ...ted in the two wheeler segment Its unique vehicle design and superior ergonomics makes it a scooter which gives you more in every aspect This manual explains the features and operations of your TVS Jupiter Fi Kindly read it carefully and follow the instructions to enjoy years of safe riding To ensure reliable performance we urge you to get your TVS Jupiter Fi serviced only at TVS Motor Company Aut...

Page 7: ...icle Ensure that anyone else riding your TVS Jupiter Fi does the same All information illustrations photographs and specifications contained in this owner s manual are based on the latest product information available at the time of this publication TVS Motor Company Limited may however incorporate modifications or improvements on its vehicles at any time without notice and therefore in such event...

Page 8: ...le to warn you about all hazards associated with operating or maintaining the vehicle you must use your own judgement You will find important safety information in following form in this manual These words carry the following connotations Disregarding this message might result in injury to the rider This message indicates special procedures or precautions to be followed to avoid damage to the vehi...

Page 9: ...CONTENTS CONTENTS VIII Running in information 01 Safe riding tips 02 Know your TVS Jupiter Fi 06 Riding your TVS Jupiter Fi 23 Maintenance 27 Service record sheet 45 Technical specifications 47 ...

Page 10: ...special care and restraint exercised during the running in period It is especially important that you avoid operating the engine in high speed RPM which could expose the engine parts to excessive stress Maximum recommended speed during the running in is Maximum 50 kmph speed upto 1000 km vary the engine speed for better mating of parts The first service at 500 750 km is most important During runni...

Page 11: ...fortable and unsafe when riding a two wheeler Choose good quality two wheeler riding apparel Know your limits Ride within the boundaries of your own skill at all times Knowing these limits and staying within them will help you avoid accidents SAFE RIDING TIPS SAFE RIDING TIPS 2 Two wheeler safety equipment starts with wearing a good quality helmet One of the most serious injuries that can happen i...

Page 12: ...r the vehicle due to skidding Causes for poor braking 1 If the brake shoes or drum are worn out or if there is water or oil on them sufficient friction does not develop and brakes do not work well Posture Proper vehicle riding starts with proper posture 1 Keep your elbows relaxed and flexible 2 Sit and adjust yourself on seat so that arms and shoulders are relaxed 3 Look widely instead of gazing a...

Page 13: ...oad of the vehicle capacity of battery and magneto EMISSION CONTROL All the TVS vehicles are tested in the factory for optimum fuel efficiency and CO levels If the vehicle needs any adjustments please consult nearest TVS Motor Company Authorised Distributor or Dealer Authorised Service Centers While adequate care is exercised at the factory to ensure that the emissions are within the limits it is ...

Page 14: ...it periodically checked and serviced by TVS Motor Company Authorised Distributor or Dealer Authorised Service Centers so that the emission and fuel consumption levels are maintained as per norms SAFE RIDING TIPS SAFE RIDING TIPS 5 ...

Page 15: ...r Control key number Please fill the above boxes now for future reference KNOW YOUR TVS JUPITER FI KNOW YOUR TVS JUPITER FI The frame serial number is stamped on the frame at the rear end below the seat assembly Open the seat assembly to read the frame number The engine serial number is stamped on the left side of the engine at the bottom near center stand mounting See bottom to read serial number...

Page 16: ... Parking brake rear brake lock 6 Rear view mirror L 7 High low beam cum pass by switch 8 Speedometer assembly 9 Rear view mirror R 10 Front brake lever 11 Throttle grip 12 Electric starter switch 13 Ignition cum steering lock KNOW YOUR TVS JUPITER FI KNOW YOUR TVS JUPITER FI 7 4 5 1 3 2 6 7 8 9 10 11 13 12 ...

Page 17: ...nut 2 Kickstarter lever 3 Effortless easy center stand 4 Pillion foot rest L 5 Reflex reflector 6 Speedometer cable 7 Front brake adjusting nuts 8 Seat cum fuel tank cap lock 9 Pillion handle KNOW YOUR TVS JUPITER FI KNOW YOUR TVS JUPITER FI 1 3 6 7 9 8 2 5 4 8 ...

Page 18: ...SIDE 1 Front wheel axle nut 2 Bag hook rear 3 Cover front 4 Pillion foot rest R 5 Gauge oil level 6 Muffler assembly 7 Rear fender 8 Seat assembly 9 Bag hook front KNOW YOUR TVS JUPITER FI KNOW YOUR TVS JUPITER FI 9 1 4 5 3 6 7 8 9 2 ...

Page 19: ... LH 5 Turn signal lamp front RH 6 License plate front 7 Throttle cable adjuster REAR 1 Fuel tank cap 2 Turn signal lamp rear RH 3 Tail brake lamp 4 Licence plate rear 5 Transmission oil level screw 6 Reflex reflector 7 Turn signal lamp rear LH KNOW YOUR TVS JUPITER FI KNOW YOUR TVS JUPITER FI 10 2 4 1 3 5 6 7 1 2 4 3 5 6 7 ...

Page 20: ... open the safety shutter align the key head to the safety shutter hole by matching the projections of key head to the slots of the shutter knob hole and turn it in clockwise direction There are three positions in the ignition cum steering lock They are 1 OFF position All the electrical circuits are turned OFF in this position Engine will not start Key can be taken out 2 ON position In this positio...

Page 21: ...rning Caution Note 3 4 5 6 7 1 9 2 8 To lock the steering turn the handle bar all the way to the left or right Push the key in and turn it to the LOCK position and take out All the electrical circuits are turned OFF in this position Safety shutter can be closed in the reverse order of opening Insert the key into the lock and turn it to OFF or ON position to unlock the steering SPEEDOMETER ASSEMBLY...

Page 22: ... 6 sec and if the vehicle is not started till then the power lamp glows This indicates the user to start the engine or turn the key to off position This is to avoid draining of battery when the vehicle is not in use LFI is not a mileage calculating medium and it should not be used for measurement of fuel consumption Note 3 Turn signal indicator lamp left Flashes when the left side turn signal indi...

Page 23: ... HANDLE BAR LEFT SIDE 1 Horn switch Press the switch to operate the horn 2 Turn signal lamp switch Slide the turn signal lamp switch to left or right side to operate respective turn signal lamps LH RH Press the switch to turn OFF 3 Rear brake lever The rear brake is applied by squeezing the rear brake lever gently towards the handle grip The brake lamp glows on application of rear brake 4 Rear bra...

Page 24: ...o operate the pass by keep the switch in low beam position press gently and release This makes the head lamp high beam to flash and signal the approaching vehicle The pass by signal can be used while overtaking during day time HANDLE BAR RIGHT SIDE 1 Front brake lever The front and rear brake applied together while squeezing the front brake lever gently towards the throttle grip The brake lamp glo...

Page 25: ...electrically along with the application of either front or rear brake FUEL TANK CAP Fuel tank is located at the rear end of the vehicle below the pillion holder To open the fuel tank cap insert the control key into the seat fuel tank cap lock and turn it in anti clockwise direction The fuel tank cap opens automatically To close the cap gently press the cap in its position and ensure locking by hea...

Page 26: ...tyre will loose its grip on the road Ensure to close fuel tank cap without fail to avoid fuel spillage Warning Caution KICKSTARTER LEVER The kickstarter lever is located on the left side of the vehicle To start the vehicle keep the ignition in ON condition and apply the rear brake as a safety precaution to prevent the rear wheel rotation Keep your foot on the lever extension as shown in the figure...

Page 27: ...andle bar left grip with left hand Place your foot firmly on the centre stand extension 2 and press TOOL KIT To assist you in performing certain aspects of periodic maintenance and emergency repairs a tool kit is supplied along with the vehicle and it is located below the seat base To access the tool kit insert the control key into seat lock and rotate it in clockwise direction Lift and open the s...

Page 28: ...ny Authorised Distributor or Dealer Authorised Service Centers Caution UTILITY BOX Utility box is located below the seat Lift the seat by unlocking the seat lock as explained earlier to access the utility box Operating the TVS Jupiter Fi overloaded will hamper riding stability and may lead to loss of control Hence it is advisable to carry the recommended amount of load only Warning ...

Page 29: ...oks provided with your scooter to carry light luggage like carry bags weighing upto 3 kg One hook is located below handle bar on the rear panel Utility box can be used to carry a load of 10 kg maximum Do not carry perishable items inside the utility box It is not fully sealed Do not allow spray water to get inside the utility box Take care not to spill petrol or oil into the utility box Do not kee...

Page 30: ...rly 2 Use only mobile phone company s authorized USB cable for mobile charging 3 Do make sure the flap is not damaged while opening inserting the USB cable Care should be taken not to attach the luggage which hangs out of your scooter Please note that the luggage attached to your scooter should not interfere your feet movement Caution A Just pull out the hook from the top A to hang your luggage Pu...

Page 31: ... Do not attempt to use charge any other device other than one mobile phone at a given time 3 Do not try to force the USB connector in check if it is inserted in the appropriate direction to prevent damage 4 Do not charge your mobile when engine is off 5 Do not use other device this port is for charging mobile phones only ...

Page 32: ...h No cracks or cuts Battery Proper working of electric starter horn fuel gauge pass by brake lamp and turn signal lamps page no 31 Lighting Proper working of head lamp high low beam high beam indicator position lamps speedo back illumination tail lamp and number plate lamp Steering Smooth movement No play or looseness Throttle Correct free play of cable Smooth operation Brakes Correct front and re...

Page 33: ... take out the control key Finally close the safety key shutter lock RIDING YOUR TVS JUPITER FI RIDING YOUR TVS JUPITER FI Do not raise the throttle rapidly so the vehicle will move forward suddenly and lead to loss of control 24 Warning Caution Do not keep the engine in idling rpm for long and do not open excessive throttle when engine is idling and the vehicle is parked it leads to overheating of...

Page 34: ... the filter Replace the filter incase of any abnormalities Engine oil and Transmission oil Dirty or less engine oil increases friction between various parts of the engine and reduces the engine life thereby increases the fuel consumption Running with low transmission oil will cause damage to the gears and bearings Regularly inspect the engine oil and the transmission oil for correct level and top ...

Page 35: ...rly weekly and inflate it to the recommended pressure refer page no 41 Never use tyres which are worn beyond the permissible limit Wheel freeness Inspect and ensure the wheel freeness by rotating the wheel at least once in a week to avoid wastage of fuel Avoid unnecessary idling While waiting for someone or stopping in signals for long time if the engine is kept running at idle speed it causes unn...

Page 36: ...careful servicing TVS Motor Company Limited strongly recommends that the jobs as per the maintenance schedule be performed by your TVS Motor Company Authorised Distributor or Dealer Authorised Service Centers Periodic inspections may reveal one or more parts that may need replacement Whenever replacing parts on TVS Jupiter Fi it is recommended that you use only the TVS Motor Company Genuine parts ...

Page 37: ...I DR Drain oil if necessary 1 CVT filter element I C I C Replace every 12000 km Tappet clearance I A I A I A Fuel hose Fi Replace every 20000 km Drive belt and CVT rollers Replace every 24000 km 2 Cover variator I C L I C L Clutch shoe Replace every 24000 km Front and rear suspension I I I I I Inspect for proper functioning 3 All control cables I A L I A L I A L I A L I A L Throttle grip L L Lubri...

Page 38: ...ace every 24000 km All fasteners I TI I TI I TI I TI I TI All bulbs horn and switches I I I I I Inspect for proper functioning Head lamp beam I A I A I A I A I A 4 Battery I I I I I Brake effectiveness play I A I A I A I A I A Brake cam C L C L Lubricate using grease Wheel freeness I I I I I Front wheel bearing Lubricate using grease every 12000 km Tyre pressure at cold condition I S I S I S I S I...

Page 39: ...st DR Drain L Lubricate TI Tighten S Set 1 2 Inspect for damage Clean the cover with air Lubricate kick starter with grease 3 4 Inspect for proper operation and adjust play Lubricate ends using grease Recharge if necessary Application Qty Manufacturer Brand Engine oil 750 ml during regular service TVS Motor Company TVS TRU4 PREMIUM oil 800 ml incase of disassembly Transmission oil 100 ml during re...

Page 40: ...ly at TVS Motor Company Authorised Distributor or Dealer Authorised Service Centers 3 Do not add additional electrical accessories 4 While connecting the terminals observe the correct polarity Connect the red wire to the positive terminal and black wire to the negative terminal of the battery 5 Apply petroleum jelly at terminals to prevent it from corrosion FUSE Non working of electrical systems m...

Page 41: ...elf in a pouch 5 Close the fuse case and re fix it into the battery holder Other two fuses is located at the front end of utility box below the seat and covered by the cover front The cover front must be removed to access the Fuses Follow the procedure for removal 1 Remove the bottom mounting screw A of cover front 2 Open the seat and remove the top mounting screws B from both the sides of cover f...

Page 42: ... TVS Motor Company Authorised Distributor or Dealer Authorised Service Centers Extra fuses Do not use vehicle by shorting the wires without fuse This may result in overheating of electrical items wiring and may result in fire Do not use fuse of higher amperage than specified for the safety of electrical system Good Fuse Blown Fuse Caution SPARK PLUG 1 Remove the cover front as explained earlier 2 ...

Page 43: ...g spanner ENGINE OIL LEVEL Check the engine oil level periodically 1 Place the vehicle on centre stand on a flat surface Wipe off the surroundings of gauge oil level 2 Remove the gauge and wipe it clean 3 Fix the gauge back to its mounting hole Do not thread in 4 Take out the gauge and check the oil level The level should be between minimum and maximum level marks of the gauge shown in the figure ...

Page 44: ...l periodically 1 Place the vehicle on centre stand on a flat surface 2 Wipe off the surroundings of oil level screw 3 Remove the transmission oil level screw along with a gasket from the rear end of crankcase L 4 Check for the flow of oil from oil level hole 5 If the level is less if there is no oil flow top up with TVS TRU4 PREMIUM oil till the oil just starts to flow out from the oil level hole ...

Page 45: ...should be between 15 20 mm 3 Turn the adjuster nut at the bottom side 1 in the slot marked as I in clockwise direction for reducing the free play or in anti clockwise direction for increasing the free play If the vehicle is driven with less engine and transmission oil the engine components will be severely damaged Check the oil level as per the schedule to avoid costly damage Do not fill excess oi...

Page 46: ...ect for the clearance between the bullet 3 and slot end 4 marked as S as shown in the figure 5 If any clearance is found turn the adjuster nut 2 at the top side in the slot marked as S in clockwise direction until there is no clearance between the bullet top 3 and the slot top 4 6 After adjusting the adjuster nut top If any clearance is observed in between the bullet bottom 5 and the slot bottom 6...

Page 47: ...ront brake panel Incase the wear limit index mark 1 is going beyond wear limit indicator 2 index the lever to next slot with the help of the Dealer to extend the shoe life Rear brake 1 Measure the free play of the rear brake lever at the lever end as shown in the figure 2 Free play of brake lever before the engagement of brake should be between 10 15 mm 2 1 Check front brake and rear brake play pe...

Page 48: ...it indication pointer 1 on the rear brake cam lever should be within the wear limit indicator 2 on the crankcase LH In case the wear limit indication pointer 1 is going beyond wear limit indicator 2 index the lever to next slot with the help of Dealers to extend shoe life Please remember that the rear brake lever free play adjustment to be done only after adjusting the front brake leverplayincase ...

Page 49: ...I Rear 2 00 kg cm 28 PSI 2 25 kg cm 32 PSI Tyre tread condition Operating the vehicle with excessively worn tyres will decrease riding stability and can lead to loss of control It is recommended to replace the tyre when the tyre wears off to the tyre wear indicator level indicated by TWI A on the tyre Tyre rotation direction While reassembling the tyres after removing from the wheel rim ensure tha...

Page 50: ... lift the vehicle up 4 Dislocate the wheel assembly along with brake the panel from front fork Separate the brake panel from the wheel and take out the wheel 5 Reverse the procedure for reassembling While reassembling ensure to locate the lug on fork leg L to the slot in the brake panel Warning The tyre inflation pressure in cold condition and the tyre tread condition are extremely important for t...

Page 51: ...ain engine oil and transmission oil Store the oil if new in a dust free container 3 Remove the spark plug and feed in several drops of engine oil through spark plug hole Crank the engine few times and reinstall the spark plug 4 Remove the battery store it away from direct sunlight and freezing temperatures A Warning Always make sure whenever the wheel is removed the axle nuts are tightened properl...

Page 52: ...oil and check the oil level at the oil level screw 5 Lubricate the parts as instructed in the periodic maintenance schedule 6 Fill up fresh petrol in the fuel tank 7 Check and inflate the tyres to the specified tyre pressure 8 Check and correct the points mentioned in page no 23 RECOMMENDED TIPS WHEN TAKING A LONG TRIP OF MORE THAN 500 KM A Please keep the following items for use in case of emerge...

Page 53: ...amp working 7 Front fork for any abnormality 8 Any leakage in fuel lines 9 Spark plug gap and condition of spark plug 10 Air filter element cleanliness 11 Lubrication of all items mentioned in the periodic maintenance schedule 12 Any other job as necessary 13 Have your vehicle checked at any TVS Motor Company Authorised Distributor or Dealer Authorised Service Centers Caution Long journey are to b...

Page 54: ...ice between a 2500 3000 km or b 4 months from the date of purchase whichever of the two occurs earlier 3 3rd service between a 5000 6000 km or b 8 months from the date of purchase whichever of the two occurs earlier 4 4th service between a 8500 9000 km or b 12 months from the date of purchase whichever of the two occurs earlier 5 5th service between a 11500 12000 km or b 16 months from the date of...

Page 55: ...onths from the date of purchase whichever of the two occurs earlier 7 7th service between a 17500 18000 km or b 24 months from the date of purchase whichever of the two occurs earlier 8 8th service between a 20500 21000 km or b 28 months from the date of purchase whichever of the two occurs earlier 9 9th service between a 23500 24000 km or b 32 months from the date of purchase whichever of the two...

Page 56: ...7500 rpm Maximum torque in Nm 8 5500 rpm Maximum speed 78 km h Engine idling rpm 1400 200 rpm Starting system Kick starter Electric starter TRANSMISSION Clutch Dry Centrifugal clutch Primary transmission CVT Continuous Variomatic Transmission Primary reduction 2 38 to 0 82 Final reduction 10 47 CHASSIS Dimensions and weight Overall length 1834 mm Overall width 640 mm Overall height 1115 mm Ground ...

Page 57: ... UR5KCW Spark plug gap 0 9 1 0 mm Battery 12V 4Ah Generator Fly wheel magneto 12V 130W Head lamp Halogen HS1 12V 35 35W Tail brake lamp 12V LED Turn signal lamps 12V 10W x 4 Position lamp 12V 3W x 2 Number plate lamp 12V 4W x 1 Speedometer lamp 12V 1 7W x 2 Turn signal indicator lamp 12V 1 7W x 2 Low fuel warning lamp 12V LED High beam indicator lamp 12V 1 7W x 1 Eco and power mode lamps 12V LED M...

Page 58: ... and 800 ml incase of disassembly Transmission oil capacity TVS TRU4 PREMIUM oil 100 ml during regular service and 120 ml incase of disassembly Front fork oil capacity Gabriel Premium front fork oil 84 1 ml per leg 49 TECHNICAL SPECIFICATIONS The fuel tank is not a measuring instrument and the capacity of fuel tank may slightly vary from the indicated capacity ...

Reviews: