background image

2

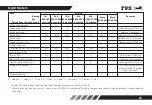
  Inspect for smooth steering rotation, steering shake / noise. Adjust the steering if necessary.

3

  Inspect for smooth and proper function of front and rear suspension. Also inspect for any visual damage and oil leakage.

4&5

 Inspect at every service. Replace if found damaged. However the retainer oil seal & the chain guide bottom need to be replaced every 9000 km.

6

   Recharge if necessary

**

  Clean the drive chain with dry cloth and apply TRU SPRAY / TRU 4 oil as frequently as every 500 km for better chain life and smooth vehicle 

running.


Contd...                               

MAINTENANCE

Item 


Service


Service 

1st 

2nd 

3rd 

4th 

5th 


Remarks

Every 

Every


km 

500-750  2500-3000 5000-6000 8500-9000 11500-12000 

3000 km  6000 km

  Period from the date of sale  1 month  3 months  6 months  9 months  12 months

Steering smooth operation/play  

I & A 

– 

– 

– 

C, L & A 

– 

– 

C & L with fresh Bechem

2


  premium grade 3 grease


every 12000 km

Front fork oil 


– 

– 

– 

– 

– 

– 

– 

Replace every 18000 km

Front and rear suspension  

– 

3

All fasteners 


I & TI 

I & TI 

I & TI 

I & TI 

I & TI 

I & TI 

– 

Tighten if necessary

Drive chain** 


C, L & A  C, L & A 

C, L & A 

C, L & A 

C, L & A 

C, L & A 

– 

Adjust if necessary

4

Retainer oil seal


– 

Replace every 9000 km

5

Chain guide bottom


– 

Replace every 9000 km

All bulbs, horn and switches 

– 

Inspect for proper functioning


Head lamp beam 


I & A 

I & A 

I & A 

I & A 

I & A 

I & A 

Battery electrolyte level  

I & T 

I & T 

I & T 

I & T 

I & T 

I & T 

6

Specific gravity and voltage  

40

Summary of Contents for RTR 200 Fi4V 2018

Page 1: ...families This manual explains the features and operations of your TVS RTR 200 Fi4V Please read it carefully and follow the instructions to enjoy the ultimate racing experience To have prolonged joy r...

Page 2: ...experience riding your new vehicle Ensure that anyone else riding your TVS RTR 200 Fi4V does the same All information illustrations photographs and specifications contained in this owner s manual are...

Page 3: ...is an important responsibility of the rider To help you make decisions on safety we have provided necessary operating procedure and other information in this manual This information alerts you on pot...

Page 4: ...Running in information 01 Safe riding tips 02 Know your TVS RTR 200 Fi4V 06 Riding your TVS RTR 200 Fi4V 32 Maintenance 38 Service record sheet 58 Technical specifications 61 CONTENTS IV...

Page 5: ...unning in is Maximum50 km hspeedupto750 km vary the engine speed for better mating of parts The first service at 500 750 km is most important During running in period all the engine components and oth...

Page 6: ...some precautions to be taken to ensure the safety of the rider pillion rider and other road users These precautions are Familiarise yourself withnewTVSRTR 200 Fi4V Riding skill and your mechanical kn...

Page 7: ...rea to thoroughly familiarise with the operation of the vehicle Posture Proper vehicle riding starts with proper posture 1 Keep your elbows relaxed and flexible 2 Sit and adjust yourself on seat so th...

Page 8: ...Close release the throttle 2 Hold the vehicle upright as you apply the brakes 3 Progressive application of brakes is safer 4 Never depress the clutch lever while braking at higher speeds 5 Applybothth...

Page 9: ...ycle The addition of unsuitable accessories can lead to unsafe operating conditions Your friendly Distributor Dealer will assist you in selecting quality accessories and installing them correctly Whil...

Page 10: ...rdering parts or referring to special information Please fill the above boxes now for future reference Frame number Engine number Control key number Frame serial number is engraved on the right side o...

Page 11: ...L 6 High low beam switch 7 Digital speedometer 8 Ignition cum steering lock 9 Master cylinder front 10 Rear view mirror R 11 Engine cut off switch 12 Front brake lever 13 Throttle grip 14 Head lamp ON...

Page 12: ...wheel axle 2 Cover fuel filter EFI 3 Gear shift lever 4 Centre stand 5 Side stand 6 Rider foot rest L 7 Pillion foot rest L 8 Rear wheel axle 9 Saree guard 10 Wheel hugger 11 Cover frame L 08 1 2 3 5...

Page 13: ...y front 4 Spark plug 5 Gauge oil level 6 Rear brake pedal 7 Rider foot rest R 8 Pillion foot rest R 9 Muffler assembly 10 Disc plate rear 11 Rear wheel axle nut 12 Caliper assembly rear 13 Cover frame...

Page 14: ...p front L 2 Head lamp assembly 3 Oil cooler 4 Crash guard 5 Turn signal lamp front R 6 Position lamps REAR 1 Turn signal lamp rear R 2 Reflex reflector 3 Turn signal lamp rear L 4 Tail lamp assembly 5...

Page 15: ...he self diagnostic cycle once upon activation The engine can be started The key cannot be taken out from the lock 3 LOCK position Your TVS RTR 200 Fi4V steering can be locked in both left and right di...

Page 16: ...the time in 12 hour time format 2 Turn signal indicator left Flashes when the left side turn signal indication is activated 12 Caution Warning 7 8 1 2 3 4 5 6 Speedometer background illumination and p...

Page 17: ...fuel in the tank reaches above 10 5 liters approximately full tank When the fuel reaches half tank 6 5 liters approx the fuel gauge displays only four bars as shown The fuel gauge shows only single b...

Page 18: ...High speedindicator Shortesttime indicator The procedure for setting each mode is given in page 19 14 9a Odometer Odometer registers the total distance covered by the vehicle in kilometer or mile as p...

Page 19: ...linking once it starts counting Lap timer will stop counting and starts blinking once the vehicle speed reduces to below 3 km h Blinking will stop once the vehicle comes to neutral New lap can be star...

Page 20: ...corded so far to reach 60 km h or 40 mph speed will be displayed when the ignition is turned ON and the meter is set in SHORTEST TIME mode Once the speed reached 60 km h or 40 mph then the time will s...

Page 21: ...aches the set RPM red indicator in the digital speedometer glows and indicates the user to shift to next higher gear 17 11 Tachometer Tachometer indicates the engine speed in multiples of 1000 RPM Rev...

Page 22: ...distance covered when the fuel level rises above minimum safe level TRIP F meter cannot be activated or deactivated manually The speedometer will be in TripF mode for a distance of 1km even after fill...

Page 23: ...thorised Distributor or Dealer Authorised Service Center Service reminder indicator lamp works only based on the distance km miles covered by the vehicle This is only a reminder indicator Customers ar...

Page 24: ...d press the Mode button once again so that the Clock icon blinks If ignition is turned OFF when the meter is in ODO or TRIP meters then the respective meters will be displayed in the next ignition ON...

Page 25: ...Press and hold the Mode button till MPH icon blinks in display l Release and press the Mode button twice so that the RPM icon blinks l Press the Set button to reach shift RPM setting mode the SHIFT R...

Page 26: ...22 4 5 3 1 2 The oil cooler is mounted in front of the engine which improves the engine durability and provides better heat management without any compromising the engine performance RAM AIR DUCT TVS...

Page 27: ...ing other vehicles during day If the pass by switch is pressed during day time when the head lamp is in OFF condition the head lamp HIGH beam alone will glow with 100 of intensity During night time wh...

Page 28: ...ine return the switch to the position 5 Front brake lever It controls a hydraulic circuit that operates the front braking system The front brake is applied by pressing the front brake lever gently tow...

Page 29: ...void entry of water into fuel tank a metallic pipe is welded inside fuel tank to safely drain out rain water entering into plastic inlet zone through annular spaces in tank cap Do not smoke while refu...

Page 30: ...or or Dealer Authorised Service Center for setting the gear shift lever position Note To change it to the second gear lift the lever up Lifting the lever up repeatedly engages all the gears in success...

Page 31: ...s affected adversely with wet surfaces loose surfaces and overheating of brake system due to unnecessary continuous application of brakes For safety exercise extreme caution while braking and also at...

Page 32: ...tility box is located under the passenger seat to store some important items and it provides security to things placed inside Park the motorcycle safely on a solid ground On slopes engage the first ge...

Page 33: ...isable to take your vehicle to TVS Motor Company Authorised Distributor or Dealer Authorised Service Center Caution To remove the front seat 3 remove the rear seat passenger seat and take out the key...

Page 34: ...n COVER FRAME R Removal Cover frame R is provided to access the battery and rear disc brake master cylinder This cover can be opened in the following manner 1 Remove the seats as explained in Page no...

Page 35: ...ly closed when not in use 2 Do not attempt to use charge any other device other than one mobile phone at a given time 3 Do not try to force the USB connector in check if it is inserted in the appropri...

Page 36: ...oper working of all lamps horn and pass by switch Low battery indication Electrolyte level page no 43 Speedometer Performing self check Steering Smooth movement No play or looseness Throttle Correct f...

Page 37: ...n the throttle smoothly Select the required gears in a similar manner STARTINGTHE ENGINE As you turn the ignition switch to the ON position the instrument cluster and the warning lights will go throug...

Page 38: ...n a hill the engine may be used as brake by shifting to a lower gear Reduce speed to a safe limit before turning cornering Do not apply brake while turning cornering Do not disengage clutch before bra...

Page 39: ...plug if necessary Visually inspect the spark plug gap If the gap is found more replace the plug with a new one However the spark plug need to be replaced every 12000 kms 1 year Always use recommended...

Page 40: ...tion and condensation of moisture inside which will result in rusting of the tank Ensure to close fuel tank cap after every filling If the fuel tank cap is kept open for a long time it leads to loss o...

Page 41: ...ll waste fuel and damage the engine It also creates a potentially dangerous traffic situation Fastaccelerationwastes fuel Fuel is wasted whenever the rider suddenly accelerate or apply brake Avoidunne...

Page 42: ...careful servicing TVS Motor Company Limited strongly recommends that the jobs as per the maintenance schedule be performed by your TVS Motor Company Authorised Distributor or Dealer Authorised Service...

Page 43: ...Oil filter strainer C C C C Oil filter paper filter R R R R Spark plug I C R Replace every 12000 km Air cleaner element R Replace every 12000 km Tappet clearance I A I A I A I A Fuel filter Replace ev...

Page 44: ...rks Every Every km 500 750 2500 3000 5000 6000 8500 9000 11500 12000 3000 km 6000 km Period from the date of sale 1 month 3 months 6 months 9 months 12 months Steering smooth operation play I A C L A...

Page 45: ...Wheel freeness I I I I I I Tyre pressure at cold condition I S I S I S I S I S I S Engine idling RPM I I I I I I 7 Idling CO I S I S every 12000 km Ball joint gear shift lever L L L Lubricate using gr...

Page 46: ...TVS TRU4 FULLY SYNTHETIC oil 1400 ml during engine overhaul SAE 10W30 API SL JASO MA2 Front fork oil 325 2 cc KYB G10 oil Disk brake fluid DOT 3 DOT 4 Grease Bechem Bechem premium grade 3 Chain lubri...

Page 47: ...lncase of any abnormality or for removal of battery from the vehicle contact TVS Motor Company Authorised Distributor or Dealer Authorised Service Center Once the battery is initially charged never a...

Page 48: ...e fuse fails again consult the nearest TVS Motor Company Authorised Distributor or Dealer Authorised Service Center FUSE REPLACEMENT Non working of electrical systems may be due to safety fuse failure...

Page 49: ...and inspecting the gap reinstall the spark plug and tighten by hand to avoid cross threading Finally tighten using the spanner Do not over tight or cross thread the spark plug Always use only recommen...

Page 50: ...e to the engine components Excessive oil filling will cause oil leak and other malfunctions Always use TVS TRU4 FULLY SYNTHETIC oil only SAE 10W 30 API SL JASO Ma2 Make sure that no foreign object get...

Page 51: ...r should be 8 15 mm as measured at the clutch lever end at handle bar Adjust the clutch lever free play periodically by means of clutch cable adjuster at arm clutch release If the free play is not wit...

Page 52: ...ghly compressed gas Do not try to open or disassemble it in any way After adjusting free play properly if there is a clutch slip or there is difficulty in shifting gear visit your TVS Motor Company Au...

Page 53: ...always should be above the LOWER mark B provided on the master cylinder when the master cylinder is parallel to the ground 3 If the brake fluid level is below the mark or while applying brake if you...

Page 54: ...r bleeding and other brake related inspections Rearbrake You can observe a master cylinder 1 mounted on the right side rider foot rest a reservoir 2 below the cover frame R a caliper assembly 3 fitted...

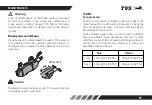
Page 55: ...ts at all times Solo Pillion Front 1 75 kg cm 25 PSI 1 75 kg cm 25 PSI Rear 2 00 kg cm 28 PSI 2 25 kg cm 32 PSI Brake padwearindicator Visually check the brake pads for wear If the wear is found beyon...

Page 56: ...Eventhough if there is a need of tyre removal it is strongly recommended to use a tyre removal fitment machine If at all tyre levers need to be used the levers should be free from sharp edges and care...

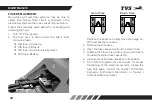
Page 57: ...Place the vehicle on centre stand with the transmission in neutral 2 Inspect the drive chain slackness vertical movement using the finger as shown in the figure 3 The slackness of the drive chain shou...

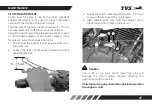
Page 58: ...REAR WHEEL REMOVAL AND REASSEMBLY Ensure proper seating of disc in the caliper assembly while reassembling the wheel Warning Warning 1 Remove the wheel hugger rear 2 Remove the axle nut 1 and along w...

Page 59: ...steps 1 Clean the vehicle thoroughly Park the vehicle on centre stand 2 Warm up the engine and drain engine cum transmission oil Store the oil if new in a dust free container 3 Remove the spark plug...

Page 60: ...emount the battery after bench charging if required 3 Fill the engine cum transmission oil TVS TRU4 FULLY SYNTHETIC SAE 10W30 API SL JASO MA2 and check the oil level using the gauge 4 Lubricate the pa...

Page 61: ...rgency 1 Complete tool kit first aid kit 2 Recommended spark plug one number 3 Head lamp and turn signal lamp bulbs one number each 4 Throttle and clutch cables one number each B Precautions to be tak...

Page 62: ...earlier 2 2nd service between a 2500 3000 km or b 3 months from the date of purchase whichever of the two occurs earlier 3 3rd service between a 5000 6000 km or b 6 months from the date of purchase w...

Page 63: ...arlier 6 6th service between a 14500 15000 km or b 15 months from the date of purchase whichever of the two occurs earlier 7 7th service between a 17500 18000 km or b 18 months from the date of purcha...

Page 64: ...ween a 23500 24000 km or b 24 months from the date of purchase whichever of the two occurs earlier 10 10th service between a 26500 27000 km or b 27 months from the date of purchase whichever of the tw...

Page 65: ...c paper filter Lubrication system Forced wet sump Maximum power in kW 15 46 21 PS 8500 rpm Maximum torque in Nm 18 1 Nm 7000 rpm Maximum speed 129 km h Engine idling rpm 1400 200 rpm Starting system E...

Page 66: ...as charged Mono shock absorber 7 step adjustable with rectangular swing arm Trail length 95 5 mm TYRE Tyre size Front 90 90 x 17 Tubeless Rear 130 70 x 17 Tubeless Tyre pressure Front 1 75 kg cm 25 PS...

Page 67: ...API SL JASO Ma2 Engine cum transmission 1200 ml during servicing oil and capacity 1400ml during engine overhaul Front fork oil grade KYB G10 oil Front fork oil capacity 325 2 cc Brake fluid TVS Girli...

Reviews: