CONTINUATION FROM PREVIOUS PAGE
INSTALLATION OF SALAMANGRILL
®
TO THE BASE CART
4)
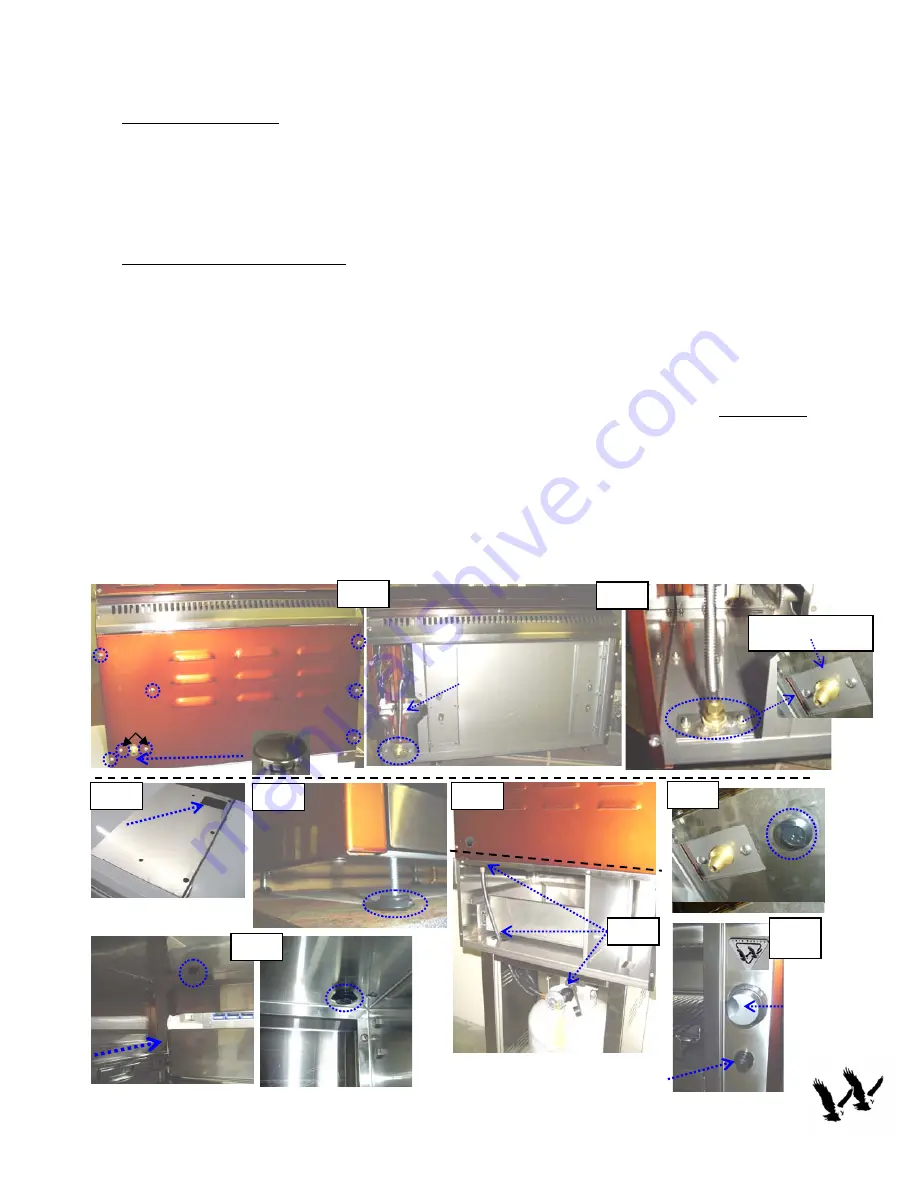
GAS INLET CHANGE:
Before installing the Salamangrill, the gas inlet must be relocated from the back to the bottom.
a.
Remove the back cover of the Salamangrill
(6-philips heads screws plus 2 for gas inlet).
b.
Remove the 1” hole plug from the bottom hole and save it you will need it for rear hole.
c.
Bend the flex tubing from the rear direction to the bottom to match the bottom hole opening and
screw in from the bottom using the philips screw that were taken off the back.
d.
Place the rear cover back on the unit and place all 6 screws back on. Snap in the 1” hole plug.
5)
SALAMANGRILL MOUNTING:
a.
Completely remove the protective plastic film from the base cart top.
b.
Take off the 4 legs at the bottom of the Salamangrill by hand turning counter-clockwise. Careful
not to damage the gas inlet fitting.
c.
Place the Salamangrill on the base cart and align it to the hole-pattern on the base cart top.
d.
Secure the Salamangrill onto the cart using the legs as screws. Screw on the 4 legs from the bottom
up…push the drawer forward to create more arm room.
e.
Run the LP hose and regulator supplied through the hole of the base and connect to the
Salamangrill. Connect regulator to LP tank and with the LP tank valve open conduct LEAK TEST
using soapy water solution. If gas leak is found, re-tighten connection. Once no leak is found
replace cart rear cover
(4 screws)
.
f.
To turn on Salamangrill:
i.
Open LP tank valve.
ii.
Push and turn knob to HI. Push and hold igniter button for about 4 seconds or until burner is
lit…you will hear continuous clicking.
iii.
If burner does not ignite within 4 seconds turn off valve, wait for 5 minutes and repeat
procedures.
3
4a)
To be re-used.
4c)
Change bended
direction down.
HI
Spark Igniter
5d)
5a)
5b)
4d) 1” hole
plug
Open the
drawer
5c)
Bottom View
5d)
5f)
Gas Inlet
towards
right-rear
5e)


