

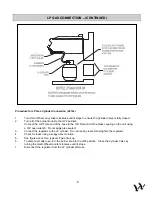
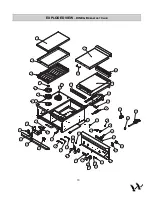

OPERATING INSTRUCTIONS
Lighting Instructions (Top Burners)
1.
Remove the covers from the Top Burners.
2.
Ensure the Gas Supply Cylinder Valve is closed and the burner knobs are set to the off position.
3.
Open the valve on the gas supply cylinder.
4.
Press in and rotate one of the burner knobs counterclockwise to the “HI” position. You should here a
continuous clicking sound indicating that a spark is being provided to the burner. (If clicking sound is
weak, replace battery.)
5.
If ignition does not take place within 4 seconds, turn the burner knob to the off position, leave the
cover off, and wait 5 minutes to repeat lighting procedure.
6.
Repeat steps 4-6 to light the second side burner.
7.
CAUTION: Do not leave the Dine & Breakfast Club unattended while cooking.
Lighting Instructions (Griddle Plate)
1.
Remove the cover from the Griddle Plate.
2.
Ensure the Gas Supply Cylinder Valve is closed and the burner knob is set to the off position.
3.
Ensure that the grease tray is completely installed.
4.
Open the valve on the gas supply cylinder.
5.
Flip the rocker switch to the simulated light position.
6.
Press in and rotate the thermostat knob counterclockwise to the desired temperature setting, a
burner on light should glow when the griddle thermostat is turned on until it reaches the temperature
the thermostat knob was set too.
7.
CAUTION: Do not leave the Dine & Breakfast Club
unattended while cooking.
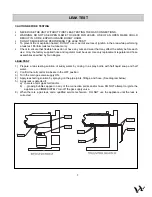
Manual Lighting Instructions
If the electronic ignition does not light the top burner, the burner can be lit manually using a long match (or
taper).
1.
Remove the cover from the top burner.
2.
Ensure the Gas Supply Cylinder Valve is closed and the burner knob is set to the off position.
3.
Place a lit match (or taper) over the burner near the igniter.
4.
Press in and rotate the burner knob counterclockwise slowly to the “HI” setting. Make sure match (or
taper) is lit before turning the knob.
5.
If ignition does not take place within 4 seconds, turn the burner knob to the off position, leave the
cover off, and wait 5 minutes to repeat lighting procedure.
6.
CAUTION: Do not leave the Dine & Breakfast Club unattended while cooking.
CAUTION: THE GRIDDLE PLATE CAN NOT BE LIT MANUALLY
Extinguishing the Burner Flame
1. Depress and rotate burner knob to OFF.
2. Natural Gas: Turn the gas off at the installer supplied gas shut-off valve.
3.
Liquid Propane: Close the valve on the gas supply cylinder.
8


