13
TROUBLE SHOOTING GUIDE
NEVER attempt to service the heater without disconnecting or shutting OFF its power and gas
supply from the source.
Important Notes:
a)
After the initial usage it is normal to see white smoke come out the back. This eventually will go away
and it doesn’t affect the performance of the heater.
b)
It is also normal to see warpage on the housing since the housing expands while heated but after it cools
back down it will come back to its original shape.
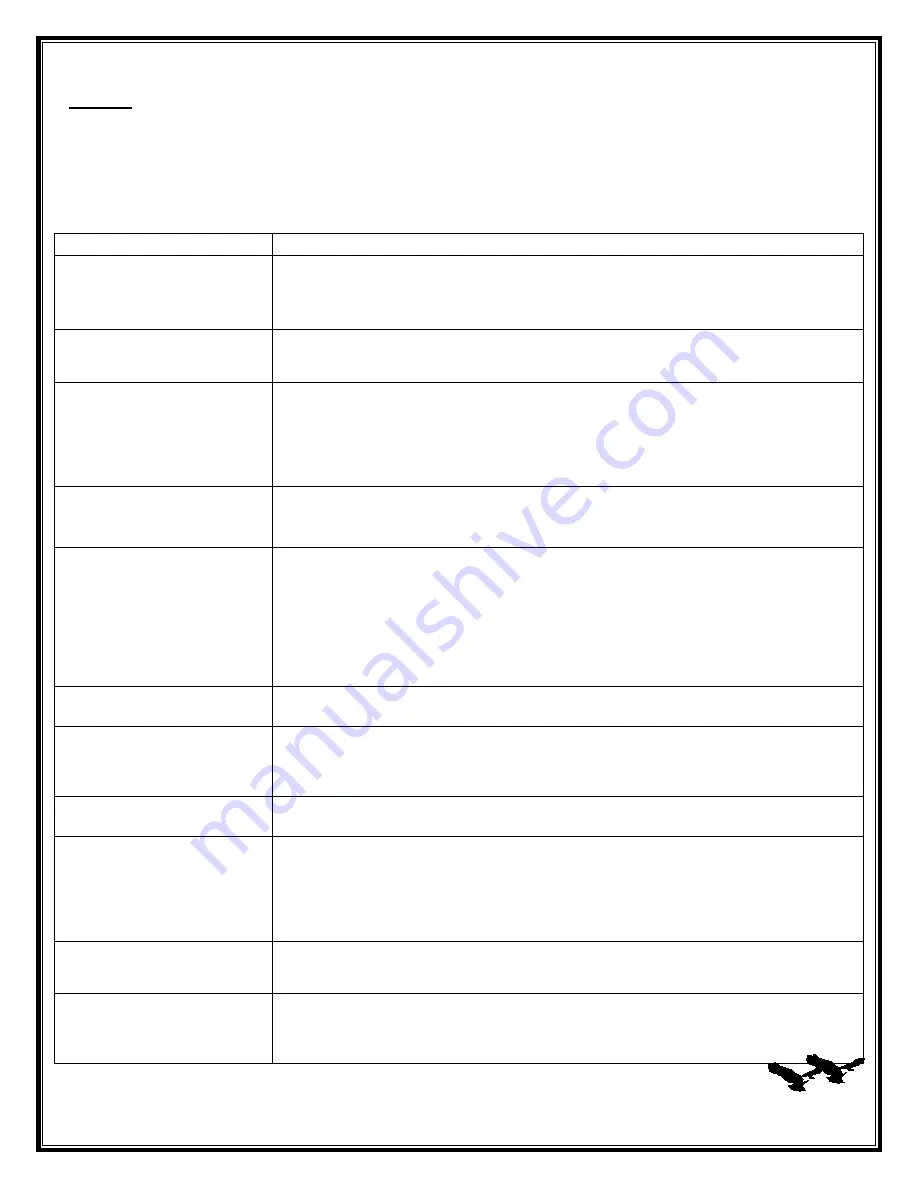
PROBLEM
WHAT TO DO
Igniter sparks but pilot burner
will not ignite and igniter goes to
lock-out.
1.
No gas supply to the pilot. Check if gas supply valve is turned on.
2.
Air trapped in gas line (VERY COMMON DURING INITIAL START-UP). Turn on
remote control 3 times to purge air. If unsuccessful, disconnect gas hose from heater
inlet and purge air until you smell gas. Then reconnect gas hose to heater inlet.
Igniter gives very weak or slow
sparks.
1.
Low battery in battery pack. Open heater control panel and replace 4 AA batteries.
2.
Ground wire is not connected. With the control panel open, check if green wire is
grounded.
Remote control (transmitter) will
not communicate with heater
module (receiver)
1.
Low battery in transmitter. Replace 2 lithium batteries (3V)
2.
Low battery in battery pack or battery pack is unplug. Open control panel and check if
battery pack is plugged in or replace 4 AA batteries.
3.
Module switch is set to OFF. Make sure module switch is set to REMOTE.
4.
Remote is not synchronized with module. Refer to manual on how to synchronize
remote.
Remote control communicates
with heater but heater will beep
and no sparks to pilot.
1.
Pilot sensor is damped or wet. Installation must be located in dry condition.
2.
Defective pilot sensor. Replace pilot burner assembly
3.
Low battery pack. Replace 4 AA batteries.
Pilot turns on and off. Burner
turns on and off
1.
Windy condition. Pilot sensor senses flame inconsistently. Do not operate equipment
until wind dies down or heater is relocated to less windy condition.
2.
Pilot flame is too small for flame sensing. Increase pilot flame such that flame
surrounds the pilot sensor rod.
3.
Heater is installed reversed such that the pilot sensor is below the pilot flame instead of
above or even to the pilot flame. Correct installation such that the gas inlet is on the
left side of the heater for proper operation. When the gas inlet is on the left side the
pilot sensor rod is above the pilot burner.
Pilot burner stays on after heater
is turned off.
1.
Defective gas valve. Contact local dealer to replace gas valve.
Heater valve will not switch from
Hi to Low and vice versa
1.
Low battery pack. Replace 4 AA batteries.
2.
Ground wire not connected. Connect ground wire to chassis and remove and re install
4 AA batteries to clear memory.
3.
Defective gas valve. Contact local dealer to replace gas valve.
Batteries in the battery pack
drain fast.
1.
The battery pack is switch to DC MOTOR instead of LATCHING SOLENOID. Make
sure that the battery pack switch is set to LATCHING SOLENOID.
Front grille deteriorates
1.
Tip angle exceeding 30 degrees such that products of combustions vent out to the front
grille instead of out the top of the heater. Correct installation and make sure only
radiant heat passes through the front grille.
2.
Windy condition. Excessive wind disrupts flow of combustion products such that
combustion products flow though the front grille instead of out the top of the heater.
Locate heater in less windy conditions.
Burner makes loud rumbling
noise during operation. Burner
does not glow and flares out
1.
Damaged burner. Contact local dealer to replace burner.
Heater operates but makes
continuous beeps.
1.
Module exceeds designed operating temperature. Improper installation such that
products of combustion flows through the front grille instead of out the top of heater.
This could be due to exceeding the 30 degree tip angle or windy conditions. Correct
installation such that only radiant heat passes through the front grille.
Summary of Contents for TEGH48-B
Page 18: ...14 EXPLODED VIEW ...


