background image

1

ATTENTION

IF YOU HAVE ANY PROBLEMS OR QUESTIONS, EMAIL 

OR CALL CUSTOMER SERVICE BEFORE YOU RETURN 

THIS PRODUCT TO THE STORE WHERE IT WAS PURCHASED.

For Customer Service: 

www.

twinstarhome.com

in English Call: 866-661-1218

in Spanish Call: 866-661-1218

in French Call: 866-374-9203

ATENCIÓN

SI TIENE ALGÚN PROBLEMA O PREGUNTAS,

ENVÍE UN MENSAJE DE CORREO ELECTRÓNICO O LLAME AL SERVICIO 

DE ATENCIÓN AL CLIENTE ANTES DE DEVOLVER

ESTE PRODUCTO A LA TIENDA EN LA QUE LO COMPRÓ.


Servicio de atención al cliente: 

www.

twinstarhome.com

Línea para llamadas en inglés: 866-661-1218

Línea para llamadas en español: 866-661-1218

Línea para llamadas en francés: 866-374-9203

STOP

STOP

PARE

PARE

ATTENTION

SI VOUS AVEZ DES PROBLÈMES OU QUESTIONS, 

ENVOYEZ UN COURRIEL AU SERVICE À LA CLIENTÈLE OU APPELEZ LE 

SERVICE À LA CLIENTÈLE AVANT DE RETOURNER 

CE PRODUIT OÙ VOUS L’AVEZ ACHETÉ.


Pour le service à la clientèle : 

www.

twinstarhome.com

pour le service en anglais, composez le  866-661-1218

pour le service en espagnol, composez le  866-661-1218

pour le service en français, composez le  866-374-9203

ARRÊT

ARRÊT

INSTRUCTION MANUAL ENCLOSED

MANUEL D’INSTRUCTION À L’INTÉRIEUR

MANUAL DE INSTRUCCIONES ADJUNTO

INSTRUCTION MANUAL ENCLOSED

MANUEL D’INSTRUCTION À L’INTÉRIEUR

MANUAL DE INSTRUCCIONES ADJUNTO

Summary of Contents for 23MM9501

Page 1: ...ra llamadas en ingl s 866 661 1218 L nea para llamadas en espa ol 866 661 1218 L nea para llamadas en franc s 866 374 9203 STOP STOP PARE PARE ATTENTION SI VOUS AVEZ DES PROBL MES OU QUESTIONS ENVOYEZ...

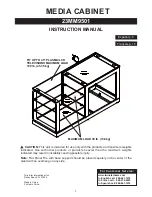
Page 2: ...Use with other products or products heavier than the maximum weights indicated may result in instability causing possible injury Note Flat Panel TVs with base support should be placed squarely in the...

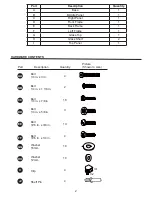
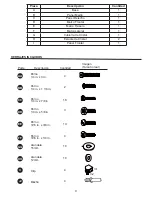
Page 3: ...1 H Glass Shelf 2 I Top Panel 1 HARDWARE CONTENTS Part Description Bolt 1 4 in x 3 in Bolt 1 4 in x 1 1 8 in Bolt 1 4 in x 7 8 in Bolt 3 16 in x 3 8 in Bolt 1 4 in x 5 8 in Bolt 3 16 in x 1 4 in Washe...

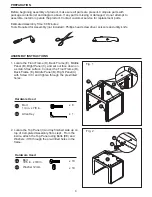
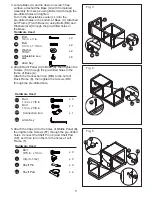
Page 4: ...sembly carefully use scissors or utility knife to cut and unwrap all parts Make sure you do not discard the hardware CAUTION Use care in assembling your new fireplace Take your time and use the hardwa...

Page 5: ...and lay finished side up on top of Completed Assembly from step1 From the inside attach the Top Panel using Bolts EE and Washers HH through the pre drilled holes in the frame Bolt 1 4 in x 7 8 in Alle...

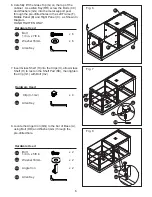
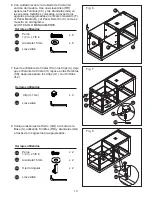
Page 6: ...illed holes in the bottom of Base A Attached Left Frame F with Base A using Bolts BB and Washers GG through the pre drilled holes in the Base 4 Attach Right Panel C to Base A then tighten the Screws C...

Page 7: ...Allen Key RR screw the Bolts CC and Washers GG into the metal support post through the pre drilled holes in the Left Frame F Middle Panel B and Right Panel C as Shown In Diagram HAND TIGHTEN ONLY 7 I...

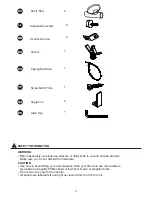
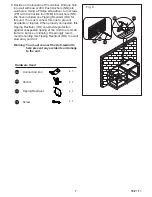
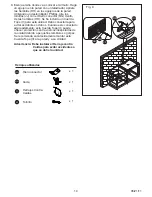
Page 8: ...ion iron MM into Anchors NN We have included one Tipping Restraint OO for this unit You must connect this one to prevent accidents or injuries When properly connected this Tipping Restraint OO can pro...

Page 9: ...ayor a los pesos m ximos indicados puede producir inestabilidad lo que posiblemente causar a lesiones Note Los televisores de pantalla plana con soporte de base deben colocarse perfectamente en el cen...

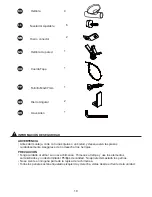
Page 10: ...6mm Arandela 12mm Clip II 1 II 2 4 2 18 10 3 4 10 10 4 BB CC EE DD FF GG HH II AA Macho 4 JJ HERRAJES INCLUIDOS Parte Descripci n Cantidad Imagen Tama o real Pieza Descripci n Cantidad A Base 1 B Pane...

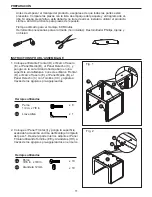
Page 11: ...as tijeras o un bistur y desenvuelva las piezas cuidadosamente Aseg rese de no desechar los herrajes PRECAUCI N Tenga cuidado al armar su nueva chimenea T mese su tiempo y use los elementos suministra...

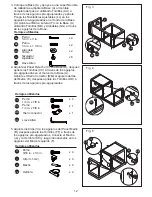
Page 12: ...a arriba encima del Montaje Completo del paso 1 Desde la parte Interior adjunte el Panel Frontal utilizando Tornillos EE y Arandelas HH a trav s de los agujeros pre agujereados en el marco Perno 1 4 i...

Page 13: ...en el fondo de la Base A Adjunte el Marco Lateral F con la Base A utilizando Tornillos BB y Arandelas GG a trav s de los agujeros de la Base 4 Adjunte el Panel Derecho C a la Base A despu s apriete lo...

Page 14: ...las Arandelas GG en los soportes met licos colocados a trav s de los agujeros pre agujereados en el Marco Izquierdo F el Panel Medio B y el Panel Derecho C como se muestra en el diagrama AJUSTE S LO M...

Page 15: ...los tornillos JJ con el Hierro conector GG dentro de las hembras HH Se ha incluido un Cuerda Tope II para esta unidad Debe conectarla para evitar accidentes o da os Cuando este conectado adecuadament...

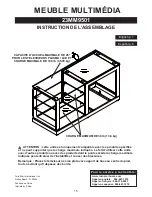
Page 16: ...Star International Inc Delray Beach FL 33445 Fabriqu en Chine Imprim en Chine CHARGE MAXIMUM DE 30 lb 13 6 kg ATTENTION cette unit est uniquement compatible avec les produits sp cifi s et ne peut supp...

Page 17: ...e 2 I Panneau Sup rieur 1 Boulon 1 4 in x 3 in Boulon 1 4 in x 1 1 8 in Boulon 1 4 in x 7 8 in Boulon 3 16 in x 3 8 in Boulon 1 4 in x 5 8 in Boulon 3 16 in x 1 4 in Washer 16mm Rondelle 12mm Clip II...

Page 18: ...outeau universel coupez et d ballez soigneusement toutes les pi ces Assurez vous de ne pas jeter de mat riel MISE EN GARDE Faites preuve de prudence dans l assemblage de votre nouvelle chemin e Prenez...

Page 19: ...tape 1 De l int rieur fixez le Panneau Sup rieur en ins rant les Boulons EE et les Rondelles HH dans les trous pr perc s dans le cadre Boulon 1 4 in x 7 8 in Cl Allen PR PARATION Avant de commencer l...

Page 20: ...e Gauche F avec la base A en vissant les Boulons BB et les Rondelles GG dans les trous pr perc s de la Base 4 Joignez le Panneau de Droite C la Base A puis ins rez et serrez les vis CC dans les trous...

Page 21: ...les Boulons CC et les Rondelles GG dans les trous pr perc s du support m tallique du Cadre Gauche F du Panneau Central B et du Panneau Droit C comme indiqu sur le sch ma SERRER UNIQUEMENT LA MAIN 7 In...

Page 22: ...S curit Ancrage HH Vous trouverez dans le kit de montage une Sangle de S curit OO qu il vous faut accrocher afin d emp cher les accidents ou les blessures Lorsqu elle est attach e correctement la San...

Reviews: