background image


- 14 - 

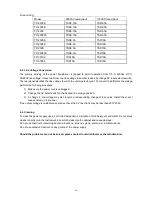
Fuse rating: 

Model 

220VAC rated input 

110VAC rated input 

TP-2303E 

TSD3.15A 

TSD6.3A 

TP-2303K 

TSD3.15A 

TSD6.3A 

TP-2303 

TSD3.15A 

TSD6.3A 

TP-2303TK 

TSD3.15A 

TSD6.3A 

TP-2305E 

TSD6.3A 

TSD10A 

TP-2305K 

TSD6.3A 

TSD10A 

TP-2305 

TSD6.3A 

TSD10A 

TP-2305TK 

TSD6.3A 

TSD10A 

TP-30102 

TSD10A 

TSD10A 

TP-60052 

TSD10A 

TSD10A 


6-2. Line Voltage Conversion


The primary winding of the power transformer is tapped to permit operation from 110 or 220Vac  ±10%, 

50/60Hz line voltage. Conversion from one line voltage to another is done by change AC input selector switch. 

The rear panel identifies the line voltage to which the unit was factory set. To convert to a different line voltage, 

perform the following procedure: 

1)  Make sure the power cord is unplugged. 

2)  Change the AC select switch to the desired line voltage position. 

3)  A change in line voltage may also require a corresponding change of fuse value. Install the correct 

fuse as listed on rear panel. 

lf the output voltage is unstableness, please check the AC line that it may be less than 207V/105V. 


6-3. Cleaning


To clean the power supply, use a soft cloth dampened in a solution of mild detergent and water. Do not spray 

cleaner directly onto the instrument, since it may leak into the cabinet and cause damage. 

Do not use chemicals containing benzene, benzene, toluene, xylene, acetone, or similar solvents. 

Do not use abrasive cleaners on any portion of the power supply. 


Should the problems can not be solved, please contact local distributor or the manufacturer.


Summary of Contents for TP-2303

Page 1: ...Multi channel DC Power Supply TP Series Operation Manual V1 0 BENCHTOP INSTRUMENT ...

Page 2: ...Rear Panel Control 8 5 OPERATION INSTRUCTIONS 9 5 1 Precaution 9 5 2 Setting Current Limit 9 5 3 Constant Voltage Constant Current Characteristic 9 5 4 Operation Mode 10 5 4 1 Independent Operation 10 5 4 2 Series Tracking Operation 11 5 4 3 Parallel Tracking Operation 12 5 4 4 Fixed 5V Power Supply Operation 13 6 MAINTENANCE 13 6 1 Fuse Replacement 13 6 2 Line Voltage Conversion 14 6 3 Cleaning 1...

Page 3: ... establish the output current limit overload or shout circuit when the supply is used as a constant voltage source independent or tracking modes and the voltage controls can be used to establish the voltage limit ceiling when the supply is used as a constant current source independent mode only The supply will automatically cross over from constant voltage to constant current operation current lim...

Page 4: ...8 8 TP 2305TK 0 30V x2 0 5A x2 External 10 9 TP 30102 0 30V x2 0 10A x2 Built in 16 10 TP 60052 0 60V x2 0 5A x2 Built in 16 Dimensions TP 30102 TP 60052 255Wx155Hx460D mm TP 2303 2305 2303TK 2305TK 255Wx155Hx370D mm TP 2303E 2305E 2303K 2305K 255Wx155Hx330D mm 3 SPECIFICATIONS 3 1 Operation Mode 1 Independent Two independent outputs and 5V fixed output Output from 0 to rating volts and 0 to ratin...

Page 5: ...g error 0 5 10mV of the master no load with load add load regulation 300mV Fixed output Output voltage 5V 0 25V Output current 3A Load regulation 25mV 110 220VAC rated input Ripple noise 2mVrms 5Hz 1MHz Display Voltmeter 3 digits 0 4 LED display Ammeter 3 digits 0 4 LED display Resolution 100mV 10mA Accuracy Real voltage and current output 1 reading 2 digits Preset voltage and current 1 reading 8 ...

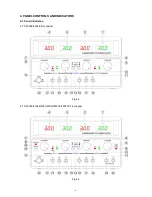
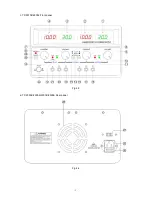
Page 6: ... 4 4 PANEL CONTROLS AND INDICATORS 4 1 Panel Illustration a TP 2303E 2305E Front panel Fig 4 2 b TP 2303K 2305K 2303 2305 2303TK 2305TK Front panel Fig 4 2 ...

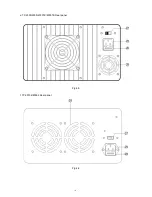
Page 7: ... 5 c TP 30102 60052 Front panel Fig 4 3 d TP 2303E 2305E 2303K 2305K Rear panel Fig 4 4 ...

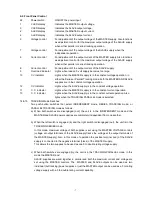
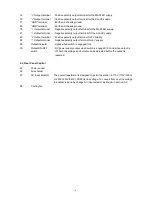
Page 8: ... 6 e TP 2303 2305 2303TK 2305TK Rear panel Fig 4 5 f TP 30102 60052 Rear panel Fig 4 6 ...

Page 9: ... when the MASTER supply is in the constant current operation 13 C C indicator Lights when the SLAVE supply is in the constant current operation Also lights when the TRACKING PARALLEL mode is selected 14 15 TRACKING Mode Switches Two push button switches that select INDEPENDENT mode SERIES TRACKING mode or PARALLEL TRACKING mode as follows a When both switches are disengaged out the unit is in the ...

Page 10: ...utput terminal for 5V supply 24 Output terminal Negative polarity output terminal for 5V supply 29 Output indicator Lights when switch is engaged in 30 Output ON OFF switch DC power supply output when switch is engaged in And when output is off both the voltage and current can be adjusted before the output is resumed 4 3 Rear Panel Control 25 Power socket 26 Fuse holder 27 AC input selector The po...

Page 11: ...ext turn the voltage current adjustment knob to set targeted values 3 Output voltage overshoot Voltage between output terminals may exceed the present value when the power is turned on or off 5 2 Setting Current Limit 1 Determine the maximum safe current for the device to be powered 2 Temporarily short the positive negative terminals of the power supply together with a test lead But for TP 2303TK ...

Page 12: ...ery becomes charged and its voltage approaches 13 8 volts its load decreases to the point where it no longer demands the full 1 amp charging rate This is the crossover point where the power supply goes into the constant voltage mode Crossover from the constant current to the constant voltage mode automatically occurs from a decrease in load Fig 5 1 Constant Voltage Constant Characteristic 5 4 Oper...

Page 13: ...play is set for voltage metering and the SLAVE display for current metering the output voltage across the MASTER positive red terminal and the SLAVE negative black terminal would be double the reading on the MASTER LED Display since both supplies are putting out the same voltage The actual output current would be the value read from the SLAVE LED Display since the two supplies are wired in series ...

Page 14: ...Only the MASTER output terminals are used for parallel tracking operation In the parallel tracking mode the SLAVE supply output voltage and current are tracking the MASTER supply output voltage and current A Set the power supplies to the TRACKING PARALLEL mode by engaging both TRACKING switches B Because both voltage and current of the SLAVE supply track the MASTER supply the maximum current and v...

Page 15: ... correct this situation the load on the supply must be decreased so that no more than 3 amps of current are sucked 6 MAINTENANCE WARNING The following instructions are for use by qualified personnel only To avoid electrical shock do not perform any servicing other than contained in the operating instruction unless you are qualified to do so 6 1 Fuse Replacement If the fuse blows the CV or CC indic...

Page 16: ...rent line voltage perform the following procedure 1 Make sure the power cord is unplugged 2 Change the AC select switch to the desired line voltage position 3 A change in line voltage may also require a corresponding change of fuse value Install the correct fuse as listed on rear panel lf the output voltage is unstableness please check the AC line that it may be less than 207V 105V 6 3 Cleaning To...

Reviews: