background image

TYM 1000/2000 Slide Gate Operator Installation Guide 

- 12 -


Rev 9 02/14

Basic Controller Programming

Programming Overview

The  Controller  can  be  programmed  with  various  options 

for  the  operator.  The  programming  fields  are  defined  as 

“functions” that have “options”. To make setup easier for the 

installer,  the  Controller’s  programming  is  divided  into  two 

groups: basic and advanced. The basic programming group 

contains  the  functions  commonly  used  in  most  slide  gate 

installations.  The  advanced  programming  group  contains 

functions less commonly used (i.e. dual gate stagger delay, 

maximum run timer, etc.).

Entering Programming Mode

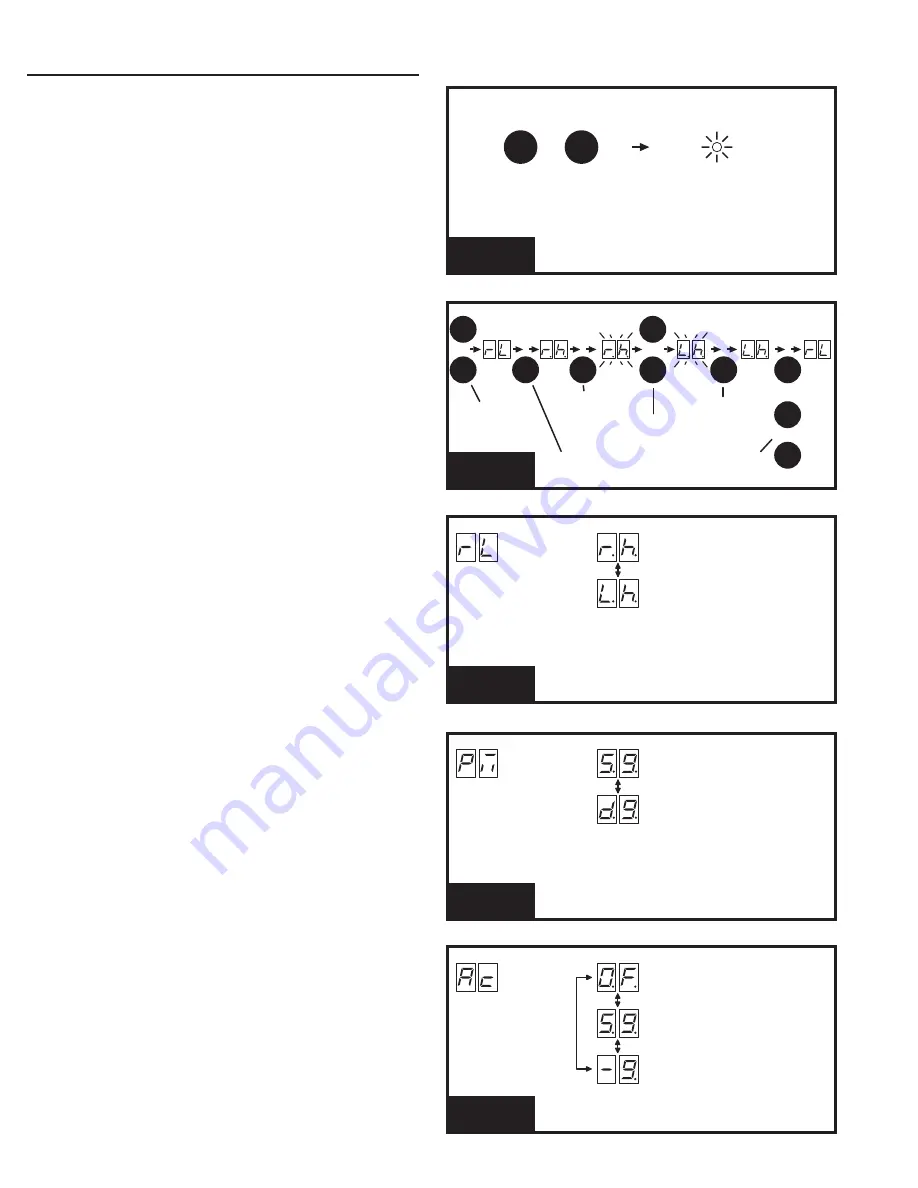
Enter programming mode by pressing the UP and DOWN 

buttons  together  for  one  second.  While  in  programming 

mode the PROGRAM indicator will light.

Exiting Programming Mode

Exit programming mode at any time by pressing the UP and 

DOWN  buttons  together. The  Controller  will  automatically 

exit programming mode after three minutes of inactivity.

Programming Keystrokes

(Typical Programming Method)
While  in  programming  mode,  press  the  UP  or  DOWN 

buttons to scroll through the programming functions. When 

the desired function is displayed press the ENTER button 

to display the currently set option for the function. When an 

option is displayed, the decimal points are lit.
To change the option, press and hold the ENTER button for 

1 second. To indicate that an option is ready to be changed, 

the display will flash. While the display is flashing, press the 

UP or DOWN button to display the other options available 

for that function.
When  the  desired  option  is  displayed,  press  the  ENTER 

button to store it into memory. To select another function, 

press ENTER, UP, or DOWN.

Left or Right Hand Operation

The factory default is for right hand operation (operator on 

right side of the driveway when viewed from the inside of 

the gate). For left hand installations, program the Controller 

for left hand operation.

Dual Gate Enable

The factory default is for single gate operation. For dual gate 

operation, wire the two gate controllers together through the 

COMM LINK terminals (see Page 25) and enable dual gate 

operation with this programming step.

3

  NOTE:  The  Mid-travel  Stop  feature  is  disabled  when 

dual gate operation is enabled for paired units.

Auto Close Timer

The factory default turns off the Auto Close Timer. The timer 

can be set from 1 to 59 seconds and from 1 to 9 minutes. 

When the Auto Close Timer is set, after opening, the gate 

will wait for the length of the Auto Close Timer then close 

automatically.

PRESS DOWN AND UP

BUTTONS TOGETHER

FOR ONE SECOND

PROGRAM INDICATOR

WILL LIGHT WHEN SYSTEM

IS IN PROGRAM MODE

PROGRAM

INDICATOR

AND

DOWN

UP

ENTERING

PROGRAMMING

FUNCTION

LEFT HAND INSTALLATION

(OPERATOR ON LEFT OF GATE

WHEN VIEWED FROM INSIDE)

RIGHT HAND INSTALLATION

(OPERATOR ON RIGHT OF GATE

WHEN VIEWED FROM INSIDE)

OPTIONS

PRESS UP OR

DOWN TO CYCLE

THROUGH OPTIONS

PRESS ENTER TO

SELECT AN OPTION

LEFT HAND

RIGHT HAND

"RL"

PRESS UP OR DOWN

TO SCROLL DISPLAY

THROUGH FUNCTIONS

PRESS ENTER FOR

ONE SECOND TO

SELECT OPTION

(THE DISPLAY

WILL FLASH)

PRESS UP

OR DOWN

TO CHANGE

OPTION

ENTER

PROGRAMMING

KEYSTROKES

SELECT

FUNCTION

CURRENTLY

SET OPTION

OPTION READY

TO CHANGE

PRESS ENTER TO

DISPLAY CURRENTLY

SET OPTION

CHOOSE

OPTION

OR

UP

DOWN

OR

UP

DOWN

OPTION

STORED

PRESS ENTER

TO STORE

OPTION

SELECT

FUNCTION

ENTER

ENTER

ENTER

OR

UP

DOWN

OR

PRESS UP, DOWN

OR ENTER SELECT

NEXT FUNCTION

FUNCTION

DUAL GATE INSTALLATION

SINGLE GATE INSTALLATION

OPTIONS

PRESS UP OR

DOWN TO CYCLE

THROUGH OPTIONS

PRESS ENTER TO

SELECT AN OPTION

SINGLE GATE

DUAL GATE

"PM"

FUNCTION

SET TIMER VALUE

1 TO 59 SECONDS

AUTO CLOSE TIMER DISABLED

SET TIMER VALUE
1 TO 9 MINUTES

OPTIONS

PRESS UP OR

DOWN TO CYCLE

THROUGH OPTIONS

PRESS ENTER TO

SELECT AN OPTION

AUTO CLOSE

TIMER

"AC"

Summary of Contents for TYM 1000

Page 1: ...tallation Guide Operator models contained in this manual conform to UL325 standard for use in Class I II III and IV applications Tymetal Corp Toll Free 800 328 GATE 4283 Fax 518 692 9404 Greenwich NY Pearland TX www tymetal com Rev 9 02 14 ...

Page 2: ...ming Guide 18 Loop Layout Illustration 20 Loop Detector Operating Instructions 21 Using Gate Reversing Edge Transmitters 23 Reversing Edge Layout Illustration 24 Photoeye Installation Illustration 25 Picket Gate Installation 26 Dual Gate Installations 27 Gate Operation 28 Open Button 28 Close Button 28 Stop Button 28 Single Input 28 Fire Department Input 28 Fire Department Access 28 Open Input 28 ...

Page 3: ...vices The following contact or non contact obstruction detection devices have been approved for use with this slide gate operator as part of a UL325 compliant installation Contact Edges Miller Edge Models MGO20 MGR20 MGS20 ME120 Photoeyes MMTC Model IR 55 165 range MMTC Model E3K 28 range Safety Information and Warnings Regulatory Warnings Read the following before beginning to install this slide ...

Page 4: ...u choose to run dedicated equipment from these devices it will decrease the distance for maximum length and the charts will no longer be accurate 8 TYM 1000 is 115v 1ph 6 0 amp draw TYM 2000 is 208 230v 1ph 4 7amp draw 9 TYM 2000 operator is dual 208 230 voltage single phase No transformer tap change or motor rewiring is required for either voltage 10 EARTH GROUND REQUIRED see pg 6 DC Control and ...

Page 5: ...l Mounting Pad Specifications Recommended pad size is 21 x 21 minimum Pad depth should be set according to local codes and at least as deep as frost line 5 8 J bolts may be set into the concrete before it sets following the dimensions shown or drilled after the concrete sets Figure 1 Mounting Pad Specifications WARNING The operator is intended for installation only on gates used for vehicles Pedes...

Page 6: ...TYM 1000 2000 Slide Gate Operator Installation Guide 4 Rev 9 02 14 Figure 2 Operator Positioning Parallel Placement ...

Page 7: ...unting bracket as shown in Figure 3 Slide the gate to the folly closed position and mount the other chain mounting bracket to the rear edge of the gate frame the same way Attach the chain to both chain mounting brackets as shown in Figure 4 route the chain through the operator as shown in Figure 5 Install chain support brackets as shown in Figure 6A or 6B as applicable to gate style Brackets shoul...

Page 8: ... due to overload or high frequency operation This overload protector will reset automatically after the motor cools down Earth Ground Install a ground rod and connect it to the operator s frame in every gate operator installation A good earth ground is necessary to allow the Controller s built in surge and lightning protection circuitry to work effectively The physical bolting of the operator to t...

Page 9: ...eaded shaft see Figure 10 3 After setting the open limit move the gate to one foot from fully closed and repeat the process for the CLOSE limit nut see Figure 10 Limit Nuts Fine Adjustment After finishing the rough limit nut adjustments reposition the gate to approximately the center of travel 1 Re engage the operator using the disconnect handle 2 Turn the power disconnect switch ON 3 Stand clear ...

Page 10: ...N TERMINALS SOLAR PANEL TERMINALS BATTERY TERMINALS PLUG IN LOOP DETECTOR CONNECTORS PRIMARY SECONDARY COMM LINK TERMINALS SINGLE INPUT TERMINALS FIRE DEPT INPUT TERMINALS OPEN INPUT TERMINALS 3 BUTTON STATION TERMINALS OPEN AND CLOSE OBSTRUCTION INPUT TERMINALS REVERSE INPUT TERMINALS OPEN LOOP INPUT TERMINALS REVERSE LOOP INPUT TERMINALS SHADOW RESET LOOP INPUT TERMINALS LIMIT SWITCH INPUT TERMI...

Page 11: ...E DELAY OPEN LIMIT SWITCH IS ACTIVATED CLOSE CURRENT SET MOTOR CURRENT HAS EXCEEDED THE CLOSE CURRENT SETTING WHILE CLOSING SET MAXIMUM CLOSE CURRENT CLOSE OBSTR MGT 1 SET CLOSE OBSTRUCTION TERMINAL CONNECTED TO COMMON BY BEAM OR REVERSING EDGE OR SIGNAL FROM MGT OBSTACLE TRANSMITTER SET MGT 1 FUNCTION CLOSE RELAY AUTO CLOSE SET CLOSE RELAY IS ACTIVATED SET AUTO CLOSE TIME CLOSE LIMIT AC DC SET CL...

Page 12: ...CHING A LIMIT THE GATE WILL STOP AGAIN LOCKOUT AND SOUND THE CONTINUOUS TONE ALARM O OBS C OBS CLOSE OBSTRUCTION INPUT CONNECT TO NORMALLY OPEN DEVICES GATE EDGE PHOTO BEAM TO DETECT AN OBSTRUCTION DURING CLOSING WHILE GATE IS MOVING ANY CLOSE OBSTRUCTION SIGNAL WILL CAUSE THE GATE TO STOP THEN REVERSE AND TRAVEL TO THE FULL OPEN POSITION SHOULD A OPEN OBSTRUCTION INPUT OR AN OPEN DIRECTION INHERE...

Page 13: ...EIVER WIRELESS GATE EDGE SENSOR MGT TRANSMITTER PHOTOEYE FOR REVERSE PHOTOEYE FOR OPEN OBSTRUCTION TELEPHONE ENTRY KEYPAD EXTERNAL POWER SOLENOID LOCK MAGLOCK WARNING STROBE OR AUDIBLE SOUNDER GATE EDGE SENSOR FOR REVERSE CHANNEL 1 OPEN CLOSE TWO CHANNEL RADIO RECEIVER PHOTOEYE FOR CLOSE OBSTRUCTION Figure 13 Operator Accessory Connections N C N O N O N O See p 15 N C ...

Page 14: ... driveway when viewed from the inside of the gate For left hand installations program the Controller for left hand operation Dual Gate Enable The factory default is for single gate operation For dual gate operation wire the two gate controllers together through the COMM LINK terminals see Page 25 and enable dual gate operation with this programming step 3 NOTE The Mid travel Stop feature is disabl...

Page 15: ...end of travel 7 sec min and a different number will flash This number indicates the range variation above and below the average motor current during the run 5 Re set the range number slightly above the measured flashing range number using the or buttons Push ENTER to store the value A minimal force of 50 75 lbs should activate the reversal device should an obstruction occur The setting should be h...

Page 16: ...tions This function is used in dual gate installations only The factory default sets the Stagger Mode to OFF In dual gate installations the two operators communicate through the 3 wire COMM LINK interface When using the Stagger Mode set one operator for delayed opening and the other operator for delayed closing The Stagger Delay Time programming function see below sets the length of the delay 3 NO...

Page 17: ... energize during any pending or actual gate motion either open or close to activate a warning strobe light Alarm The relay will energize if the gate is manually forced open from the full closed position Reverse Delay Time The factory default sets the Reverse Delay to 1 second The operator will wait the length of the delay before reversing direction This feature will not change the reversal time wh...

Page 18: ... or reverse loop input is triggered 3 NOTE The Mid travel Stop feature is disabled when dual gate operation is enabled for paired units Motor Type Selection The factory sets the default for the Controller to match the type of motor in the operator If required change the motor selection option to a different type of motor used in the operator The options available are AC Motor Only DC Motor Only wi...

Page 19: ...current sense values or motor type Transmitters must be deleted with the two functions above FUNCTION TO DELETE ALL MGT TRANSMITTERS PRESS ENTER FOR 2 SECONDS TO EXIT WITHOUT DELETING ANY QUICKLY PRESS ENTER ERASE MGT TRANSMITTERS MD WILL BLINK FOR 30 SECONDS WHILE THE CONTROLLER IS READY TO DELETE ALL MGT TRANSMITTERS MD ENTER PRESS ENTER ENTER THE DISPLAY WILL SHOW DELETE ALL AND THE CONTROLLER ...

Page 20: ...ISPLAYED NOTE ADVANCED PROGRAMMING WILL STAY ENABLED AFTER EXITING PROGRAMMING UNTIL THE GATE CYCLES 50 TIMES FUNCTION SINGLE INPUT WILL OPEN OPERATOR IF OPERATOR IS ALREADY OPEN SINGLE INPUT WILL CLOSE OPERATOR SINGLE INPUT WILL CYCLE OPERATOR IN ORDER OF OPEN STOP CLOSE STOP OPTIONS PRESS UP OR DOWN TO CYCLE THROUGH OPTIONS PRESS ENTER TO SELECT AN OPTION SINGLE BUTTON INPUT SETUP SB FUNCTION SE...

Page 21: ... THEN SHOW THE TRANSMITTER S ID NUMBER REPEAT STEPS FOR SECOND MGT TRANSMITTER IF USED PRESS ENTER TO ACCEPT THE SELECTION PRESS UP OR DOWN TO SELECT THE MGT FUNCTION rE REVERSE St STOP OP OPEN OBSTRUCTION CL CLOSE OBSTRUCTION FUNCTION ACTIVATE THE TRANSMITTER DISPLAY WILL SHOW THEN THE TRANSMITTER ID NUMBER IF TRANSMITTER IS ALREADY ENTERED dU WILL BE DISPLAYED IF DECODE IS BAD ERROR WILL BE DISP...

Page 22: ... Layout Illustration SEPARATE PEDESTRIAN GATE REQUIRED 7 FEET MINIMUM DISTANCE FROM GATE 2 3 8 LOOP SEALANT MULTIPLE TURNS REFER TO LOOP INSTALLATION NOTES FOR DETAILS TWIST WIRE FROM END OF LOOPS BACK TO OPERATOR AT LEAST SIX TIMES PER FOOT 2 MAX USE RELIEF CUTS AT CORNERS ...

Page 23: ...s that the sensitivity dynamically updates after each push button position change allowing you to change sensitivity settings while a vehicle is over the loop zone Adjusting sensitivity without using the DEFLECTOMETER Manually set Sensitivity The Model 2500 2346 offers 9 levels of sensitivity 1 to 9 This can be manually set to any desired level by pressing the SENS or SENS front panel push buttons...

Page 24: ...ure aids in preventing dropouts during the passage of high bed vehicles and is particularly useful in sliding gate situations Detector Diagnostics The detector continuously checks the integrity of the loop The system is able to detect open or shorted circuit loops or sudden changes in inductance exceeding 25 of the nominal inductance If a fault is detected the POWER and DETECT LED both continuousl...

Page 25: ...ned the transmitter will immediately send a trouble transmission Anytime the transmitter is serviced you will need to open the case After closing the MGT case cycle the Controller s power to clear the trouble annunciation Edge Supervision MGT transmitters can monitor the connection to the gate edge if the gate edge is equipped with an internal 100µf capacitor There is a jumper in the MGT that enab...

Page 26: ... DO NOT BECOME DAMAGED DURING NORMAL OPERATION AVOID PINCHING AND ABRASION THIS DRAWING IS INTENDED TO DRAW ATTENTION TO POSSIBLE LOCATIONS FOR THE INSTALLATION OF CONTACT OR NON CONTACT OBSTRUCTION SENSING DEVICES OTHER AREAS OF ENTRAPMENT MAY EXIST DEPENDING ON EACH SPECIFIC INSTALLATION SEE NOTE ITEM 4 SEE NOTE ITEM 1 SEE NOTE ITEM 2 SLIDE GATE OPERATOR WITH RADIO RECEIVER MOUNTED INSIDE SEE NO...

Page 27: ...TYM 1000 2000 Slide Gate Operator Installation Guide 25 Rev 9 02 14 Photoeye Installation Illustration ...

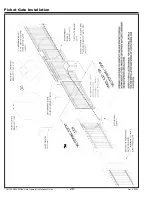
Page 28: ...TYM 1000 2000 Slide Gate Operator Installation Guide 26 Rev 9 02 14 Picket Gate Installation ...

Page 29: ...able or equivalent only P N 2500 1982 per foot q NOTE The shield wire should be connected COMM LINK terminal C in both operators Three of the programming functions available are only used for dual gate installations Dual Gate Enable Dual Gate Enable must be set for all dual gate installations Stagger Mode The Stagger Mode function determines if the operator has a delayed open or a delayed close St...

Page 30: ...a handle inside the access box that can be pulled out to mechanically release the operator drive sprocket to allow the gate to be manually pushed open The handle will be required to be pushed back inward to continue normal gate operation Note that a Knox brand padlock has a dust shield for the key is plastic armored and retains the key when unlocked Knox supplies the keys to fire departments and a...

Page 31: ...stops The sounder will chirp every five seconds when the gate is idle Correct the trouble close case replace battery or replace transmitter to clear the obstacle transmitter trouble indications Maximum Run Time Exceeded If the Maximum Run Time is exceeded the Controller stops the operator the same as if a double obstacle has occurred in an entrapment condition The entrapment alarm sounds constantl...

Page 32: ...before adjusting the current sensing B The Maximum Run Timer may have counted down and expired This can be caused by having the timer set too low if a chain or belt is broken or if a sprocket or pulley is slipping When the timer expires the gate stops and the beeper will sound C An obstruction signal from an accessory wired to the obstruction input may have triggered falsely Check the control boar...

Page 33: ...reach of children Never operate this system without being in sight of the full path of travel of the moving gate Stand clear of the gate s path of travel at all times Gate may start without audible warnings Consult your installing dealer regarding audible visual pre start options Never reach between through or around the gate fence to access the operator or any control device Turn power off before...

Page 34: ...ing device and contacts for connecting secondary obstruction sensing devices contact sensor edge sensor or non contact sensor photo electric type units Any number of access control devices can activate the gate operator The primary obstruction sensing system and secondary obstruction sensing devices are designed to detect possible entrapment The installer is required to place sufficient secondary ...

Page 35: ...te Operator Installation Guide 33 Rev 9 02 14 1 31 30 29 27 33 34 2A 2 3 24 26 22 25 36 15 13 23 4 21 35 20 12 11 10 9 8 16 14 18 19 17 7 7A 32 38 1A 1B 28 NOTE MAY HAVE OPTIONAL TORQUE LIMITER 40 TYM 1000 2000 Exploded View ...

Page 36: ...04 APeX Mounting Plate 2300 1025 Plastic Cover 2510 423 Knob Kit 25 2520 396 SLC Limit Box Assembly with Cover 2100 057 Limit Shaft 2200 029 Oilite Bushing 2200 030 Limit Nut 2200 193 1 2 E ring 2300 946 Heyco Bushing with Wire Guards 2500 2347 Limit Switch 2500 764 Auxiliary Limit Switch not included 2100 261 Detent Plate 2200 028 Detent Spring 26 2300 945 Limit Box Cover REF PART DESCRIPTION MOT...

Page 37: ...rews for tightness and tighten if necessary 2 Inspect chain and sprockets for wear and replace if necessary Check for proper tension and alignment and adjust if required 3 Check limit switches and limit actuators cams limit nuts etc for wear and replace as required 4 Inspect the installation area Are all the warning signs intact and visible If they are missing or need replacing contact Tymetal Cor...

Page 38: ...tops and reverses a short distance with minimal resistance applied 40 lbs on a swing gate at the end of the gate 75 lbs on a slide gate ___ ___ 8 The installer has instructed the customer in the proper use of the gate operator and reviewed all of the operational functions obstruction sensing devices warning beeper and reset etc ___ ___ 9 The installer has instructed the customer in the proper use ...

Reviews: