
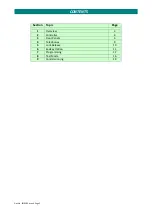
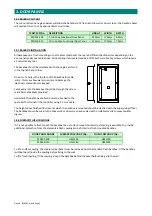


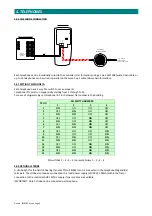
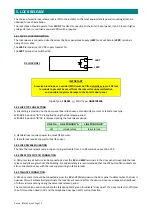


Doc
No.
FM0589
issue
A
Page
13
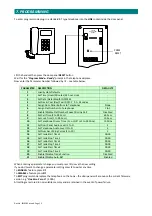
7.
PROGRAMMING
7.01
LOAD
SYSTEM
DEFAULTS
This
will
clear
all
programming
back
to
the
factory
defaults
listed
in
the
table
on
the
previous
page.
Press
1
and
a
message
will
announce
“
Load
Defaults
”
Press
and
a
message
will
announce
“
Defaults
Loaded
–
Ready
”
If
you
don’t
want
to
load
defaults
press
#
to
exit
the
mode
7.02
SET
TIME
Press
2
and
a
message
will
announce
“
Time
15
50
”
(e.g.
current
time
3:50
PM)
Enter
the
correct
time
HHMM
(24
hour
format)
followed
by
A
message
will
announce
the
new
time
setting
“
Time
HHMM
–
Ready
”
If
you
don’t
want
to
change
the
time
setting
press
#
to
exit
the
mode
Note:
the
time
is
not
cleared
if
defaults
are
loaded.
7.03
SET
DATE
Press
3
and
a
message
will
announce
“
Date
09
04
”
(e.g.
current
date
9
th
April)
Enter
the
correct
date
DDMM
(date
&
month)
followed
by
A
message
will
announce
the
new
date
setting
“
Date
DDMM
–
Ready
”
If
you
don’t
want
to
change
the
date
setting
press
#
to
exit
the
mode
Note:
the
date
&
month
is
not
cleared
if
defaults
are
loaded.
7.04
SET
DAY
AND
YEAR
Press
4
and
a
message
will
announce
“
Day
and
Year
05
10
”
(e.g.
Friday
2010)
01
=
Monday
Enter
the
correct
day
and
year
DDYY
followed
by
A
message
will
announce
the
new
day
and
year
setting
“
Day
and
Year
DDYY
–
Ready
”
If
you
don’t
want
to
change
the
day
and
year
setting
press
#
to
exit
the
mode
Note:
the
day
and
year
is
not
cleared
if
defaults
are
loaded.
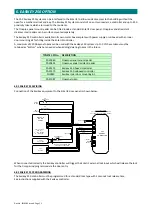
7.05
ASSIGN
ENTRANCE
KEYS
TO
TELEPHONES
This
allows
the
door
panel
buttons
to
be
set
to
call
the
correct
telephones.
Press
5
and
a
message
will
announce
“
Assign
Entrance
Keys
”
Press
the
door
panel
buttons
in
order
from
lowest
to
highest
flat
number
See
Note
After
each
door
panel
key
press
a
message
will
announce
“Handset
1”
…
“Handset
2”
…etc
If
the
door
panel
has
a
TRADE
button
press
this
twice
after
the
last
flat
number
A
message
will
announce
“Trade”
Press
and
a
message
will
announce
“
Entrance
Keys
Saved
–
Ready
”
this
assumes
the
telephone
ID’s
have
been
set
starting
with
ID
1
in
the
lowest
flat
number
and
running
sequentially.
If
this
is
not
the
case
press
the
flat
numbers
in
order
of
the
telephone
ID’s.
7.06
ASSIGN
FLAT
NUMBERS
TO
TELEPHONES
This
allows
the
actual
flat
number
to
be
announced
when
the
telephone
is
being
called.
Press
6
and
a
message
will
announce
“
Assign
Flat
Numbers”
followed
by
“Handset
1
–
Flat
Number
1
”
If
telephone
ID
1
is
fitted
in
flat
number
1
then
press
the
key,
if
not…
Enter
the
flat
number
“
NN
”
which
has
telephone
ID
1
fitted
followed
by
the
key
A
message
will
announce
“Handset
1
–
Flat
Number
NN
”
followed
by
“Handset
2
–
Flat
Number
2
”
Repeat
for
all
flat
numbers
with
telephones
fitted
Note:
from
new,
or
if
defaults
are
reloaded
the
door
panel
will
not
announce
flat
numbers
–
to
enable
this
feature
see
section
7.07.
Flat
numbers
can
be
a
maximum
of
4
digits,
alpha
numeric
numbers
e.g.
1A,
1B,
etc.
are
not
possible.


