background image

‐ 

7

 ‐ 

1.8


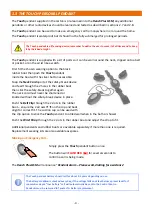
SIGNAL


STRENGTH


TEST


MODE


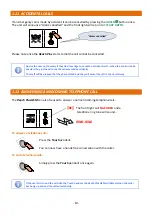
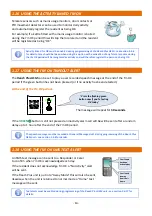
To


check


the


Network


signal


strength


follow


the


procedure


below;


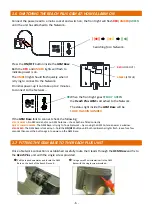
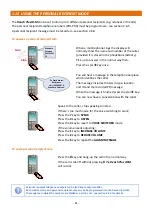
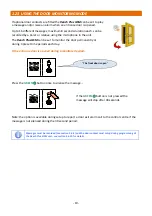
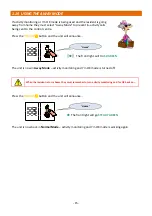
1.


Press


and


HOLD


the


GREEN


and


YELLOW


buttons


TOGETHER…


((

))


When


the


front


light


FLASHES


FAST


GREEN


release


the


buttons


and


the


unit


will


announce…


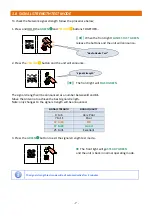
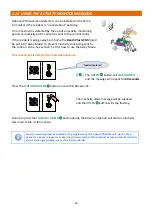
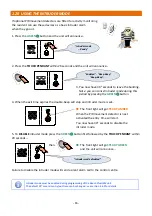
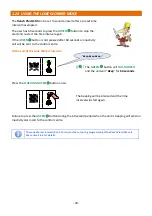
2.


Press


the


YELLOW


button


and


the


unit


will


announce…


((

))


The


front


light


will


FLASH


GREEN


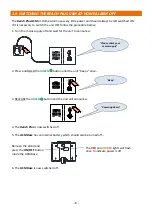
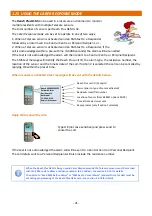
The


signal


strength


will


be


announced


as


a


number


between


0


and


31

.


Move


the


Antenna


to


achieve


the


best


signal


strength.


Note:


only


changes


to


the


signal


strength


will


be


announced.


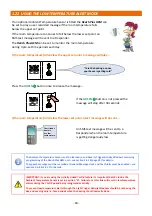
SIGNAL


STRENGTH

SIGNAL


QUALITY

0


to


6


Very


Poor


7


to


11


Poor


12


to


16


OK


17


to


24


Good


25


to


31


Excellent


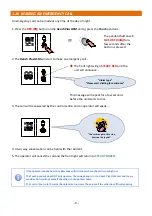
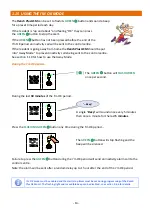
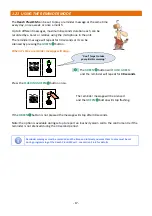
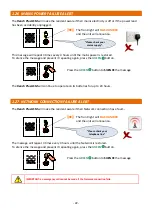
3.


Press


the


GREEN


button


to


exit


the


signal


strength


test


mode…


The


front


light


will


go


STEADY


GREEN


and


the


unit


is


back


in


normal


operating


mode.


The


signal


strength test


mode


will


exit


automatically


after


3


minutes.


Radio


Device


Test


Signal


Strength

Summary of Contents for Reach plus GSM

Page 1: ...Touch Personal Pendant USER INSTALLATION GUIDE www tynetec co uk Reach Plus GSM At Home Alarm Unit...

Page 2: ...sponse Mode 21 1 26 Mains Power Failure Alert 22 1 27 Network Connection Failure Alert 22 1 28 Battery Failure Alert 23 1 29 On Off Switch 23 SECTION 2 INSTALLATION PROGRAMMING Section Topic Page 2 1...

Page 3: ...ly installed e g smoke detectors PIR s etc are registered with the Reach Plus GSM unit Once complete a test call should be raised from each trigger device to the Alarm Receiving Centre to ensure it is...

Page 4: ...fety break together again The neck cord must never be shortened or knotted without the safety break device in place Push the Belt Clip through the 2 slots in the rubber boot ensure the 2 arrows on the...

Page 5: ...of the GSM Base Do not fix the GSM Base to the Reach Plus until it has been powered up and a Network connection is established see the following page 1 5 FITTING THE SIM CARD A 2G mini SIM card is nor...

Page 6: ...AMBER If the GSM Base fails to connect check the following STEADY AMBER No SIM card and or no GSM Antenna check both are fitted correctly QUICK FLASHING AMBER The GSM Base is trying to find a Network...

Page 7: ...ignal strength will be announced as a number between 0 and 31 Move the Antenna to achieve the best signal strength Note only changes to the signal strength will be announced SIGNAL STRENGTH SIGNAL QUA...

Page 8: ...and wait for the unit to announce 2 Press and HOLD the GREEN button until the unit beeps once 3 RELEASE the GREEN button and the unit will announce 4 The Reach Plus is now switched off 5 The GSM Base...

Page 9: ...l will be answered by the control centre and an operator will speak 4 A two way conversation can be held with the resident 5 The operator will cancel the call and the front light will return to STEADY...

Page 10: ...ently The staff will be pleased that they have talked and they will cancel the call in the normal way 1 12 ANSWERING AN INCOMING TELEPHONE CALL The Reach Plus GSM can also be used to answer a normal i...

Page 11: ...ress the star key You can now have a conversation with the caller Speak to the caller stop speaking to listen If there s too much noise for the voice switching to work Press the 7 key to SPEAK Press t...

Page 12: ...ay Mode If no movement is detected the unit will announce The GREEN button will FLASH GREEN and the message will repeat for 60 seconds Press the FLASHING GREEN button once within 60 seconds The inacti...

Page 13: ...e During the I m OK period The GREEN button will FLASH GREEN once per second During the last 30 minutes of the I m OK period A single Beep will sound once every 5 minutes then once a minute for the la...

Page 14: ...en button has not been pressed or if no activity has been detected At the end of the I m OK period The message will repeat for 30 seconds If the GREEN button is still not pressed an inactivity alarm c...

Page 15: ...utton and the unit will announce The front light will FLASH GREEN The unit is now in Away Mode activity monitoring and I m OK mode is turned off When the resident returns home they must remember to tu...

Page 16: ...op and intruder mode is set The front light will go STEADY AMBER When the PIR movement detector is next activated the entry time will start You now have 30 seconds to disable the intruder mode 5 To DI...

Page 17: ...utton will FLASH GREEN and the reminder will repeat for 30 seconds Press the FLASHING GREEN button once The reminder message will be silenced and the GREEN button will stop flashing If the GREEN butto...

Page 18: ...essage will be sent to a Responder when the room temperature is getting dangerously low The Ambient Temperature Sensor must be learned in and have its Trigger Activity Windows set during programming o...

Page 19: ...manently or during 3 preset time periods each day If the entrance door is opened during a monitored period Press the GREEN button once to silence the message If the GREEN button is not pressed the mes...

Page 20: ...he control centre At the end of the Lone Worker interval The GREEN button will FLASH GREEN and the unit will Beep for 60 seconds Press the FLASHING GREEN button once The beeping will be silenced and t...

Page 21: ...an be cancelled by replying OK within the preset time When a sensor is activated a text message will be sent with the details below Reply OK to cancel the call Type OK not case sensitive and press sen...

Page 22: ...E the message The Reach Plus GSM will continue to operate on its batteries for up to 24 hours 1 27 NETWORK CONNECTION FAILURE ALERT The Reach Plus GSM will make the resident aware if their Network con...

Page 23: ...d replacing for between 3 to 5 years The replacement battery must be identical to that originally fitted and should only be changed by a competent person Replacement battery Tynetec Part No F00141 1 2...

Page 24: ...communications with a traditional Control Centre or Personal Recipient via the mobile network the ability to send and receive text messages from Carers or Responders and lifestyle monitoring via Tyne...

Page 25: ...column After programming a parameter you can press the 1 key to confirm what you entered See below for the minimum information you will need to program for a basic installation 2 3 1 SETTING THE UNIT...

Page 26: ...t announces Ready it s OK to proceed and program another parameter Alternative control centre telephone numbers can be programmed using codes 027 028 029 2 3 3 SETTING THE PROTOCOL TYPE The control ce...

Page 27: ...th year as 7 digits using the format below 1st Digit Day 1 Mon to 7 Sun 2nd 3rd Digit Date 01 to 31 4th 5th Digit Month 01 to 12 6th 7th Digit Year 00 to 99 followed by If the date was entered correct...

Page 28: ...ing a door contact to monitor a door from 9PM in the evening to 7AM in the morning enter the trigger activity parameter 051 followed by the 8 digit ID of the radio door contact e g 34040752 a 2 digit...

Page 29: ...4 Tel No 3 ARC3 Dial Attempts 03828 K 4 Tel No 4 ARC4 Dial Attempts 03829 K 4 Tel No 5 PR1 Dial Attempts 03830 K Enter the number of dial attempts 1 to 9 at each PR number followed by 4 Tel No 6 PR2 D...

Page 30: ...Auto Learn Carer Response Radio Device 053 K Same as 050 except the Radio Device can be assigned a residence number N A Buttons LED Setup Red Emergency Button 064 K 0 Disable or 1 Enable Enabled 2 6 1...

Page 31: ...ponder 164 S None Mobile Tel No 5 Carer 165 S None Mobile Tel No 6 Carer 166 S None Mobile Tel No 7 Carer 167 S None Mobile Tel No 8 Carer 168 S None Mobile Tel No 9 Technical 169 S None iCare ID 140...

Page 32: ...l announce Audio Volume press 0 to 5 followed by Ring Volume the volume of the internally generated ring tone this is only used if there is no telephone connected to the TEL socket can be set between...

Page 33: ...Door 2 42 Lift 1 55 Bin Store 04 Stairs 1 17 Bathroom 1 30 Rear Door 1 43 Lift 2 56 Boiler Room 05 Stairs 2 18 Bathroom 2 31 Rear Door 2 44 Lift 3 57 Attic 06 Landing 19 WC Toilet Up 32 Garage 1 45 F...

Page 34: ...eat for PR telephone numbers 6 7 8 If PR telephone numbers are used a unit identity message should be recorded see section 2 3 8 ARC1 to ARC4 Dial Attempts the number of times each ARC telephone numbe...

Page 35: ...to Enable Lone Worker Interval if the lone worker interval is set the unit will start to beep after the preset time interval has elapsed The user has 60 seconds to confirm they are OK by pressing the...

Page 36: ...ecord ID Message allows a personal recipient message to be recorded This message will be heard over the phone by the person that answers the emergency call Enter 060 the unit will announce Record ID M...

Page 37: ...ssage will repeat for 30 seconds only Enter 092 to 098 to setup reminders 2 to 8 For example to set a reminder every Tuesday for lunch club at 11 45AM acknowledgement is required with an alarm call to...

Page 38: ...chen 2 36 Laundry Room 2 49 Outbuilding Shed 97 Cooker Hob 11 Living Room 1 24 Kitchen Area 37 Office 50 Garden Front 98 Microwave 12 Living Room 2 25 Utility Room 1 38 Study 51 Garden Rear 99 Kettle...

Page 39: ...n code acknowledge alarm parameters and activity windows assigned Enter 051 the unit will announce Learn Radio Device and Enter Location Code Activate the radio device the unit will announce Device Ty...

Page 40: ...nable Enter 065 the unit will announce Program Yellow Button enter 0 to Disable or 1 to Enable Enter 066 the unit will announce Program Green Button enter 0 to Disable or 1 to Enable Enter 067 the uni...

Page 41: ...all settings listed in section 2 6 9 Check Time Date enter 086 the unit will announce Check Time Date followed by all settings listed in section 2 6 12 Check Trigger Window enter 087 the unit will ann...

Page 42: ...s attempted to dial ARC or PR but not connected Silent Alarm Failure Programming Ack Confirmation of programming SMS Self Test Unit will send a test SMS Person Not Active Programmable sent after I m o...

Page 43: ...RESPONSE SETUP If the Reach Plus GSM is being used in the Carer Response mode the option can be set to send an SMS text to Carers or Responders before the alarm is reported to the Control Centre or Pe...

Page 44: ...ing an additional pendant press the button once The button will FLASH RED for several seconds and the Reach Plus GSM will announce Pendant If the unit emits a single low tone the device has already be...

Page 45: ...ST GREEN release the button and the unit will announce 2 Go to all extremes of the dwelling and activate the pendant the Reach Plus GSM will beep each time a radio signal is received OK Repeat the tes...

Page 46: ...46 NOTES...
Page 47: ...aily weekly monthly reminders Message Function 16 user recordable messages can be assigned to alarms reminders Activity Mode 3 activity monitoring periods day with 0 99 threshold PIR required Inactivi...

Page 48: ...or AWAY mode for activity monitoring I m OK or in conjunction with a Carer pendant to register a CARER VISIT RED EMERGENCY BUTTON Used to make an EMERGENCY alarm call FRONT STATUS LIGHT Steady Green N...

Reviews: