Bendigo Bank Go EFTPOS reader user guide
3
1. Quick Start
1.1
Download the Tyro Go EFTPOS reader app (“app”)
On your chosen device (smartphone or tablet), download the Tyro Go App
from the App Store or Google Play
TM
.
Please refer to the App Store or Google Play for supported devices and
software versions.
Do
wnload
1.2 Log into the app
Administrators on your account have been sent an email with a temporary PIN for the Tyro Go App. If you
have not received an email by the time you receive your Go EFTPOS reader or cannot find the email, call
Customer Support to resend the credentials.
Once you have retrieved those details and have downloaded the app, log in with your User ID and
temporary PIN then create a new PIN.
Login
1.3 Charge your device
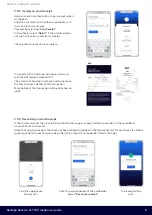
Fully charge your Go EFTPOS reader before first use. To check that it is fully charged, check the Tyro Go
app after pairing with the reader. You can pair to the reader while it is charging.
Charge
1.4 Pair the app with the Bendigo Go EFTPOS reader (“reader”)
1. Switch on the reader using the power button, keeping it close to your smart device.
2. On the smart device, access settings and enable all of the following:
a. Bluetooth connectivity
b. Location services
c. Wi-Fi or mobile network (3G, 4G or 5G).
3. Log into the Tyro Go App using your credentials.
4. Press the
“Reader”
icon at the top right corner of the Tyro Go app
5. Select
“Connect reader”
and manually pair to the Go EFTPOS reader by selecting
“Connect
manually”
and matching the serial number at the back of the reader to the list of available Bluetooth
devices. Alternatively, you can scan the barcode on the back of the reader with the Go app.
6. You should see a message
“Reader is connected”
when successfully paired.
Connect
1.5 Perform a test transaction
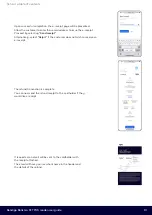
1. From within the Tyro Go App, select the wallet icon
to find the Payment page, which also is
the home screen.
2. At the payment page, select the Card payment
button.
3. Enter the sales amount, noting that a decimal is not required.
4. If desired, enter a sale description by selecting the
“add note”
icon on the top right and
selecting
“Done”
.
5. On the Payment confirmation page, confirm the payment by selecting
“Confirm”
.
6. Allow the customer to tap their contactless card on the reader. Alternatively, the customer can
insert their card into the reader chip slot.
7. The customer is required to enter their PIN into the app if:
a. The contactless transaction exceeds AU$200, or
b. A chip payment is made.
8. Once the card is tapped or inserted, a beep sound is emitted, and the LED indicator on the reader
will light up. The branding of the card scheme will appear on the mobile or tablet screen, which
indicates payment is processing and authorising.
9. Upon successful authorisation, an e-receipt page will appear.
10. Allow the customer to enter their email address to issue an e-receipt.
11. Proceed by selecting
"Send Receipt"
. Alternatively, select
"Skip"
if the customer does not wish to
receive an e-receipt.
12. The payment transaction is now complete.
Test


