background image

TYROLIT


Hydrostress AG

Page 5

Wall saw WZ

Assembly / disassembly

Place the wall saw on the guide rail

If the grips fail to engage or the wall saw sits too loosely on the guide rail: adjust the guide 

rollers.

Adjusting the guide rollers

* The guide rollers must sit in the guide groove, and it must be possible to turn them by hand.

1.

2.

B*

A

C

B*

A

C

3

3.1

3.2

All manuals and user guides at all-guides.com

Summary of Contents for WZ

Page 1: ...Operating Instructions Wall saw WZ Index 006 10988309 EN 17 05 2010 All manuals and user guides at all guides com a l l g u i d e s c o m ...

Page 2: ...ress replacement parts can guarantee quality and interchangeability We are unable to ful fil our warranty obligations if maintenance work is neglected or carried out unprofessionally Any repair work must be carried out by trained personnel only Our aftersales service is available to help ensure that your TYROLIT Hydrostress units remain in perfect working order We hope that you enjoy untroubled an...

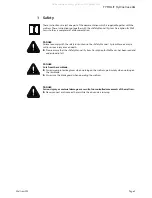
Page 3: ...em Manual may re sult in serious injury or even death Please ensure that the Safety Manual System Description for Wall Saws has been read and understood in full DANGER Cuts from the saw blade Always wear protective gloves when working on the wall saw particularly when working on the saw blade Always use the blade guard when operating the wall saw DANGER Serious injury or material damage as a resul...

Page 4: ... swivel 2 Water connection 8 Grip lock unit 3 Saw blade holder 9 Chassis 4 Blade guard holder 10 Water line 5 Name plate 11 Geared swivel arm 6 Blade drive motor 12 Guide roller Typ Masch Nr Gewicht Index Baujahr CH 8330 Pfäffikon ZH Made in Switzerland 1 2 3 4 6 5 7 8 9 10 11 12 Typ Masch Nr Gewicht Index Baujahr CH 8330 Pfäffikon ZH Made in Switzerland 1 2 3 4 6 5 7 8 9 10 11 12 2 2 1 2 2 All ma...

Page 5: ...l If the grips fail to engage or the wall saw sits too loosely on the guide rail adjust the guide rollers Adjusting the guide rollers The guide rollers must sit in the guide groove and it must be possible to turn them by hand 1 2 B A C B A C 3 3 1 3 2 All manuals and user guides at all guides com ...

Page 6: ...m TYROLIT Hydrostress AG DANGER Serious injury can be caused by sudden start up of the saw blade Switch off the drive unit before working on the saw blade Depressurize the hoses Preparations for assembly During initial installation remove the flush cut anchoring screws on the quick release flange C A B C A B 3 3 3 4 3 4 1 All manuals and user guides at all guides com a l l g u i d e s c o m ...

Page 7: ... of rotation of the machine Correct alignment Countersinking of the fastening bores against the blade cover For normal cuts with saw blades up to Ø 1000 mm For normal cuts with saw blades larger than Ø 1000 mm C A B 2x 40 Nm C A B 2x 40 Nm C A D2x 40 Nm B6x 15 Nm C A D2x 40 Nm B6x 15 Nm 3 4 2 All manuals and user guides at all guides com ...

Page 8: ...ER It can cause death or serious injury if the saw blade flies away Check whether the sleeve and central screw are countersunk Tighten the central screw to a torque of 60 Nm A B6x 15 Nm A B6x 15 Nm click A 60 Nm B C D click A 60 Nm B C D 3 4 3 All manuals and user guides at all guides com ...

Page 9: ...e saw blade drops down Lift out the saw blade unit to the top when removing it Disassemble the saw blade unit in the reverse order to the installation assembly process Mount the blade guard Mount the blade guard according to the instruction leaflet 1 2 3 5 3 6 All manuals and user guides at all guides com ...

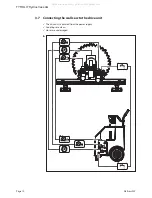
Page 10: ...rostress AG Page 10 Wall saw WZ Connecting the wall saw to the drive unit The drive unit is isolated from the power supply Couplings are clean Hoses are undamaged 3 7 All manuals and user guides at all guides com ...

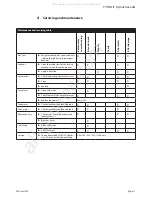
Page 11: ...llers Check the bearing clearance for wear X X X X Clean X X X X Replace X Swivel arm Clean with water X Check the saw blade uptake for wear X X X Replace the gear oil Every 50 h Feed motor Check cleanliness and leak tightness X X X X Drive motor Check cleanliness and leak tightness X X X X Water economy Check water line for cleanliness and leak tightness X X X Blow out water X Saw blade Clean wit...

Page 12: ...l The use of unsuitable oil can damage the wall saw Use only TYROLIT Hydrostress AG oil containers no 10981362 10 cl Replacing the guide rollers Defective guide rollers should be replaced with replacement set no 10977911 4 1 4 2 4 3 All manuals and user guides at all guides com ...

Page 13: ...ndles 2 piece with locking function Guide rollers Low wearing suitable for all VS and VAS rails Rail mounting Locking and safety function on grip Main motor Mounted via quick release device size 2 Feed motor Geroller with integral overload and braking function Flush cutting Quick release flange ST without blade cover Normal cutting Quick release flange ST with blade cover Water Water connection on...

Page 14: ...ing pressure 260 bar Type External geared motor Rotational speeds hydraulic motors for wall saws cm3 12 cm3 16 cm3 18 cm3 22 cm3 26 cm3 30 l min 33 2750 2063 1833 1500 1269 1100 l min 40 3333 2500 2222 1818 1538 1333 l min 45 3750 2813 2500 2045 1731 1500 l min 50 4167 3125 2778 2273 1923 1667 l min 60 5000 3750 3333 2727 2308 2000 l min 70 5833 4375 3889 3182 2692 2333 Operation possible Operatio...

Page 15: ...ke and overload coupling Operating pressure max 120 bar Output torque 150 Nm Swivel range swivel arm 360 Feed force 3000 N Saw blades Saw blades Parameter Value Saw blade max Ø 1600 mm Fully detachable saw blade Ø 825 mm Blade holder Ø 60 mm Blade flange mounting at wall saw Quick release flange ST Saw blade fixing on blade flange also for flush cuts 6 countersunk head screws reference circle 130 ...

Page 16: ...ectable drive units The wall saw must only be operated with the coordinated drive units from TYROLIT Hydrostress Drive unit power requirements Parameter Value Minimum output 20 kW max operating pressure 260 bar Maximum performance 25 kW max operating pressure 260 bar Water connection Parameter Value Pressure 2 to 6 bar Quantity At least 6 l min Max temperature 25 C 5 8 5 9 All manuals and user gui...

Page 17: ...ive applied Machinery Directives 2006 42 EC Standards applied EN 12100 1 EN 12100 2 Safety of machines Basic concepts general design principles EN 294 Safety of machinery Safety distances to prevent upper limbs reaching danger areas EN 349 Safety of machinery Safety distances to avoid crushing of body parts EN 982 Safety of machinery Safety requirements for safety systems and their components hydr...

Reviews: