background image

Obtaining a Blood Sample

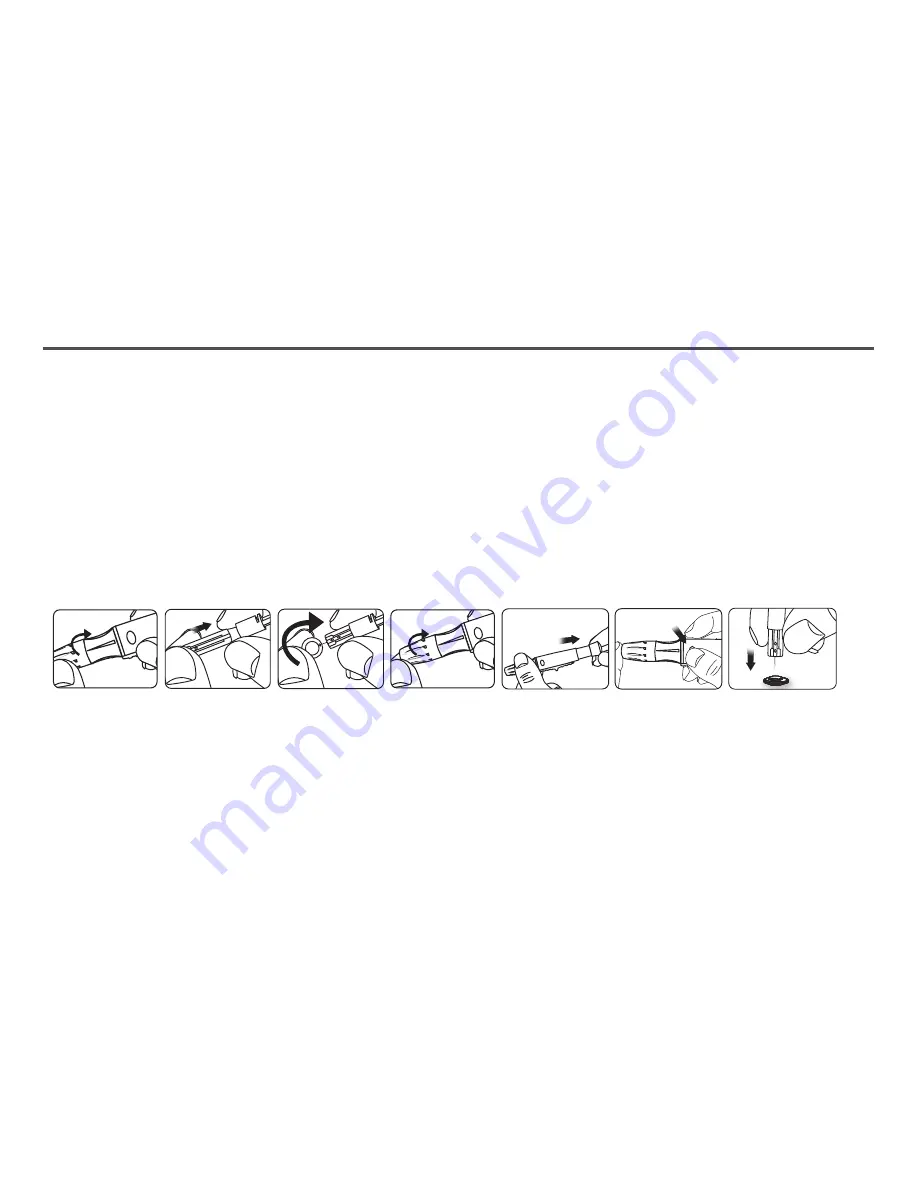
1. Unscrew the lancing device cap (Fig.27).

2. Place a lancet into the lancing device (Fig.28).

3. Twist and pull to remove the protective lancet cover to expose the sterile needle. Save the cap for later use (Fig.29).

4. Screw the lancing device cap back on. Select the skin penetration depth preferred (Fig.30).

5. Pull the barrel back until you hear a 'click' (Fig.31).

6. Place the lancing device against the finger, palm, or forearm. Press the trigger to obtain a blood sample (Fig.32).

To unload the lancing device

1. After sampling, carefully remove the cap containing the used lancet.

2. Push the exposed tip of the lancet into its Protective Cap (Fig.33).

    Slide the Lancet Ejector forward and dispose the used lancet in an appropriate container.

    For further instructions please see the insert provided with the lancing device.

CAUTION:
To reduce chances of infection:

˙

Lancets are for single usage only.

˙

Wash hands thoroughly with soap and water before and after handling the meter, lancing device, and test strips.

˙

Please refer to section "Cleaning and Disinfection Procedure" (refer to P.25) for detail instructions of meter 

    maintenance.

(Fig.27)

(Fig.28)

(Fig.29)

(Fig.30)

(Fig.31)

(Fig.32)

(Fig.33)

13

Summary of Contents for HT100-B

Page 1: ...s experiencing a hyperglycemic hyperosmolar state with or without ketosis For In vitro diagnostic only For over the counter use Alternative site testing should be performed only during steady state wh...

Page 2: ...100 B Blood Glucose Test Strip Setting Up Tyson Bio HT100 B Blood Glucose Meter Installing Replacing Batteries Date Time Setup Reminder Alarms Setup HI LO Alarms Setup Important Information Using Tyso...

Page 3: ...l Solution Results Memory Features View Day Average Results Exiting the Memory Mode Transfer Test Results to a Computer Bluetooth Data Transfer HT100 B Only Cleaning and Disinfection Procedure Care an...

Page 4: ...the quantitative measurement of glucose in fresh capillary whole blood samples drawn from the fingertips forearm or palm Alterative site testing should be performed only during steady state when gluc...

Page 5: ...sinfecting Solution Clorox Bleach Germicidal Wipes Clorox Professional Products Company EPA Reg No 67619 12 Reference FDA Public Health Notification Use of Fingerstick Devices on More than One Person...

Page 6: ...he complete kit contains HT100 B Blood Glucose Meter HT100 B Blood Glucose Test Strip 10 strips HT100 B Control Solution Level 2 Adjustable Automatic Lancing Device 10 Sterile Lancets User Manual Quic...

Page 7: ...o enter buzzer setup To adjust numbers to toggle settings To browse test results and averages in memory 5 Button Press and hold to enter the year date time setting To browse Control Solution test resu...

Page 8: ...N 7 Meal Indicator Icon Pre meal and post meal 8 14 day Average 14 day average result 9 Time Time display 10 Blood Drop Icon Flashes when the meter is ready to accept your blood sample to test 11 Warn...

Page 9: ...ucose Meter Use each strip ONCE ONLY A test strip consists of the following parts 1 Target Area Where a blood drop or control solution to be applied 2 Confirmation Window To confirm sufficient blood s...

Page 10: ...mg dL Level 2 mg dL Level 3 mg dL Tyson Bio HT100 B Blood Glucose Test Strip Test Strip Vial Label Test Strip Vial Blood Glucose Test Strips HT100 B Control Solution Range Store at 39 86 F 4 30 C 10...

Page 11: ...ear will appear and flash Press or to adjust and Press to confirm Fig 5 5 The number of month will appear and flash Press or to adjust and press to confirm Fig 6 6 The numbers of date will appear and...

Page 12: ...s chosen Fig 13 and pressed the number of hour will start flashing Fig 14 Press or to adjust and press to confirm 5 The numbers of minutes will flash Fig 15 Press or to adjust and press to confirm The...

Page 13: ...m Fig 18 The HI alarm value range is 100 400mg dL and the default value is 180mg dL 4 Continue to the LO alarm setting Fig 19 repeat Step 2 and 3 Fig 20 21 to confirm or to change LO alarm setting The...

Page 14: ...ution if the package is damaged Store your test strips and the Control Solutions between 39 F 86 F 4 C 30 C Temperature beyond this range can damage test strips and lead to inaccurate results Any chan...

Page 15: ...the vial 3 Take a test strip from the vial and re cap immediately Fig 23 4 Insert the test strip top side up into the test port Fig 24 The meter will be automatically turned on 5 System checking will...

Page 16: ...o unload the lancing device 1 After sampling carefully remove the cap containing the used lancet 2 Push the exposed tip of the lancet into its Protective Cap Fig 33 Slide the Lancet Ejector forward an...

Page 17: ...The test result will appear on the display in 5 seconds Fig 36 All results will be automatically stored into the meter memory Fig 37 5 The meter will automatically turn off after 2 minutes 6 After co...

Page 18: ...Fig 39 appears on the display it indicates the reading is higher than 600 mg dL If LO Fig 40 appears on the display it indicates the reading is lower than 20 mg dL We suggested the testing procedure...

Page 19: ...poglycemia low blood glucose we recommend that you test on your fingertips There are limitations for doing AST Please consult your healthcare professional before you do AST AST measurements should not...

Page 20: ...op side up contact bar end first into the test port The meter will be automatically turned ON Fig 41 3 A beep will sound and the system checking will appear followed by a flashing icon Fig 42 Performi...

Page 21: ...the above instructions when performing a Control Solution test in order to prevent contamination Fig 45 Fig 44 The Tyson Bio HT100 B Blood Glucose Monitoring System is working properly only if the Con...

Page 22: ...op right corner Fig 47 The most recent memory results will be displayed first 3 You can press or to scroll forwards and backwards 4 Press to exit and view the Control Solution test result Fig 48 5 Whe...

Page 23: ...atus assigned press button and the meter will change to view results in memory View Day Average Results Fig 50 Fig 51 Fig 52 Fig 53 Fig 54 Fig 55 Fig 56 Fig 57 Note 1 The 7 14 30 day average is calcul...

Page 24: ...ter Obtain the required software and cable to be ordered separately For order information please call Customer Service or visit website of www tysonbio com 1 Follow the instructions provided with soft...

Page 25: ...pear and flash on the meter when meter is not connected with a mobile device Fig 60 2 Turn on BLE tool APP with Blood Glucose Test and Bluetooth on your mobile device 3 Click Connect and select the de...

Page 26: ...meter is NOT connected with a mobile device 6 Turn on BLE tool APP with Blood Glucose Test and Bluetooth on your mobile device Note Please skip Step 1 4 if Bluetooth feature is already ON 7 Click Con...

Page 27: ...ed with a mobile device 6 After testing your blood glucose the test result is shown Fig 67 Bluetooth icon is still blinking Note Please skip Step 1 4 if Bluetooth feature is already ON 7 Turn on BLE t...

Page 28: ...o 67619 12 Signs of deterioration Performance The control solution measurements are out of range which is listed on the test strip label Physical Polymer crazing thin silver streaks appear cracking sw...

Page 29: ...allow water or cleaning fluids into the meter test port and data port Disinfection Cleaning solution and disinfecting solution Clorox Bleach Germicidal Wipes Use a new disinfection wipe The meter is...

Page 30: ...eter test strips and the Control Solution to extreme conditions such as high humidity heat freezing cold or dust DO NOT STORE IN DIRECT SUNLIGHT OR AREAS WITH HIGH HUMIDITY AND OR DUST It is advised t...

Page 31: ...setting Display Description Action Test result is HIGHER than 600 mg dL Repeat the test by using a new test strip If the same message displays again the result is confirmed to be higher than the mete...

Page 32: ...rm a test 2 Use control solution to check the meter and test strips 1 Follow the instructions and try again with a new test strip Please contact customer service if the problem persists 2 Follow the i...

Page 33: ...re testing Battery power is depleted for further usage Replace with 2 AAA batteries immediately An error message indicates a problem with the test strip or meter Review the instructions and try again...

Page 34: ...perly Please contact customer service if the problem persists An error message indicates a problem with the test strip Review the instructions and try again with a new test strip Please contact custom...

Page 35: ...than 2 minutes before testing Review the instructions and re insert a test strip correctly LCD display on the meter is blank when trying to perform a test Please contact customer services for assistan...

Page 36: ...erface and Bluetooth Power supply 2 AAA batteries Battery Life Approximately 1000 tests Dimension 106L x 66W x 20H mm Weight 65 g without batteries Specifications Note Please refer to the Test Strip I...

Page 37: ...al Number Manufacturer In vitro diagnostic medical device Consult instructions for use Sufficient for Catalogue number Control Caution Bluetooth logo Transport and store at temperature 4 F 122 F 20 C...

Page 38: ...s of this User Manual provided The Lancing device and Lancets are in conformity with the CFR Tiltle 21 and MDD 93 42 EEC Manufacturer Warranty Tyson Bioresearch Inc offers 3 years guarantee on this pr...

Page 39: ...uency energy and if not installed and used in accordance with the instructions may cause harmful interference to radio communications However there is no guarantee that interference will not occur in...

Page 40: ...ice must accept any interference received including interference that may cause undesired operation of the device FCC RF Radiation Exposure Statement 1 This Transmitter must not be co located or opera...

Page 41: ...Lianfa Medical Plastic Products Co Ltd No 1 Shuangshan Sanjian Road 250200 Zhangqiu City Jinan Shandong PEOPLE S REPUBLIC OF CHINA SteriLance Medical Suzhou Inc No 68 Litanghe Road Xiangcheng Suzhou...

Reviews: