background image

Lexis Light   

 – 


ET1B

 User’s Manual T. Rev. 0512 PM 23 

11. DISPOSAL AND RECYCLING 

‰

  The packing material must be separated to plastic and paper/cardboard 

components and submitted to authorized recycling locations.


‰

 The 

Lexis Light

 device consists of electronic components, 

cables, plastic parts, steel and aluminium frame and adapter parts. Do 

not discard of any components to normal garbage facilities. When 

Lexis

Light

 is no longer operational, it is to be dismantled and 

separated into above material groups and submitted to authorized 

recycling facilities.


12. TECHNICAL DATA 

Speed 

Continuously adjustable, up to  

4

.

8

 mph   

Power Supply 

24 V from Two rechargeable maintenance-
free sealed Lead/acid batteries  
Standard size: 12V – 7.2 Ah 
Jumbo size: 12V-12 Ah 

Charging time 

7 – 10 hours 

Max. admissible slope 

 (10 %) 

Max. negotiable curb  
height  

2” / 5 cm 

Range* Standard pack 4 - 5 Miles

Jumbo pack 6.5 – 

10

 Miles   

Tires 

Flat-free PU 200 x 50 

Dimensions: 

22”X41”X34” / 57 X 104 X 86 cm 

Weights:  
Rear frame 28 Lb / 12.9 Kg 
Front column (without 
battery)  

1

8

 Lb / 8.6 Kg 

Battery Pack  Standard: 14 Lb. / 6.5 Kg 

Jumbo: 20 Lb. / 9.2 Kg. 

Total weight  6

7

 Lb. / 28 Kg 


*The actual range depends on the operation conditions and the load


Summary of Contents for Easy Travel Lexis Light

Page 1: ...Lexis Light USER S MANUAL...

Page 2: ...Lexis Light ET1B User s Manual T Rev 0512 PM 2...

Page 3: ...d Folding Instructions 7 5 Operating your Lexis Light 10 6 Moving and Transporting your Lexis Light 14 7 Helpful Hints for Everyday Use 16 8 General Maintenance and Inspection 17 9 EMI Electromagnetic...

Page 4: ...s Keep the speed at a reduced level until you are comfortable controlling the scooter Follow the safety tips and instructions and you will be comfortable maneuvering through doorways on and off lifts...

Page 5: ...ILS 3 1 Lexis Light parts Figure 1 1 Battery pack detachable 11 Rear wheel 2 Front column detachable 12 Folded frame lock release pin 3 Column lock release triggers 13 Unfolded frame lock release pin...

Page 6: ...Switch 2 Hand control lever right and left 3 Speed adjusting knob 4 Indicator light LED 5 Battery Gauge 6 Hand grips 3 3 Lexis Light Optional Accessories 1 Extra battery pack BELL If the user requires...

Page 7: ...l position Unfolding Front Column Pull the column lock trigger Fig 4 3 upward towards the handle to release the tilt lock Move the drive unit away from the column all the way to open the quick release...

Page 8: ...most position 2 For getting in and out of the Lexis Light seat comfortably the column may be moved away from the seat to the entry exit position 3 For detaching the front column from the rear frame a...

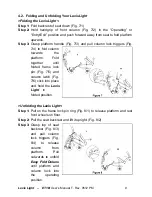
Page 9: ...7 4 to fold column towards the platform Fold together until folded frame lock pin Fig 7 5 and column latch Fig 7 6 click into place and hold the Lexis Light in folded position Unfolding the Lexis Ligh...

Page 10: ...ion The top speed may be adjusted by turning the speed adjusting knob fig 9 3 By turning the knob to the HI position your Lexis Light top speed will be up to 3 7mph 6kph When the knob is set to the LO...

Page 11: ...rol lever does not return by itself to the middle position do not operate Contact your service agent 5 Switch the Lexis Light on again and check the indicator light If it flashes rapidly again switch...

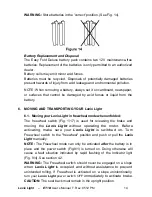
Page 12: ...teries Battery information The Lexis Light is designed to use sealed lead acid maintenance free 12V batteries Always turn your Lexis Light OFF before removing and installing batteries To get the maxim...

Page 13: ...f the batteries 2 Use the charger for charging lead acid batteries only It is not intended to supply power to an extra low voltage electrical system or to charge dry cell batteries 3 Never charge a fr...

Page 14: ...exis Light in freewheel mode when unfolded The freewheel switch Fig 1 17 is used for releasing the brake and moving the Lexis Light without operating the motor Before activating make sure your Lexis L...

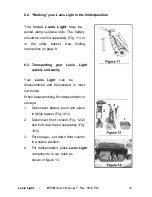
Page 15: ...age 8 6 3 Transporting your Lexis Light quickly and easily Your Lexis Light cian be disassembled and transported in most car trunks When disassembling for transportation or storage 1 Disconnect batter...

Page 16: ...your Lexis Light up a ramp or incline Be aware that not all ramps are constructed according to government standards The government standard for wheelchair ramps is 1 inch 2 5 cm rise per foot 30 cm Lo...

Page 17: ...your authorized dealer Weekly Checks 1 Throttle test Pull the throttle to the full speed position and switch ON the Power switch The Lexis Light should not move and the LED on the panel should flash I...

Page 18: ...tire wear Fuse Replacement Instructions A fuse protects the wiring and battery in the event of a short circuit If your Lexis Light stops abruptly check the fuse If it has blown check for overloads or...

Page 19: ...ergy can be measured in volts per motor V m Each Motorized scooter can resist EMI up to a certain intensity This is called its immunity level The higher the immunity level the greater the protection T...

Page 20: ...commercial broadcast transmitters radio and TV broadcast antenna towers and amateur HAM radios NOTE Other types of hand held devices such as cordless phones laptop computers AM FM radios TV sets CD pl...

Page 21: ...N personal communication devices such an cellular phones while your Lexis Light is turned ON 2 Be aware of nearby transmitters such as radio or TV stations and try to avoid coming close to them 3 If u...

Page 22: ...e motor has a short circuit to a battery connection 4 flashes Freewheel is engaged 5 flashes Not used 6 flashes The controller is being inhibited from driving this may be because the battery charger i...

Page 23: ...rial groups and submitted to authorized recycling facilities 12 TECHNICAL DATA Speed Continuously adjustable up to 4 8 mph Power Supply 24 V from Two rechargeable maintenance free sealed Lead acid bat...

Page 24: ...ged as a result of excessive loading improper handling intentional damage or unauthorized maintenance or modification are not covered by the warranty For safety and for warranty assurance reasons any...

Reviews: