
2
3
ENGLISH
FEATURES:
• Perpetual Calendar Up to Year 2099
• Date and weekday display
• Continuous calendar up to 2099
• Two daily alarms
• Automatic snooze function
• Barometer: Graphic display to show the air
pressure, display either in mb/hPa or inHg, air
pressure trend display
• Weather forecast using five icons: sunny, light
cloud cover, cloudy, rain and stormy
• Temperature alternatively in°C or°F
• Temperature cozy icon display.
• Thermometer:
Indoor measurement ranges: 0°C (32°F) ~
50°C (122°F) (calibration time: 30 seconds),
outdoor measurement ranges: -19.9°C
(-3.8°F) ~ 59.9°C (139.8°F) (calibration time:
30 seconds),
• Hygrometer: Measurement range: 20%-95% .
• Minimum/maximum display for air humidity
and temperature
• Temperature alert
• Radio control time function (Optional)
• LED back light display (auto off after 5
seconds).
• Battery: 2 x AA /LR6 (not Included).
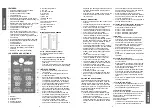
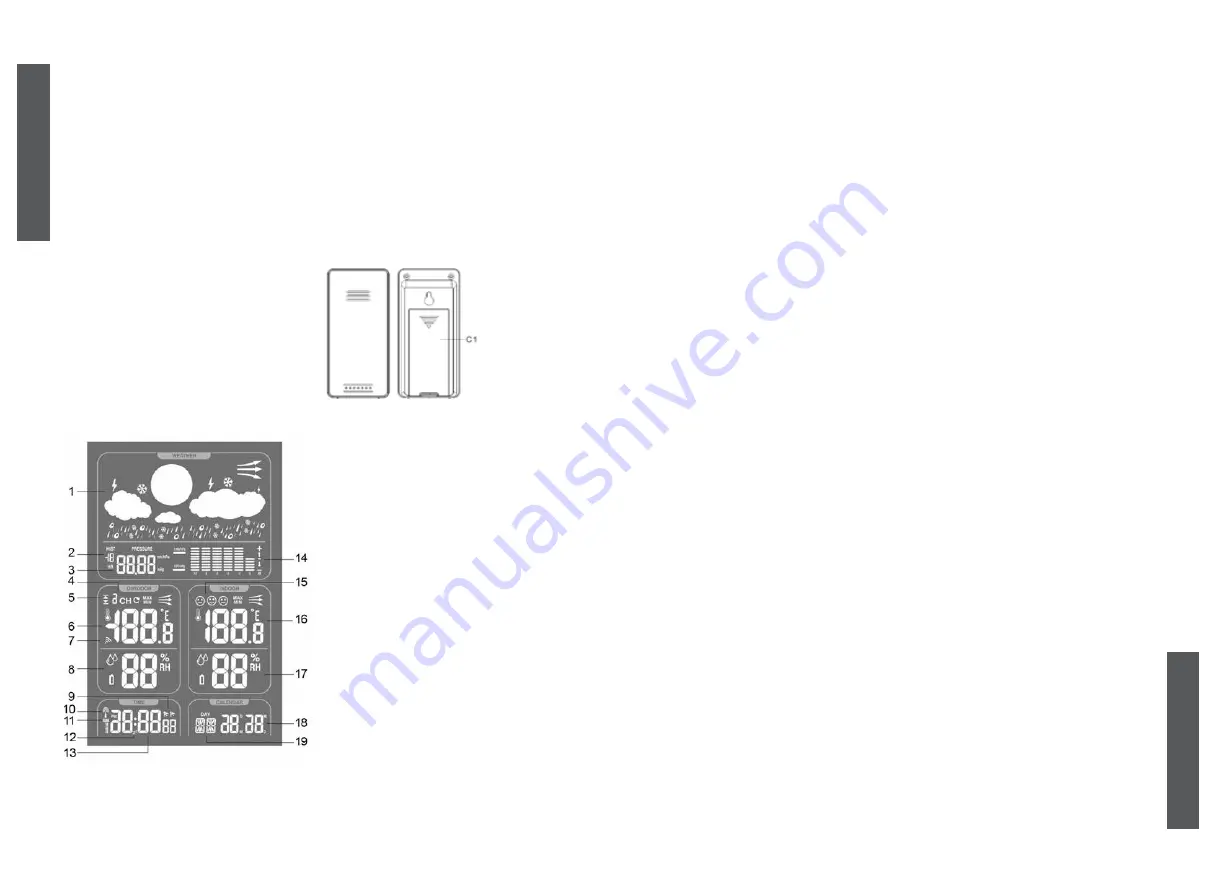
LCD SCREEN AND SETTINGS:
1. Weather
2. Pressure history
3. Pressure
4. Channel selection
5. Temperature alert
6. Outdoor temperature
7. RF icon
8. Outdoor humidity
9. Alarm icon
10. RCC icon
11. DST icon
12. SNOOZE icon
13. Time
14. Pressure trends shown
15. Comfort icon
16. Indoor temperature
17. Indoor humidity
18. Date
19. Week
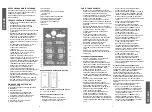
WIRELESS OUTDOOR SENSOR
Part C –Wireless Outdoor Sensor
C1: Wireless Outdoor Sensor battery
compartment
Wireless remote sensor (transmitter)
• Transmitter frequency: 433.92 MHz.
• Range of transmission is up to 60m
(200 feet).
• Insert the 2 AAA batteries in to the transmitter.
Pay attention to observe the correct polarity.
INITIAL OPERATION:
• Obstacles can severely impair the of the
transmission
• Protect the transmitter against any direct
sunlight penetration
• Open the battery compartment on the rear
side of the outdoor remote sensor and insert
the batteries. Pay attention to observe the
correct polarity. Select the °C/°F display by
pushing the button inside the compartment.
Close in the battery compartment
• Open the battery compartment on the rear
side of the receiver and insert the batteries.
Pay attention to observe the correct polarity.
Close the battery compartment.
• When you insert the batteries, all the icon
on the LCD display will briefly light up for 3
seconds, and you will hear a beep tone, and
detect indoor temperature & humidity.
• The receiver will now start to make a
connection to the outdoor remote sensor.
This operation takes about 3 minutes and is
ENGLISH
displayed by a flashing reception RF antenna
symbol in the “OUTDOOR” display area on
the receiver.
• After receiver has created a connection to the
outdoor remote sensor, it will then b enters
the clock mode.
MANUAL TIME SETTING:
• Press and hold down the “SET” button for two
seconds.
• The year display “2012” starts to flash. Now
use “UP” and “DOWN” to set the correct year.
• Press “SET” to confirm your setting.
• The month display starts to flash. Now use
“UP” and “DOWN” to set the correct month
• Press “SET” to confirm your setting.
• The date display starts to flash. Now use
“UP” and “DOWN” to set the correct date.
• Press “SET” to confirm your setting.
• There are 7 languages of Weekday: German,
English, Italian, French, Dutch, Spanish, and
Danish, press “UP” and “DOWN” to select.
• Press “SET” to confirm your setting.
• The time is displayed either in 12 or 24 hour
format. Briefly pressing the “UP” and “DOWN”
button allows you to switch between the
individual modes. The symbol AM (before
midday) or PM (after midday) appears after
the time.
• Press “SET” to confirm your setting.
• The hour display starts to flash. Now use
“UP” and “DOWN” to set the correct hour.
• Press “SET” to confirm your setting.
• The minute display starts to flash. Now use
“UP” and “DOWN” to set the correct minute.
• Press“SET”to confirm your setting.
• The Time zones start to flash, Now use “UP”
and “DOWN” buttons to set a correct time
zone (-12 to +12).
• Press“SET”to confirm your setting.
• The air pressure unit display starts to flash.
Now use “UP” and “DOWN” to set the mb/
hPa or in Hg
SETTING THE DAILY ALARMS:
The weather station possesses has two daily
alarms. To view the set alarm times, press the
“ALARM” button briefly. The display switches
from the clock to Alarm 1 and, if you press the
button again, to Alarm 2. (In eight seconds, the
weather stations automatically return to the
normal time display.)
Proceed as follows to set the daily alarm:
• Press and hold down the “ALARM” button
for two seconds until alarm time 1 and the
flashing icon are displayed.
• Now use the “UP” and “DOWN” buttons to
select the alarm time you require and then
briefly press the “ALARM” button to set this
time.
• The hour display of the alarm time starts to
flash. Use the arrow keys “UP” and “DOWN”
buttons to set the required hour.
• Press “ALARM” to confirm your setting
• The minute display of the alarm time starts to
flash. Use the arrow keys “UP” and “DOWN”
to set the required minute.
• Press “ALARM” to confirm your setting and to
end the setting procedure.
Activation and deactivating the daily alarms:
• To activate or deactivate the daily alarms,
briefly press the “DOWN” button:
Press 1x: Alarm 1 activated
Press 2x: Alarm 2 activated
Press 3x: Both alarms are activated
Press 4x: Both alarms deactivated
Information:
• After eight seconds without a button being
pressed, the clock switches automatically
from setting mode to Normal clock mode.
• The alarm will sound for two minutes if you
do not deactivate it by pressing any button.
In this case, the alarm will be repeated
automatically after 24 hours.
• Rising alarm (length: 2 minutes) changes the
volume four times whilst the alarm signal is
heard.
• Press “SET” or ”ALARM” button to deactivate
the alarm.
Automatic snooze function
• Proceed as follows to activate the automatic
snooze function:
While the alarm is sounding, press touch the
“LIGHT/SNZ” to activate the snooze function.
When the snooze function is active, the “Zz”
symbol appears in the display.
• This operation moves the alarm back by five
minutes and the alarm will restart at this time
• The snooze function can be interrupted by
pressing any button or repeated up to seven
times
• Press “SET” or ”ALARM” button to deactivate
the snooze function.
°C/°F temperature display
• The temperature is displayed either in °C/°F.
Briefly pressing the °C/°F button allows you to
switch between the individual modes.
Temperature trend display
After you insert the batteries, the weather station
measures the current temperature. The trend
display shows a neutral temperature course
(horizontal arrow).
The further course of the trend display is
determined as follows:
• If, after an hour, the temperature is more than
1°C higher than the value measured first,


