4
5
ENGLISH
ENGLISH
then a positive course is displayed (arrow
pointing upwards).
• If, after an hour, the temperature is more than
1°C lower than the value measured first, then
a negative course is displayed (arrow pointing
downwards).
• If the temperature does not change within an
hour, then the upward or downward pointing
arrow becomes a horizontal arrow. The
measured temperature is then taken as the
neutral value from which further prognoses
are made.
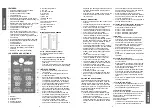
Maximum/Minimum Temperature/Relative
Humidity
• To toggle indoor/outdoor maximum, minimum
temperature and humidity data, press the
“MEM” button:
Once to show the maximum temperature and
humidity values.
Twice to sow the minimum temperature and
humidity values
Three times to return to the current
temperature and humidity levels
• To reset the maximum and minimum
temperature and humidity, press and hold
down the “MEM” button about 2 seconds.
This will reset all minimum and maximum
data recorded to the current displayed values.
F.Y.I.:
• If the temperature reading is below ranges,
the LL.L will be displayed. If the temperature
reading is above ranges, the HH.H will be
displayed.
Relative air pressure trend display
After you insert the batteries, the weather station
measures the current relative air pressure.
The trend display shows a neutral relative air
pressure course (horizontal arrow).
The further course of the trend display is
determined as follows:
• If, after an hour, the relative air pressure
is more than 2hPa higher than the value
measured first, then a positive course is
displayed (arrow pointing upwards).
• If, after an hour, the relative air pressure
is more than 2hPa lower than the value
measured first, then a negative course is
displayed (arrow pointing downwards).
• If the relative air pressure does not change
within an hour, then the upward or downward
pointing arrow becomes a horizontal arrow.
The measured relative air pressure is then
taken as the neutral value form which further
prognoses made.
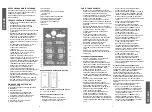
Temperature alert setting
• Press and hold down the ”ALERT” button for
2 seconds until the icon for the Temperature
Alert” starts to flash
• The icon of Upper limit of the Temperature
alarm starts to flash. Use the “UP” and
“DOWN” buttons to set the required
maximum temperature. Press ”ALERT” to
confirm your setting.
• The icon of the Lower limit of the Temperature
alarm starts to flash. Use the “UP” and
“DOWN” buttons to set the required minimum
temperature. Press ”ALERT” button to
confirm your setting and to end the setting
procedure
• When Temperature Alert is On alert : the
temperature alarm starts to flash. there are
3 beep sounds per second, the alarm will
sound for 1 minutes if you do not deactivate it
by pressing any button.
• Activate and deactivating the temperature
Alert: Briefly press ”ALERT” button to activate
or deactivate the temperature alert.
Radio connection to outdoor sensor:
Insert the 2 batteries in to the transmitter, Pay
attention to observe the correct polarity. One
sensor is suplied with your receiver. By default ,
this sensor is the channel 1, Select the channel
2 or 3 thanks to the “CH” knobs at the back of
the sensor.
• Press the “CH” button to select a channel (1
to 3). This gives you the option of polling 3
outdoor sensors with 1 weather station.
• Press and hold down the “CH” button for 2
seconds to search for outdoor sensors (to
erase the current data inside the RC clock).
Relative air pressure history
The relative air pressure history can be displayed
numerically to vie the air pressure changes over
the last 0-12 hours.
Press the “SET/HISTORY” button to display
the recorded air pressure changes during the
last 0-12 full hours. The numeric recorded air
pressure will be display according to the hour.
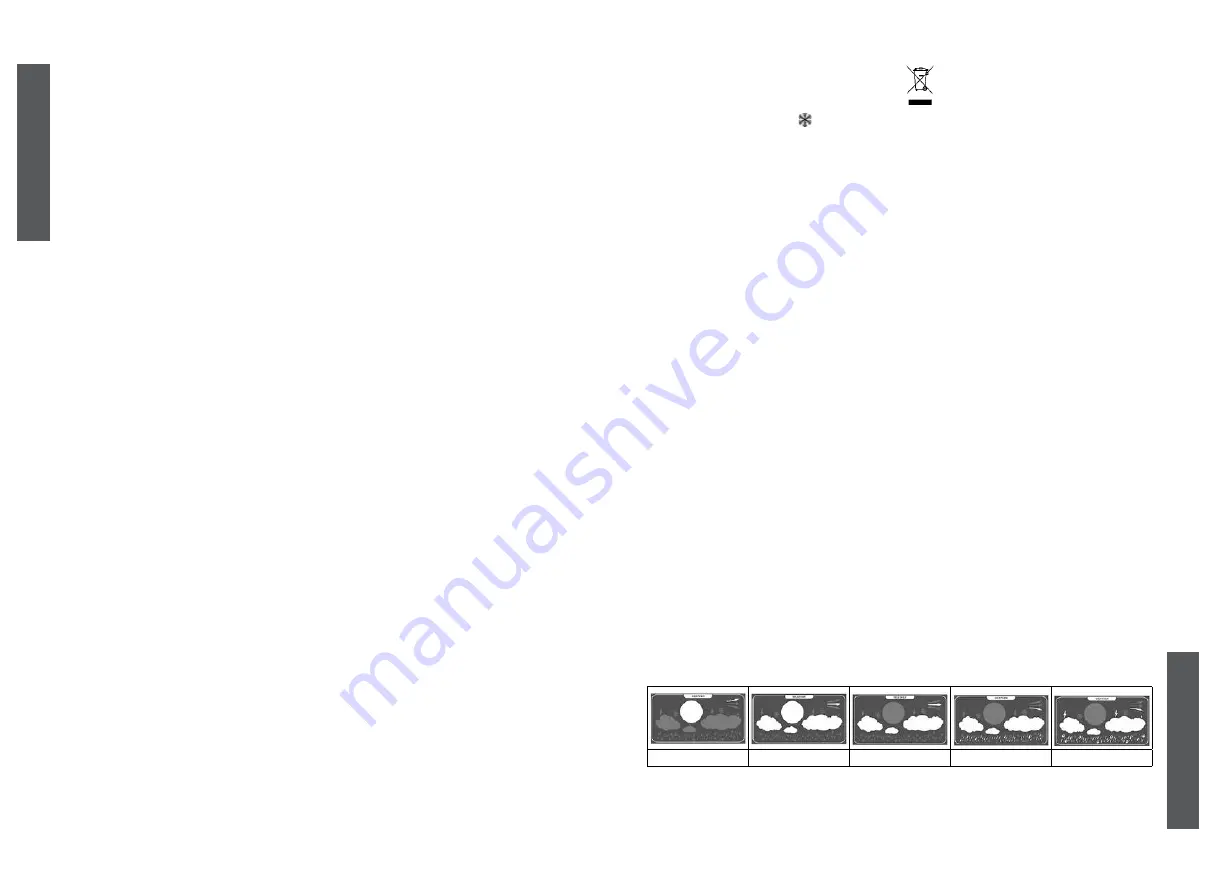
Weather forecast
• The weather stations use the air pressure
data of the last twelve hours to create a
weather forecast for the next 12 to 24 hours.
• If must be taken into account that the data
within the first twelve hours after inserting the
batteries will not be correct, as the weather
station has to get used to the environmental
circumstances after the restart.
• The forecast can be given for a radius of up
to 12-20km.
• When forecasting the weather, the station
uses 5 icons: sunny, light cloud cover, cloudy,
rain and stormy.
• If temperature recorded falls between 4°C
(39.2°F), LCD display the “ “ indicator. it will
stop display once the temperature is out of
this range.
please see table
Set channel
Press “CH” button to toggle between the
outdoor transmitters 1, 2 and 3 (if more than one
transmitter is used).
Backlight:
Briefly touch the “SNOOZE/LIGHT” to activate
the display lighting for 5 seconds.
Storage
It is recommended to store in a covered and dry
place at an ambient temperature not higher than
+ 40°C with relative humidity above 70% and the
absence in the environment of dust, acid and
other vapours.
Transportation
To the device special transportation rules are
not applied. When transporting the unit, use the
original packaging. During transportation, avoid
drops, impacts and other mechanical influences
on the device, as well as direct exposure to
atmospheric precipitation and aggressive
environments.
Unit operating life is 3 years
Environment friendly disposal
You can help protect the environment!
Please remember to respect the local
regulations: hand in the non-working
electrical equipments to an appropriate waste
disposal center.
SAFTEY GUARDS
Before using the appliance, read this instruction
manual carefully and save it for use as a
reference material.
Use the device only for its intended purpose, as
described in this manual. Incorrect handling of
the device can lead to its failure, causing harm to
the user or his property.
• Do not subject the unit to shock, dust or
moisture.
• Do not allow liquid or foreign objects to enter
the cabinet
• Do not place the device near sources of heat,
exposed to direct sunlight
• Install the unit on a flat, stable surface in
places with adequate ventilation. Do not block
any ventilation openings.
• Do not repair the device yourself, contact an
authorized service center
• This device is not intended for use by children
or persons with disabilities
If there is a DC power adapter, DC:
• Check the integrity of the power cord and
plug for connection
• Only plug the power adapter into a 220V
network
• Do not touch the cord, plug, adapter housing
with wet or wet hands
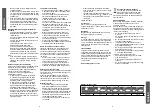
Weather forecast
(table)
lightly cloudy
sunny
cloudy
rainy
rainstorm