SETTING THE TIMER
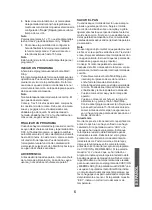
The timer function enables delayed baking. Using
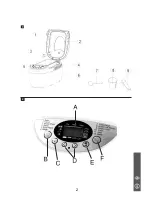
the arrow keys< and >, set the desired end time
for the baking operation. Select a program. The
display indicates the required baking time. Using
the arrow key < and > you can change the end
time of baking operation in steps of 10 minutes to
a later point of time. Keep the arrow key pressed to
carry out this function faster. The display shows the
total duration of baking time and the delayed time.
If you overshoot while changing the time, you can
correct it using the arrow key < and >. Confirm the
timer setting by means of the Start/Stop button. The
colon on the display flashes and the programmed
time starts to run. When the baking process has
been completed, ten acoustic signals are issued
and the display indicates 0:00.
Example:
It is 8 a.m. and you would like fresh bread in 7
hours 15 minutes at 3.15 p.m. First select program
1, then press the timer button until 7:15 appears on
the display, as the time until the bread is finished
is 7 hours 15 minutes. Note that the Timer function
may not be available in jam program.
Note
Do not use the timer function when working with
quickly spoiling ingredients such as eggs, milk,
cream or cheese.
BEFORE BAKING
For a successful baking process, please consider
the following factors:
INGREDIENTS
• Take the baking mould out of the housing,
before putting in the ingredients.
If ingredients reach the baking area, a fire may
be caused by them heating up on the heating
elements.
• Always put the ingredients in the stated order
into the baking mould.
• All ingredients should have room temperature to
maintain an optimal rising result of the yeast.
• Measure the ingredients precisely. Even
negligible deviations from the quantities
specified in the recipe may affect the baking
results.
Note
Never use larger quantities than those specified.
Too much dough can rise out of the baking mould
and drop onto the hot heating elements, causing a
fire. Max. 800g flour and 6g yeast!
BAKING BREAD
PREPARATION
Observe the safety instructions in this manual.
Place the bread machine on an even and firm base.
1. Pull the baking mould upward out of the
appliance.
2.
Push the kneading paddles onto the drive shafts
in the baking mould. Make sure they are firmly
in place.
3. Put the ingredients for your recipe in the stated
order into the baking mould. First add the
liquids, sugar and salt, then the flour, adding the
yeast as the last ingredient.
Note: Make certain that yeast does not come into
contact with salt or liquids.
The maximum quantities of the flour and yeast
which may be used refer to the recipe.
4. Place the baking mould back in the appliance.
Make sure that it is positioned properly.
5. Close the appliance lid.
6. Plug the power plug into the socket. An acoustic
signal sounds and the display indicates the
program number and the duration of the normal
program 1.
7. Select your program with the menu button. Each
input is confirmed by an acoustic signal.
8. Select the color of your bread. The marking on
the display shows whether you have chosen
light, medium or dark. You can also select the
setting
„Rapid“ to shorten the baking time.
Note
For programs 6,7,11, the functions
„browning
degree“ and „Rapid“ are not available.
9. You now have the possibility of setting the finish
time of your program via the timer function. You
can enter a maximum delay of up to 15 hours.
Note
This delayed function is not available for
program11.
STARTING A PROGRAM
Now start the program using the Start/Stop button.
The program will automatically run various
operations. You can watch the program sequence
via the window of your bread baking machine.
Occasionally, condensation may occur during
baking in the window. The appliance lid can be
opened during kneading.
Note
Do not open the appliance lid during baking. The
bread can collapse.
Tip: After 5 minutes of kneading, check the
consistency of the dough. It should be a soft, sticky
lump. If it is too dry, add some liquid to it. If it is too
moist, add some flour (1/2 to 1 teaspoon one or
more times, as needed).
ENDING A PROGRAM
When the baking process has been completed,
ten acoustic signals are issued and the display
indicates 0:00. At the end of the program the
appliance automatically changes to a warming
mode for up to 60 minutes. In this mode, warm air
E
NGLIS
H
11
Summary of Contents for FA-5152-4
Page 2: ...2 1 2...
Page 19: ......

