background image

02/2005

5

www.U-LineService.com

29R Refrigerator

Reversing the Door

All units may be left- or right-hand opening.

Note: 

The grille should not yet be installed. If it has been 

installed, remove it for door reversing. See 

Page


9

.

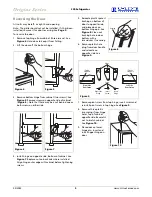
To reverse the door:

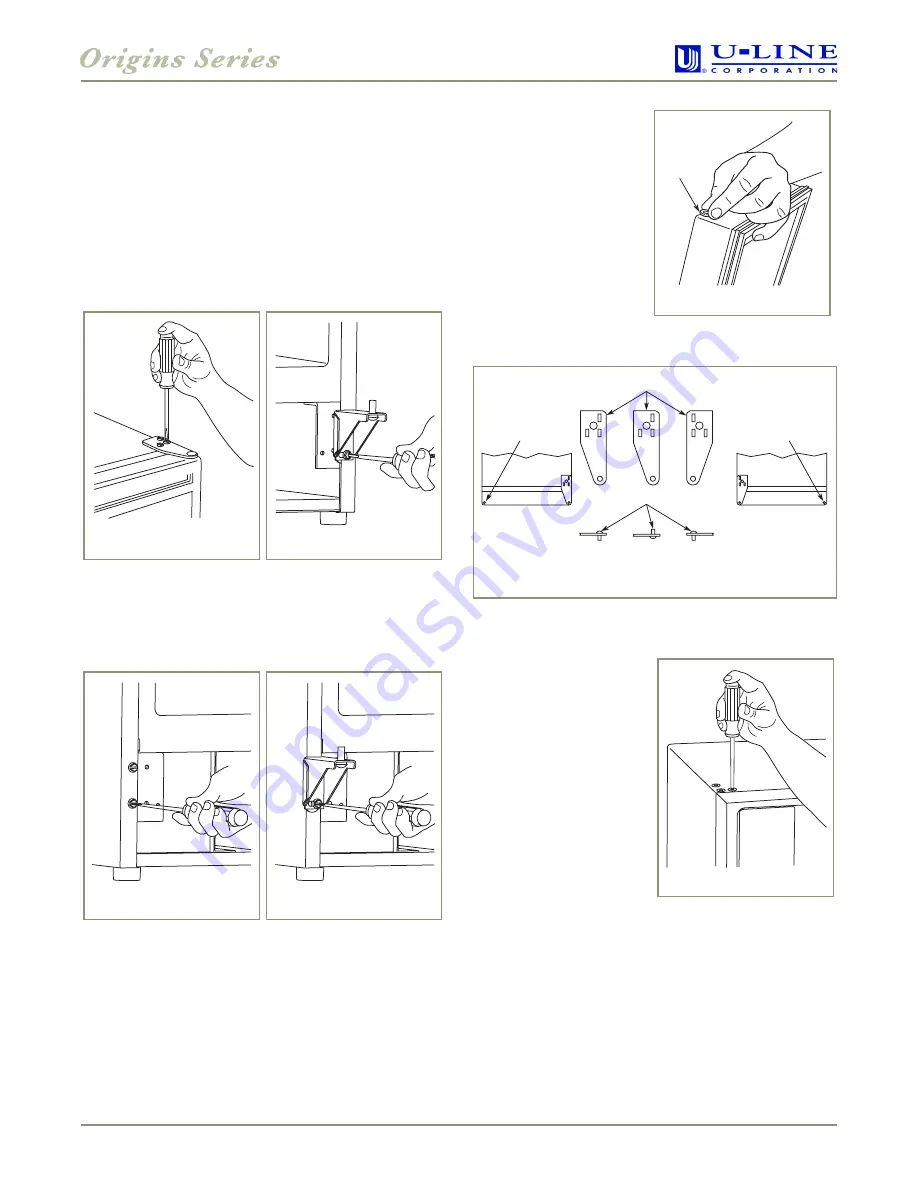
1. Remove top hinge from cabinet (three screws). See 

Figure 4

. Hold door to keep it from falling.

2. Lift the door off the bottom hinge.

3. Remove bottom hinge from cabinet (two screws). See 

Figure 5

. Remove screws on opposite side of cabinet 

(

Figure 6

). Note that there may be a nut behind one or 

both screws on either side. 

4. Install hinge on opposite side, bottom of cabinet. See 

Figure 7

. Replace nut on back side where installed. 

Align hinge outer edge with cabinet before tightening 
screws.

5. Relocate plastic spacer/

bushing on bottom of 
door to opposite side, 
and place door on 
bottom hinge pin. See 

Figure 8

. Clean out 

bushing hole in door 
bottom with a 
screwdriver if necessary.

6. Remove plastic hole 

plug from door handle 
and relocate on 
opposite side. See 

Figure 9

.

7. Remove pivot screw from top hinge, invert screw and 

reinstall pivot screw in top hinge. See 

Figure 9

.

8. Remove three plastic 

screw plugs from hinge 
holes, top of cabinet, 
opposite side. Be careful 
not to scratch cabinet. 
See 

Figure 10

.

9. Place door on lower 

hinge pin. Invert and 
install upper hinge on 
door.

Figure 4

Figure 5

Figure 6

Figure 7

Bushing

Figure 8

Plastic

Plug Hole

Plastic

Plug Hole

Hinge

Screw

Right Side

Door Swing

Right Side

Hinge

Invert

Screw

Invert
Hinge

Left Side

Door Swing

Figure 9

Figure 10

Summary of Contents for 29R

Page 1: ...LineService com Phone 414 354 0300 FAX 414 354 7905 Service Parts Tech Lines Phone 800 779 2547 FAX 414 354 5696 OnlineService U Line com 2005 U Line Corporation 02 2005 29R Refrigerator Installation...

Page 2: ...re attempting to install or operate the unit This unit requires connection to a grounded three prong polarized receptacle that has been placed by a qualified electrician in accordance with applicable...

Page 3: ...nd a Product Registration Card Complete and mail the Product Registration Card or register online at www U LineService com Once your unit is installed keep the User Manual and this Installation Guide...

Page 4: ...stallations The unit is 23 deep including the door and handle see Figure 2 Note It is recommended that the unit is level Product Dimensions Door Swing Clearances Information Units have a zero clearanc...

Page 5: ...talled Align hinge outer edge with cabinet before tightening screws 5 Relocate plastic spacer bushing on bottom of door to opposite side and place door on bottom hinge pin See Figure 8 Clean out bushi...

Page 6: ...with or accent the surrounding decor If this treatment is not included in this installation go on to 5 Adjust Door Custom 1 4 Thick Door Panel Insert Door Panel Preparation A custom door panel can be...

Page 7: ...or Alignment The unit s door is aligned at the factory before shipment However its alignment could have been disturbed during shipment or during door panel installation IMPORTANT Properly aligned the...

Page 8: ...t recommended for your unit because a GFCI could be prone to nuisance tripping However be sure to consult your local codes See Figure 16 for recommended receptacle location WARNING SHOCK HAZARD Electr...

Page 9: ...the grille itself It is located toward the top of the middle recessed section of the grille 4 Place the two hook hinges located on the rear bottom side of the grille onto the front lip of the unit ba...

Page 10: ...this time For information about Adjusting the Temperature Control see the User Manual Start Up Troubleshooting Problem Q Unit does not appear to turn on when plugged in Solution A Make sure outlet ha...

Reviews: