background image

USER GUIDE

Drawers 2

u-line.com

SAFETY •

INSTALLATION & INTEGRATION

 • OPERATING INSTRUCTIONS • MAINTENANCE • SERVICE

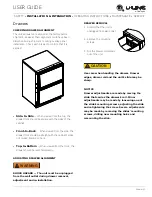
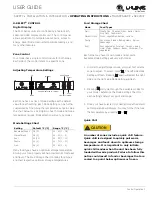
SIDE-TO-SIDE ADJUSTMENT

The drawer will need a Side-
to-Side Adjustment if, when 
viewed from the top, the 
drawer front is not square with 
the sides of the cabinet. This 
is caused by one of the slides 
being mounted too far forward 
on the unit’s liner.

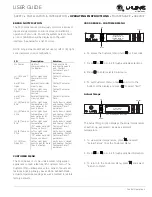
Minor Adjustment:

Note: 

The mounting holes on 

the slide are slightly larger 
than the screws’ diameter. 

1. Loosen the slide’s 

mounting screws.

2. Push the slide backward.

3. Retighten the screws. 

Severe Adjustment:

Note: 

 The slides have extra 

mounting holes that may be 
used.

1. Remove the slide’s 

mounting screws.

2. Reposition the slide so it 

is the same distance 
from the front of the liner as the other slide. Measure 
to confirm.

3. Mark new drilling holes using different sets of mounting 

holes on the slide.

Note: 

Front location holes are shown. Corresponding rear 

holes will also need to be marked. 

4. Drill all the new holes with a #30 drill bit.

5. Remount the slide.

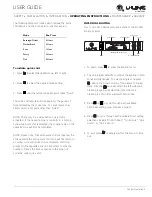
FRONT-TO-BACK ADJUSTMENT

The drawer will need a Front-
to-Back Adjustment if, when 
viewed from the side, the 
drawer front is cocked 
forward or back. This is 
caused by the front slide 
mountings not being level 
with the rear slide mountings.

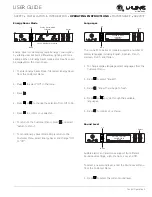
Minor Adjustment:

Note: 

The mounting holes on 

the slide are slightly larger 
than the screws’ diameter. 

1. Loosen one slide’s 

mounting screws.

2. Level the slide.

3. Retighten the screws.

4. Repeat procedure for the other slide.

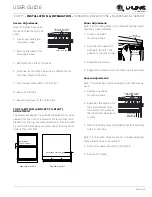
Top View of Unit

Not Aligned Side-to-Side

Push Slide

Backward

Loosen

Mounting Screws

Mark and Drill New

Mounting Holes

Push Slide

Backward

Not Aligned Front-to-Back

Side View of Unit

Screws Should

Be Loose

Level the Slide

Summary of Contents for 3060DWR

Page 1: ...SER GUIDE SERVICE MANUAL SAFETY INSTALLATION INTEGRATION OPERATING INSTRUCTIONS MAINTENANCE SERVICE Modular 3000 Series 3060DWR 60 cm Drawer Model RIGHT PRODUCT RIGHT PLACE RIGHT TEMPERATURE SINCE 196...

Page 2: ...ons Integrated Grille Plinth Dimensions Integrated Panel Installation Grille Plinth Installation Drawers Operating Instructions First Use Control Operation Sabbath Mode Airflow and Product Loading Mai...

Page 3: ...ave the opportunity to ship to you PRODUCT INFORMATION Looking for additional information on your product User Guides Spec Sheets CAD Drawings Compliance Documentation and Product Warranty information...

Page 4: ...oughout this guide This appliance is not intended for use by persons including children with reduced physical sensory or mental capabilities or lack of experience or knowledge unless they have been gi...

Page 5: ...ever install or operate the unit behind closed doors Be sure front grille plinth strip base fascia is free of obstruction Obstructing free airflow can cause the unit to malfunction and will void the w...

Page 6: ...freezer take off the doors and leave shelves in place so children may not easily climb inside If the unit is being removed from service for disposal check and obey all federal state and local regulati...

Page 7: ...F 10 C and 90 F 32 C Higher ambient temperatures may reduce the unit s ability to reach low temperatures and or reduce ice production on applicable models For best performance keep the unit out of di...

Page 8: ...g area dry If the detachable type electric supply cord is damaged it must be replaced by an equivalent cord available from the manufacturer or its service agent NOTICE Electrical installation must obs...

Page 9: ...pening must be square and plumb front to back Although not required you may choose to increase the overall cutout width for ease of installation The Modular 3000 Series units are engineered with a var...

Page 10: ...line com SAFETY INSTALLATION INTEGRATION OPERATING INSTRUCTIONS MAINTENANCE SERVICE Product Dimensions 23 1 4 591 mm 33 11 16 to 34 11 16 856 mm to 881 mm 23 5 8 600 mm Includes 3 4 20 mm integrated...

Page 11: ...m drill bit drill 3 pilot holes 5 8 16 mm deep into bottom of counter top Use the anti tip bracket as a template 4 Install 3 8x5 8 screws into the plate using a 2 Phillips head screwdriver SIDE MOUNT...

Page 12: ...ar height of 1 8 3 mm less than the opening s rear height Shorten the unit height in the front by adjusting the front legs This allows the unit to be gently tipped into the opening Adjust the front le...

Page 13: ...e the same for standard integrated panels and handleless integrated panels NOTICE Each drawer panel must not weigh more than 20 lbs 10 kg It is important to ensure that all drilled holes are drilled t...

Page 14: ...ferences in cabinetry may not align perfectly with the drawer The appliance will need up to 34 1 2 876 mm to the underside of the counter to leave room for leveling adjustments Each drawer panel with...

Page 15: ...TRUCTIONS MAINTENANCE SERVICE Handleless Integrated Panel Dimensions 3 4 20 mm 13 13 16 351 mm R 5 8 R 16 mm 1 8 3 mm 1 4 6 mm Wooden Insert Notch Depth 1 8 3 mm 2 3 8 60 mm 7 8 22 mm Ref Top Detail I...

Page 16: ...ck grille application 1 Cut the panels to the dimensions listed in the appropriate diagram on the next page 2 Optional Stain or finish panel to desired stain or color Be sure to closely follow the ins...

Page 17: ...rated Panel Integrated Panel Integrated Frame Front Side Front Side 3 5 16 89 mm to 4 5 16 114 mm Floor Cabinet 3 5 16 89 mm 3 5 16 89 mm to 1 25 mm U Line Unit Extended Integrated Panel Extended Inte...

Page 18: ...LAT SURFACE TO MOUNT OVERLAY PANEL FLAT AND WITHOUT INTERFERENCE 23 1 2 595 mm 3 4 20 mm Integrated Panel 14 15 16 379 mm BACK SURFACE MUST HAVE AMPLE FLAT SURFACE TO MOUNT OVERLAY PANEL FLAT AND WITH...

Page 19: ...r stain your grille plinth strip base fascia panel to match your surrounding furniture Finish front back and edges to prevent warping Carefully follow the manufacturer s recommendations for finish app...

Page 20: ...not damage panel finish upon removal 4 Using a 7 64 3 mm drill bit drill 6 pilot holes into the wood panel 1 2 12 mm deep using the holes in the drawer frame as a guide NOTICE It is important to ensur...

Page 21: ...th strip base fascia rail with screw heads in base of unit 2 Push grille plinth strip base fascia rails towards the center of the unit and set rails over screw head 3 Slide grille plinth strip base fa...

Page 22: ...m When viewed from the front the drawer should be level horizontally ADJUSTING DRAWER ALIGNMENT WARNING SHOCK HAZARD The unit must be unplugged from the wall outlet during drawer removal adjustment an...

Page 23: ...other slide Measure to confirm 3 Mark new drilling holes using different sets of mounting holes on the slide Note Front location holes are shown Corresponding rear holes will also need to be marked 4...

Page 24: ...stment Note The mounting holes on the slide are slightly larger than the screws diameter 1 Loosen one slide s mounting screws 2 Push the slide upward or downward to match the position of the other sli...

Page 25: ...RATION OPERATING INSTRUCTIONS MAINTENANCE SERVICE RE INSTALLATION OF DRAWER CAUTION Use care when handling the drawer Drawer edges drawer rail and the unit s slide may be sharp 1 Set the drawer s rail...

Page 26: ...commends allowing the unit to run overnight before loading with product When plugged in the unit will begin operating under the factory default setting Follow the on screen prompt for language selecti...

Page 27: ...Press to select zone Press to select mode Press to set temperature Press to confirm temperature or wait 5 seconds Adjust lighting Press to adjust lighting Press to select zone Press to set low medium...

Page 28: ...st select a zone to adjust To select press The left side Mode Setting will flash Pressing again will select the right side and the right side Mode Setting will flash 2 Pressing will cycle through the...

Page 29: ...te If storing product in the opposite zone it is important to limit the number of times the door is opened in the zone not currently under quick chill INTERIOR LIGHTING Your U Line 3000 Series unit us...

Page 30: ...vailable information 3 To return to the Customer Menu press and select Return to Menu ID Description Solution No Comm Unit lost communication to the display Disconnect and reconnect power to unit Cont...

Page 31: ...return to the Customer Menu select Energy Saver and change On to Off Languages The U Line 3000 Series of models supports a number of display languages including English Spanish French German Dutch an...

Page 32: ...ttings to their factory default To access Factory Default 1 Press to select Factory Default 2 Press To restore settings to their factory default 3 Press to select Restore and press 4 Restore will chan...

Page 33: ...l still maintain internal temperatures and set points To enable Sabbath Mode 1 Open the unit s door to activate the display 2 To access the Customer Menu hold for 5 seconds 3 Press or to scroll throug...

Page 34: ...o perform at its highest efficiency Do not block the front grille or the unit will not perform as expected Do not install the unit behind a door When loading your unit leave space between the evaporat...

Page 35: ...Scotchbrite will cause the graining in the stainless steel to become blurred Rust not cleaned up promptly can penetrate the surface of the stainless steel and complete removal of the rust may not be p...

Page 36: ...he drain pan and possibly damaging water sensitive flooring the unit must be removed from cabinetry To defrost 1 Disconnect power to the unit 2 Remove all products from the interior 3 Prop the door in...

Page 37: ...hen necessary Depending on environmental conditions more or less frequent cleaning may be necessary WARNING Disconnect electric current to the unit before cleaning the condenser NOTICE DO NOT use any...

Page 38: ...it is returned to service 3 If ice is on the evaporator allow ice to thaw naturally 4 Clean and dry the interior of the unit Ensure all water has been removed from the unit 5 The door must remain open...

Page 39: ...dency to reflect normal appliance operating noises Listed below are common refrigeration components with a brief description of the normal operating sounds they make NOTE Your product may not contain...

Page 40: ...setting Ambient temperature where installed Installation in direct sunlight or near a heat source The number of door drawer openings and the time the door drawer is open The time the internal light i...

Page 41: ...ranty arising by operation of law U Line will not be responsible for any consequential or incidental damages arising from the breach of these warranties or any other warranty whether express implied o...

Page 42: ...ELLOW EVAP VALVE EVAP VALVE 1 10 CONTROL BOARD L T ZONE TEMP 9 1 L T EVAP L T DOOR SWITCH AMBIENT R B DOOR SWITCH FUSE 6 1 10 5 R B LIGHT L T LIGHT COND FAN L T EVAP FAN R B EVAP FAN R B ZONE TEMP R B...

Page 43: ...ment of a part the servicer is authorized to replace the part in question The part that caused the damage must be returned to U Line in its entirety The part must be clearly labeled with the serial nu...

Page 44: ...dashes 12 represents the production month In most cases warranty status can be verified by the production date information within the serial number Alternatively a Proof of Purchase or equivalent may...

Page 45: ...rts will be shipped at no charge after U Line confirms warranty status Please provide the model serial number part number and part description Some parts will require color or voltage information If U...

Page 46: ...ge Lower than normal Warm near room temperature Hot Warm Warm Extremely cold near inlet Outlet below room temperature Lower than normal Partial Restriction Somewhat lower than normal vacuum Warm near...

Page 47: ...grounded to an electrical ground or grounded water pipe Handle circuit boards carefully and avoid touching components To measure the start winding resistance measure across the C and S pins To measur...

Page 48: ...on of temperature and thermistor performance can be identified by directly viewing actual temperature readings in the service mode Component failure issues can be identified through service mode menu...

Page 49: ...Section Control set too cold Refer to Adjusting Temperature Settings Section Review logged error codes Refer to Fault System Diagnosis Guide Thermistor failure Refer to Thermistor Failure Section Fro...

Page 50: ...y could force the compressor into overload The compressor will automatically deactivate during an overload and will remain deactivated until the overload switch cools This could take some time It is i...

Page 51: ...is responsible for circulating warm air from the refrigeration zone past the evaporator and back into the refrigerated zone The evaporator fan is factory set to have a 1 minute delay at the beginning...

Page 52: ...points or damage Replace if necessary Inspect wire harness from main control board for pinch points or damage Repair split or pinched cabling Amb Thrm Short Inspect thermistor cable for pinch points...

Page 53: ...evaporator thermistor fails the unit will rely on a preset defrost time during defrost cycles The unit will otherwise operate normally Evaporator thermistor errors will be displayed in the error log...

Page 54: ...S FRQGHQVHU IDQV DQG OLJKWLQJ R Oow med high OFFSETS ARE USED TO ADJUST OR CORRECT THERMISTOR READINGS CORRECTED VALUES MAY BE VIEWED THROUGH THE CUSTOMER MENU SELF TEST IS USED TO DIAGNOSE THE BOARD...

Page 55: ...Left Zone thermistor circuit short R Zone T Short Right Zone thermistor circuit short L Evap T Short Left Evaporator thermistor circuit short R Evap T Short Right Evaporator thermistor circuit short A...

Page 56: ...ough available information To exit the Relay Status simply press to exit Relay Toggle Relay toggle is used to manually switch the state of each relay to test for proper operation In addition to the AC...

Page 57: ...s to select Outputs 2 Press 3 Press and to scroll through available information To exit the Input Status menu press to select Return to Menu and press to confirm Offsets NOTICE Do not make an adjustme...

Page 58: ...trol board is functioning properly The main control board is extremely robust and should rarely require service Most issues are external to the control Reference troubleshooting for more information T...

Page 59: ...ings To exit the MULL menu press to select Return to Menu and press to confirm Factory Default Factory Default will restore all settings to their factory default To access Factory Default 1 Press to s...

Page 60: ...uring and should always be OFF 1 Press to select Factory Wi Fi 2 Press 3 Press or select OFF To exit the Factory Wi Fi menu press to select Return to Menu and press to confirm outputs Set Points The S...

Page 61: ...an Delay 1 Press to select Fan Delay 2 Press To change fan delay 3 Press to select either Fan Delay On or Fan Delay Off and press The chosen option will begin to flash 4 Press or to change settings 5...

Page 62: ...e section This unit has five thermistors Thermistor one Zone Located along the right hand side wall in the top left compartment It is used to maintain the operating temperature within that zone Thermi...

Page 63: ...e normally Refer to defrost section Ambient Thermistor If the thermistor fails the unit will operate normally Thermistor Resistance Data Temp F Temp C Nominal Resistance OHMS 40 40 169157 31 35 121795...

Page 64: ...F C 1224 RF 12 45 15 9 1215 1224 2218 2245 2224 2260 WC ZWC 12 45 45 7 1215 1224 2218 2245 2224 2260 R RSOD RDC BEV DC DWR RGL 12 45 42 6 CO29 F 12 18 n a CO1224 F 12 18 45 7 1224FZR Freezer Mode 6 4...

Page 65: ...cooling cycle or if not currently cooling the fan will run for 1 minute to circulate air and clear any condensation that may have appeared on glass doors and shelves Note If the unit is set to sabbath...

Page 66: ...nd replace fan Take special care to properly route fan wire NOTICE Fan must be oriented to pull air in through lower evaporator plate vents and push air out at fan mounting location 14 Installation is...

Reviews: