background image

ADA24

9

ADA SERIES

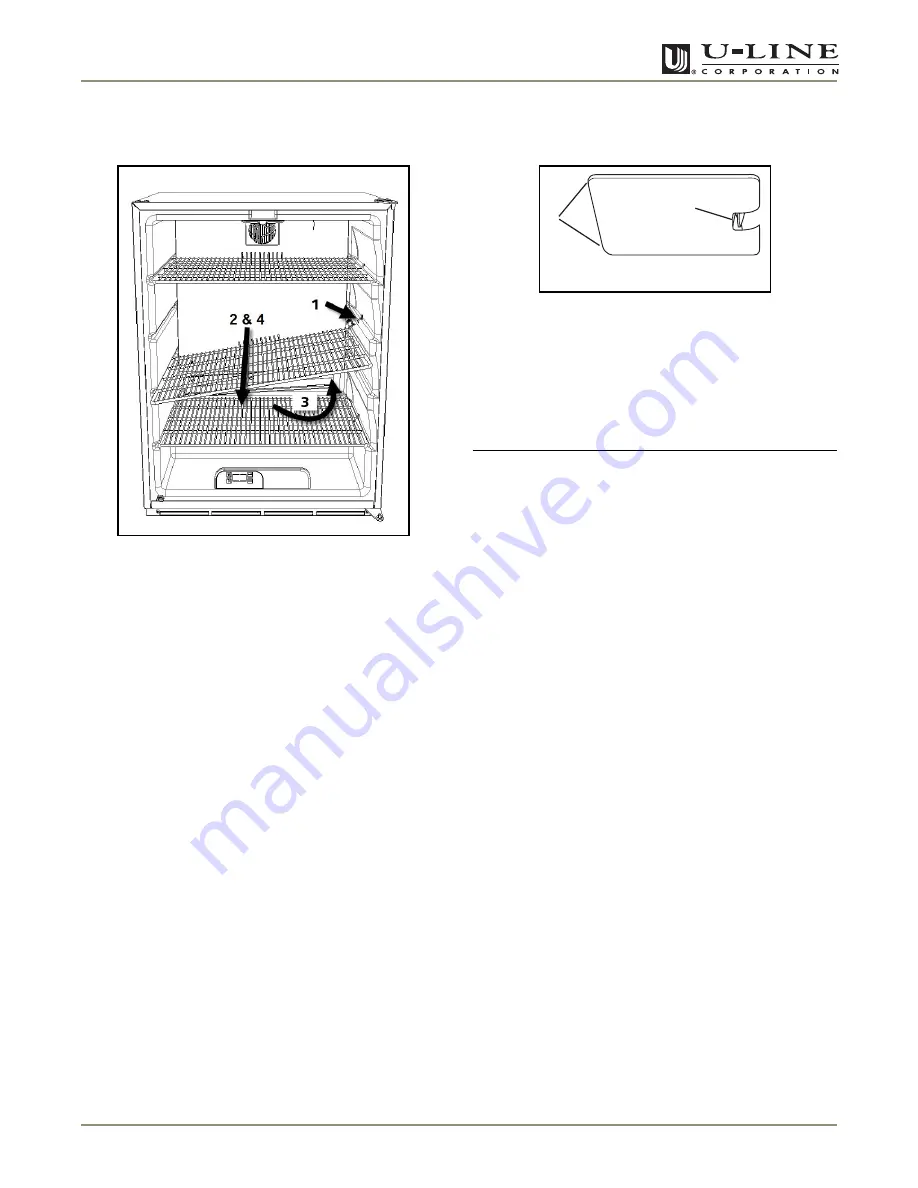
Wire Shelf Removal/Installation

Reposition the shelves as follows:

Figure 10

1. Remove shelf retention clip.

2. Pull shelf out about 6" 

(Figure 10, 1)

, until back of 

shelf clears the “hump” on the right-hand side.

3. Tilt up right-hand edge of shelf 

(Figure 10, 2)

.

4. Remove shelf from unit by pulling out 

(Figure 10, 3)

.

Insert the shelves as follows:

1. To move to a different position in the unit, insert shelf 

at an angle, approximately 15-20°, over the rib in the 
side of the unit where you want to place the shelf. The 
shelf must be started into the unit at an angle to clear 
the door.

2. Continue to slide the shelf into the unit at an angle 

until it clears the door.

3. Lower the shelf and push it in completely.

4. Install shelf retention clip.

Light Bulb Replacement

To replace the light bulb in your U-Line unit:

Figure 11

1. Grasp the edges of the light housing lens 

(Figure 11, 1)

 opposite the exposed tab, and gently 

push the lens towards the tab 

(Figure 11, 2)

.

2. Pull the edge of the lens down 

(Figure 11, 1)

, and 

swing it out of the light housing.

IMPORTANT

IMPORTANT

ALWAYS use a genuine U-Line replacement bulb (P/N 
31317) in the light housing. Use of any other bulb 
within the housing will generate excessive heat, 
causing damage to the light housing and cabinet 
interior, and compromising the precise temperature 
control of your unit.

3. Replace the bulb only with a genuine U-Line P/N 31317 

replacement.

4. Replace the lens by first inserting the tab side back into 

the housing at a slight angle. While gently pushing the 
lens towards the tab end, push the free end up into the 
housing, and release when you will hear a snap/click.

1

2

ULIN_0001_A

Summary of Contents for ADA24R

Page 1: ...Use and Care Guide ADA24R ADA24RGL A D A S E R I E S Refrigerator Models ADA24...

Page 2: ...of this guide is your U Line Corporation Limited Warranty Register the product and the original purchase date to validate your warranty Included in the package containing this guide is a Warranty Reg...

Page 3: ...A24R ADA24RGL 3 Operation 3 Air Flow 3 Initial Startup 3 Interior Lighting 4 Electronic Control Panel 4 Normal Operating Sounds 6 Outdoor Marine and RV Usage 6 Storage Vacation Moving 6 Product Dispos...

Page 4: ...off the doors and leave shelves in place so that children may not easily climb inside WARNING SHOCK HAZARD Electrical Grounding Required Never attempt to repair or perform maintenance on the unit unti...

Page 5: ...els and can achieve a custom built in look by matching surrounding cabinets Please visit www u line com for additional panel information Doors on black models are field reversible Stainless steel door...

Page 6: ...ntrol with digital display Figure 4 is configured to show a single temperature continuously This set point temperature is a base number used by the controller to maintain the temperature zone in your...

Page 7: ...rature IMPORTANT IMPORTANT Adjust the set point temperature in single increments and wait 24 hours for the temperature to stabilize before rechecking Figure 6 To adjust the set point temperature 1 Pre...

Page 8: ...If the ambient temperature is expected to drop below 50 F turn off and unplug unit and drain all water from the unit to prevent freezing damage not covered by the warranty High ambient temperatures 1...

Page 9: ...y intended for stainless steel on stainless surfaces this includes glass tile and counter cleaners If any surface discoloring or rusting appears clean it quickly with Bon Ami or Barkeepers Friend Clea...

Page 10: ...position 2 in 5 cm minimum 3 Allow the frost to completely melt naturally Clean the interior and all removed components using a mild non abrasive detergent and warm water solution applied with a soft...

Page 11: ...all shelf retention clip Light Bulb Replacement To replace the light bulb in your U Line unit Figure 11 1 Grasp the edges of the light housing lens Figure 11 1 opposite the exposed tab and gently push...

Page 12: ...y in contact with cabinet all the way around the door no gaps 4 Tighten bottom hinge screws 5 Tighten top hinge screws Door Reversal Black or white unit doors may be left or right hand opening Dependi...

Page 13: ...ic spacer bushing Figure 18 on bottom of door to the opposite side Clean out bushing hole in door bottom if necessary Figure 19 10 Place door on lower hinge pin Align flat edge of top hinge with outer...

Page 14: ...ine Corporation directly Contact information appears on the rear cover of this guide You will be asked for your product Model and Serial Numbers This information should be recorded inside the front co...

Page 15: ...Reposition or remove item s Dirty condenser coils Clean condenser See MAINTENANCE CONDENSER CLEANING Airflow to interior fan or front grille blocked Airflow must not be obstructed to interior fan or f...

Page 16: ...play shows repeating randomly flashing symbols and partial characters A factory control mode has been inadvertently entered Touch and hold the warmer temperature button and touch and release the LIGHT...

Page 17: ...ivity and F stops flashing View Actual Temp Hold 5 seconds Release when F flashes WC models will scroll top mid bottom temps Change F C Hold or Blackout Mode Hold 10 seconds Display and cabinet light...

Page 18: ...16 ADA24 ADA SERIES...

Page 19: ...s Laboratory UL as noted in the U Line Product Catalog U Line s website and or on the serial tag located inside the product Exposure to temperatures below freezing may cause damage to the product Dama...

Page 20: ...providing complete installation information is available for download at www U Line com Information for custom panel inserts per model including panel size and instructions are available by visiting...

Reviews: