background image

PAGE 1 OF 6 

0221 IH-9408

H-9408

BOOT-BOY

®

 AUTOMATIC 

BOOT CLEANER

1-800-295-5510

uline.com

ASSEMBLY

IMPORTANT! Warning label is located on top 

of machine. Keep children from playing with 

machine and keep long laces and other loose 
items away from brush. 

1.  Assemble handle onto 

main frame. (See Figure 1)

2.  Place water pan in area 

where unit will be used. 

NOTE: Unit can be  
used wet or dry. If 

operating wet, fill pan 
with water or other 
cleaning solutions to 
water line marked on 

inside of pan. If using 

dry, leave pan empty.

3.  Pick up main frame. While placing into water pan, 

ensure front edge of main frame is placed between 

the two stop lugs on front of pan. (See Figure 2) Rest 

back of frame with pivot notches onto pivot bar of 

pan, ensuring unit will rock back and forth properly. 

4.  Plug machine into grounded power outlet. 

5.  Ensure switch arm is contacting top back edge of 

pan. (See Figure 3)

NOTE: Switch arm activates microswitch to turn 

on motor when handle is pulled forward.  

It shuts off motor when handle is released. 

NOTE: If switch arm becomes bent from 
shipping or usage, minor adjusting may be 
needed for it to work properly. Use pliers and 
bend switch arm up or down until proper 
function position is achieved. 

Figure 2

Stop Lugs

Main Frame

Water Pan

Figure 3

Switch Arm

Switch Arm

Holding Bracket

Handle

Figure 1

Main 

Frame

Para Español, vea páginas 3-4.

Pour le français, consulter les pages 5-6.

Summary of Contents for BOOT-BOY

Page 1: ...me is placed between the two stop lugs on front of pan See Figure 2 Rest back of frame with pivot notches onto pivot bar of pan ensuring unit will rock back and forth properly 4 Plug machine into grounded power outlet 5 Ensure switch arm is contacting top back edge of pan See Figure 3 NOTE Switch arm activates microswitch to turn on motor when handle is pulled forward It shuts off motor when handl...

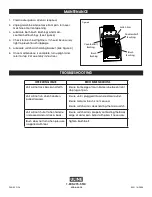
Page 2: ...ck edge of water pan Adjust with pliers if necessary Brush does not turn when pressure is applied with foot Tighten brush belt 1 800 295 5510 uline com MAINTENANCE 1 Clean water pan as often as required 2 Unplug machine and remove from pan Turn over machine onto front opening 3 Lubricate both brush brushings and main countershaft bushings See Figure 4 4 Check for brush belt tightness It should be ...

Page 3: ...ntre las dos pestañas de tope del frente de la bandeja Vea Diagrama 2 Apoye la parte posterior del armazón en las muescas de la barra de la bandeja asegurándose de que la unidad se mueva correctamente hacia adelante y atrás 4 Enchufe la máquina en un tomacorriente aterrizado 5 Asegúrese de que el brazo interruptor esté haciendo contacto con el borde superior trasero de la bandeja Vea Diagrama 3 NO...

Page 4: ...endo contacto con el borde posterior de la bandeja de agua Si es necesario ajuste con unas pinzas El cepillo no gira cuando se presiona con el pie Apriete la banda del cepillo MANTENIMIENTO 1 Limpie la bandeja de agua con la frecuencia necesaria 2 Desconecte la máquina y retire la bandeja Voltee la máquina hacia la abertura frontal 3 Lubrique los casquillos del cepillo y de los ejes secundarios Ve...

Page 5: ...uées à l avant du bac Voir Figure 2 Reposez l arrière du cadre avec les encoches de pivot sur la barre de pivot du bac en vous assurant que l appareil bascule correctement d avant en arrière 4 Branchez la machine dans une prise de courant avec mise à la terre 5 Assurez vous que le levier d interrupteur est en contact avec le bord supérieur arrière du bac Voir Figure 3 REMARQUE Le levier d interrup...

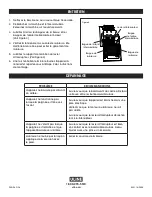
Page 6: ...justez avec une pince si nécessaire La brosse ne tourne pas lorsqu on applique de la pression avec le pied Serrez la courroie de la brosse ENTRETIEN 1 Nettoyez le bac à eau aussi souvent que nécessaire 2 Débranchez la machine et retirez la du bac Retournez la machine sur l ouverture avant 3 Lubrifiez à la fois les bagues de la brosse et les bagues de l arbre intermédiaire principal Voir Figure 4 4...

Reviews: