background image

PAGE 4 OF 15 

0521 IH-1096

WEIGHING WITH A CONTAINER 

1.  Press the zero key. Place the empty container on the 

pan. 

2.  Press the tare or zero key. (If the tare weight is known, a 

full container may be placed on the pan. In this case, 

enter the tare weight through the keyboard and then 

press the tare key.) 

3.  Wait for the "OK" symbol. Place or pour objects or 

liquids into the container. 

OPERATION CONTINUED

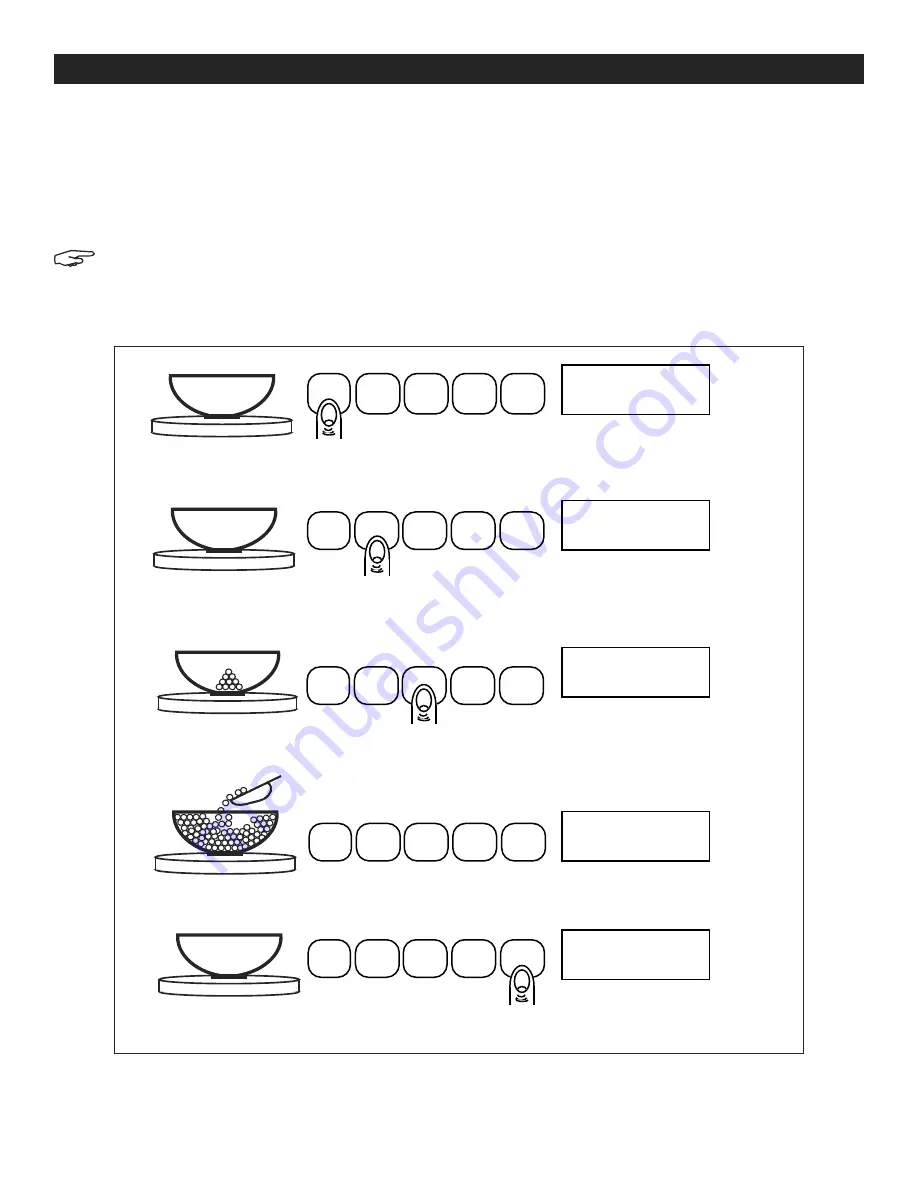
BASIC COUNTING

0.00 g

clear

print

zero

sample

size

count

1. Place an empty container on the scale. Press the zero key 

...............................................................................................................................

Add 10 Pc

clear

print

zero

sample

size

count

clear

print

zero

sample

size

count

clear

print

zero

sample

size

count

clear

print

zero

sample

size

count

2. Press the sample size key. Each time the key is pressed the requested sample size will increase.

(i.e., Add 10, 25, 50, 100 PCs).

...............................................................................................................................

...............................................................................................................................

 10 Pc

3. Place the requested number of pieces in the container. Press the count key. 

202 Pc

4. Fill the container to the desired number of pieces.

...............................................................................................................................

...............................................................................................................................

0.00 g

5. Remove the pieces from the container and press the clear  key to return the scale to the weight display. 

Figure 6

NOTE: The scale will never request a sample size less than the preset minimum sample size. The scale may 
request that more pieces be added after the initial sampling if a minimum accuracy requirement has 
been preset. 

Summary of Contents for H-1096

Page 1: ...eet A until the leveling bubble B is centered in the circle See Figure 1 3 Extend the right rear foot until it contacts the mounting surface Make certain that all four feet are contacting the mounting...

Page 2: ...cts the scale to enter a setup or perform a calibration a p w Instructs the scale to accept an average piece weight entry clear Clears the last number entered or operation requested and displays weigh...

Page 3: ...alue in memory When preceding the units key instructs the scale to convert the weighing units to the factory default grams BASIC WEIGHING 1 Press the zero key and place the object s to be weighed on t...

Page 4: ...zero sample size count clear print zero sample size count clear print zero sample size count clear print zero sample size count 2 Press the sample size key Each time the key is pressed the requested...

Page 5: ...Then add pieces until you reach the desired piece count 9 Wait for the OK symbol Then read the display The scale will read the total number of pieces you have placed in the container NOTE You may reca...

Page 6: ...ste las dos patas frontales A hasta que la burbuja niveladora B est centrada en el c rculo Vea Diagrama 1 3 Extienda la pata derecha trasera hasta que toque la superficie de instalaci n 4 Aseg rese qu...

Page 7: ...a la b scula para ingresar una configuraci n o realizar una calibraci n a p w Instruye a la b scula para aceptar el ingreso del peso promedio de una pieza clear Borra el ltimo n mero ingresado u opera...

Page 8: ...ente Vea Diagrama 5 Continue presionando la tecla hasta que la unidad que desea usar sea mostrada NOTA El orden de las unidades es como sigue GRAMOS GRAMOS OUNCES ONZAS POUNDS LIBRAS TROY OUNCES ONZAS...

Page 9: ...vez que la tecla sea presionada el tama o de muestra requerido incrementar Por ejemplo Agregue 10 25 50 100 Piezas 10 Pc 3 Coloque el n mero de piezas requeridas en el contenedor Presione la tecla co...

Page 10: ...agregue las piezas hasta que llegue al conteo deseado 9 Espere por el s mbolo OK Luego lea la pantalla La b scula leer el n mero total de piezas que ha colocado en el contenedor NOTA Puede recordar e...

Page 11: ...s avant A jusqu ce que la bulle de nivellement B soit au centre du cercle Voir figure 1 5 tirez le pied arri re droit jusqu ce qu il soit en contact avec la surface de montage Les quatre pieds doivent...

Page 12: ...on setup cal Indique la balance d entrer une configuration ou d ex cuter un talonnage a p w Indique la balance d accepter un poids moyen de pi ce clear Efface le dernier chiffre entr ou op ration requ...

Page 13: ...la touche jusqu ce que les unit s que vous souhaitez utiliser s affichent REMARQUE L ordre des unit s est le suivant GRAMMES ONCES LIVRES ONCE TROY PENNYWEIGHT CARATS x UNIT S d finies par l utilisate...

Page 14: ...nt avec le nombre de pi ces voulues 0 00 g 5 Retirer les pi ces du contenant et appuyer sur la touche clear pour revenir l affichage du poids Figure 6 AFFICHER LE POIDS BRUT 1 Appuyez sur afficheur di...

Page 15: ...ces jusqu ce que vous ayez atteint le nombre de pi ce voulu 9 Attendez le symbole OK Ensuite lisez l afficheur La balance indiquera le nombre total de pi ces mises dans le contenant REMARQUE Vous pou...

Reviews: