background image

PAGE 3 OF 12 

1023 IH-10990

INSTALLATION CONTINUED

CEILING MOUNTING 

1.  Pick the approximate location for the reel within  

2⁄' of a 110-125V 5-20R outlet.

2.  Locate a joist or beam to install the mounting 

bracket. The bracket should be placed directly over 

the center of the joist or beam.

3.  Using the bracket as a template, mark the screw 

locations with pencil. (See Figure 5)

4.  Pre-drill (pilot holes) the three screw holes with the 

use of a 1/4" drill. The depth of the pilot holes should 

be at least 2".

5.  Install the bracket with the three provided hex head 

wood screws with washers using a 1/2" wrench or 

socket. Tighten all three until snug. (See Figure 6)

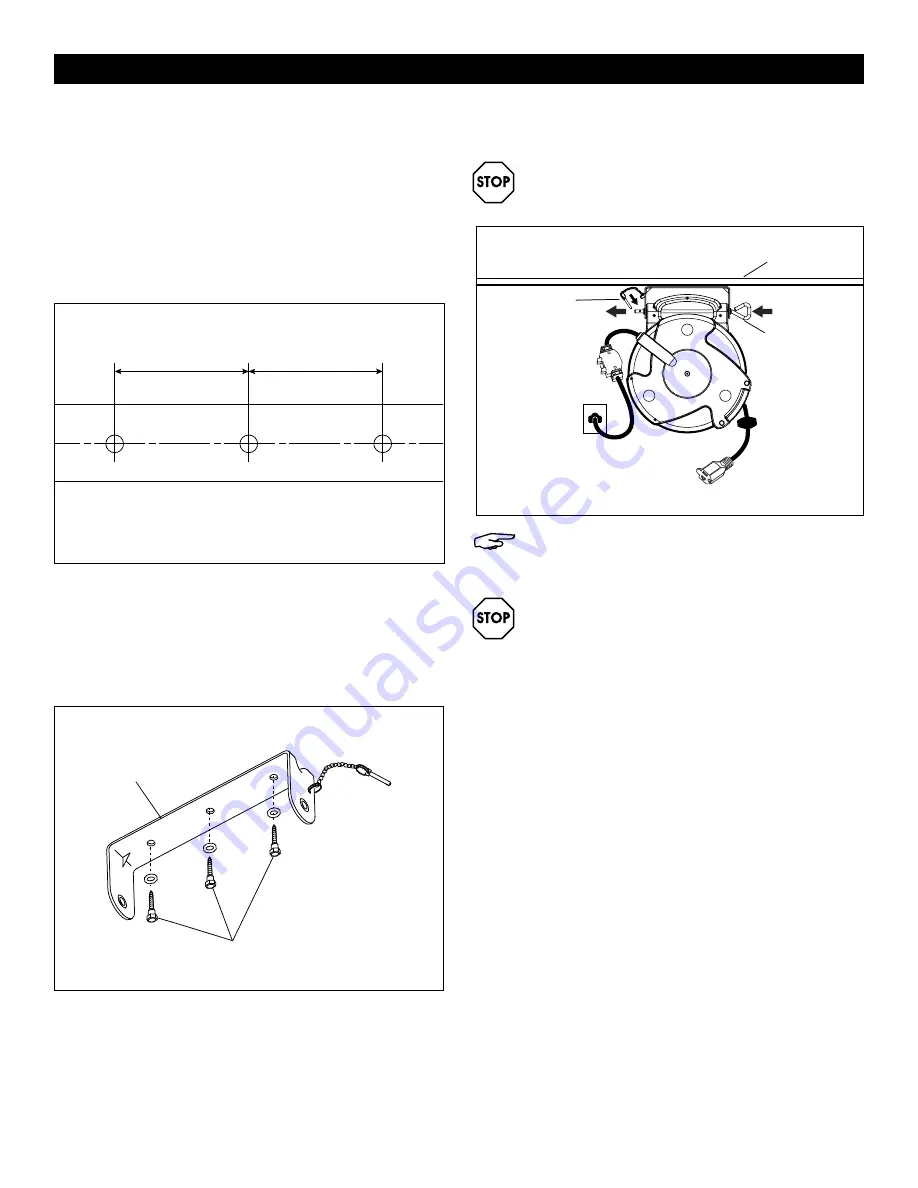
6.  Slide the mounting pin through bracket and reel.  

(See Figure 7)

WARNING! Slide the locking pin through the 
mounting pin for security. It will prevent the 
mounting pin from sliding out of position.

NOTE: When ceiling mounting is against a steel 
beam, use at minimum 1/4" bolts with lock 
washers or locking nuts.

WARNING! DO NOT USE solvents such as 
gasoline, turpentine, etc. to clean unit. Keep 
reel cord clean to assure smoothest automatic 
retraction. To clean, simply pull cord to its 
full length and allow to retract through a 

dampened rag. Pull out full length again and 
allow to retract through clean rag sprinkled 
with talcum powder. DRY THOROUGHLY BEFORE 

PLUGGING BACK INTO OUTLET.

Figure 7

Ceiling

Mounting 

Pin

Locking 

Pin

Figure 5

3¼"

Bracket Hole Pattern

3¼"

Figure 6

Bracket

Hex Head Wood Screws

Summary of Contents for H-10990

Page 1: ...third prong or otherwise try to modify the plug If it will not fit the outlet have the proper outlet installed by a qualified electrician Improper connection of the grounding conductor can result in...

Page 2: ...ill pilot holes the three screw holes with the use of at 1 4 drill The depth of the pilot holes should be at least 2 5 Install the bracket with the three provided hex head wood screws with washers usi...

Page 3: ...ee until snug See Figure 6 6 Slide the mounting pin through bracket and reel See Figure 7 WARNING Slide the locking pin through the mounting pin for security It will prevent the mounting pin from slid...

Page 4: ...cked and ready to retract fully CAUTION To avoid possible injury Do not allow the cord to fly unrestricted back into the reel Guide the cord back into the reel by hand to control retraction speed NOTE...

Page 5: ...chufe de 3 polos con conexi n a tierra No remueva el tercer polo o intenta de alguna otra forma modificar el enchufe Si no entra en el tomacorriente un electricista capacitado debe instalar uno adecua...

Page 6: ...e 1 4 La profundidad de los orificios gu a debe ser por lo menos 2 5 cm 5 Instale el soporte con los tres tornillos para madera con cabeza hexagonal proporcionados utilizando una llave de 1 2 o llave...

Page 7: ...6 Deslice el pasador de instalaci n a trav s del soporte y el carrete Vea Diagrama 7 ADVERTENCIA Deslice el pasador de bloqueo a trav s del pasador de instalaci n para mayor seguridad Esto evitar que...

Page 8: ...to PRECAUCI N Para evitar posibles lesiones no permita que el cable vuele libremente de nuevo dentro del carrete Gu e el cable de nuevo en el carrete con la mano para controlar la velocidad de retracc...

Page 9: ...pas d alt rer la fiche Si elle ne convient pas la prise faites installer une prise de courant appropri e par un lectricien qualifi Un mauvais raccordement du conducteur de mise la terre peut entra ne...

Page 10: ...c la perceuse de 1 4 po La profondeur des avant trous doit tre d au moins 2 po 5 Installez le support avec les trois vis bois hexagonales et les rondelles qui ont t fournies et une cl ou une douille d...

Page 11: ...rs le support et l enrouleur Voir Figure 7 AVERTISSEMENT Ins rez la goupille de verrouillage travers la goupille de fixation pour des raisons de s curit Elle permet d emp cher la goupille de fixation...

Page 12: ...ir d ventuelles blessures ne laissez pas le cordon s enrouler grande vitesse et sans contr le Guidez le cordon de votre main pour contr ler la vitesse d enroulement REMARQUE La prise est sans interrup...

Reviews: