PAGE 3 OF 12
0814 IH-3415
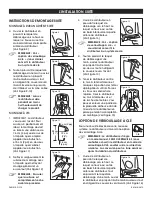
KEYED LOCKING OPTION CONTINUED
2. From the INSIDE of the
dispenser, insert the key into
the back of the dispenser in
the key slot and push until the
latch piece is ejected from
the bottom of the dispenser.
(See Figure 17)
3. Re-install the latch piece in
the bottom of dispenser with
the SLOTTED SIDE AWAY from the
wall and toward the front of the
dispenser. Push the latch piece
into the dispenser until it snaps into place.
(See Figure 18)
4. To close the dispenser, place your hand on top or
front of the dispenser below the push pad, and push
up on the cover until it is latched. (See Figure 19)
NOTE: DO NOT CLOSE BY PUSHING ON PUSH PAD!
5. To OPEN, insert key into slots of the release latch on
the bottom of the dispenser and push the key up.
(See Figure 20) Place your other hand on top and
guide the front cover forward. (See Figure 21)
NOTE: The dispenser can be converted back to
the NO KEY REQUIRED mode. Complete steps
#2 and #3 and insert the latch piece with the
SLOTTED SIDE TOWARD the wall.
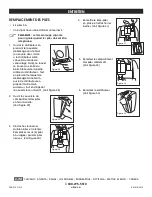
LOADING THE DISPENSER
1. Open by pushing up on the release latch (use key
if you have converted to the keyed locking mode).
The latch is on the bottom back edge in the center.
(See Figure 22) While pushing the release latch,
open by placing your other hand on the top, and
guide the front cover forward. (See Figure 23)
2. Hold bag with label towards back. Load bottom of
bag into dispenser. (See Figure 24) Slide the bag
collar over the guide and push. Be certain the bag
collar is completely inserted in the collar guide.
(See Figure 25)
3. Remove the protective overcap from the pump.
(See Figure 26) To close the dispenser, place your
hand on top or front of the dispenser below the push
pad, and push up on the cover until it is latched.
(See Figure 27)
NOTE: DO NOT CLOSE BY PUSHING ON PUSH PAD!
INSTALLATION CONTINUED
Figure 17
Figure 24
Figure 22
Figure 25
Figure 23
Figure 18
Figure 20
Figure 19
Figure 21
Figure 26
Figure 27

