background image

PAGE 1 OF 9 

0521 IH-5598

1-800-295-5510

uline.com

IGLOO PARTY BAR


H-5598

PARTS

INSTALLATION

Lid x 1

Rigid

Caster x 2

Long Screws

Mounting 

Bracket

Cooler

Locking

Caster x 2

Caster Mounting 

Hardware x 16

Bottle 

Opener x 1

Short 

Screw x 2

Long 

Screw x 2

Cap Catch 

Bin x 1

Mounting 

Bracket x 1

Cooler x 1

Base x 1

1.  Remove two short screws and bottle opener from 

bag. Line up the bottle opener with the two most 
upper holes. Using the Phillips screwdriver, tighten 
the short screws into the cooler. (See Figure 1)

NOTE: The holes are not pre-cut, but are 
marked with indentations in the cooler wall.

2.  Attach mounting bracket to cooler wall using the two 

long screws. Make sure mounting bracket is upright 

(See Figure 1)

NOTE: The holes are not pre-cut, but are 
marked with indentations in the cooler wall.


Wrench

Phillips 

Screwdriver

TOOLS NEEDED

Figure 1

Short 

Screws

Para Español, vea páginas 4-6.

Pour le français, consulter les pages 7-9.

Summary of Contents for H-5598

Page 1: ...bag Line up the bottle opener with the two most upper holes Using the Phillips screwdriver tighten the short screws into the cooler See Figure 1 NOTE The holes are not pre cut but are marked with indentations in the cooler wall 2 Attach mounting bracket to cooler wall using the two long screws Make sure mounting bracket is upright See Figure 1 NOTE The holes are not pre cut but are marked with ind...

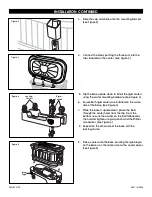
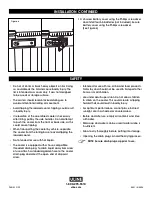
Page 2: ...rs are installed on the same side of the base See Figure 4 7 While the base is upside down place the bolts through the caster holes from the top From the bottom secure the washer on the bolt followed by the nut and tighten using a wrench and the Phillips screwdriver See Figure 4 8 Repeat on the other side of the base with the locking casters 9 Place cooler onto the base ensuring the Igloo logo on ...

Page 3: ...oler by vehicle separate the cooler from the rolling base to avoid tipping the loaded cooler Not intended for use with hot liquids The cooler is equipped with a hose compatible threaded drain plug To drain liquid away from area of use attach a standard garden hose to the cooler drain plug and direct the open end of disposal area Intended for use with ice drinks and food products Not a toy and shou...

Page 4: ... la hielera 2 Fije el soporte de montaje a la pared de la hielera con los dos tornillos largos Asegúrese de que el soporte de montaje esté en posición vertical Vea Diagrama 1 NOTA Los orificios no están precortados pero están marcados con muescas en la pared de la hielera Diagrama 1 Llave Desarmador de Cruz HERRAMIENTAS NECESARIAS 1 Tapa 2 Ruedas Fijas 2 Ruedas con Seguro 16 Accesorios de Instalac...

Page 5: ...uen en el mismo lado de la base Vea Diagrama 4 7 Mientras la base está volteada inserte los pernos desde arriba a través de los orificios para ruedas Desde abajo fije el perno con una rondana y una tuerca y apriete usando una llave y el desarmador de cruz Vea Diagrama 4 8 Repita en el lado opuesto de la base con la ruedas con seguro 9 Coloque la hielera sobre la base asegurándose de que el logotip...

Page 6: ...lera de la base rodante para evitar que la hielera llena se vuelque La unidad no fue creada para usarse con líquidos calientes La hielera está equipada con un tapón de desagüe roscado compatible con una manguera Para drenar el líquido lejos de la zona de uso fije una manguera de jardín estándar al tapón de desagüe de la hielera y dirija el extremo abierto a la zona de descarga La unidad fue diseña...

Page 7: ...port de fixation à la paroi de la glacière à l aide des deux vis longues Assurez vous que le support de fixation est en position verticale Voir Figure 1 REMARQUE Les trous ne sont pas précoupés mais sont marqués par des renfoncements dans la paroi de la glacière Figure 1 PIÈCES INSTALLATION Couvercle x 1 Roulette rigide x 2 Vis longues Support de fixation Glacière Roulette verrouillable x 2 Matéri...

Page 8: ...ées du même côté de la base Voir Figure 4 7 Pendant que la base est à l envers insérez les boulons dans les trous de roulettes à partir du dessus À partir du dessous fixez la rondelle sur le boulon puis l écrou et serrez à l aide d une clé et du tournevis cruciforme Voir Figure 4 8 Répétez cette étape pour l installation des roulettes verrouillables de l autre côté de la base 9 Déposez la glacière...

Page 9: ...éparez la glacière de la base roulante pour éviter de faire basculer la glacière chargée Non conçue pour être utilisée avec des liquides chauds La glacière est dotée d un bouchon de vidange fileté pouvant se raccorder à un tuyau Pour vider le liquide hors de la zone d utilisation fixez un tuyau d arrosage standard au bouchon de vidange de la glacière et orientez l extrémité ouverte vers la zone de...

Reviews: