background image

PAGE 2 OF 9 

0421 IH-6493

INSTRUCTIONS CONTINUED

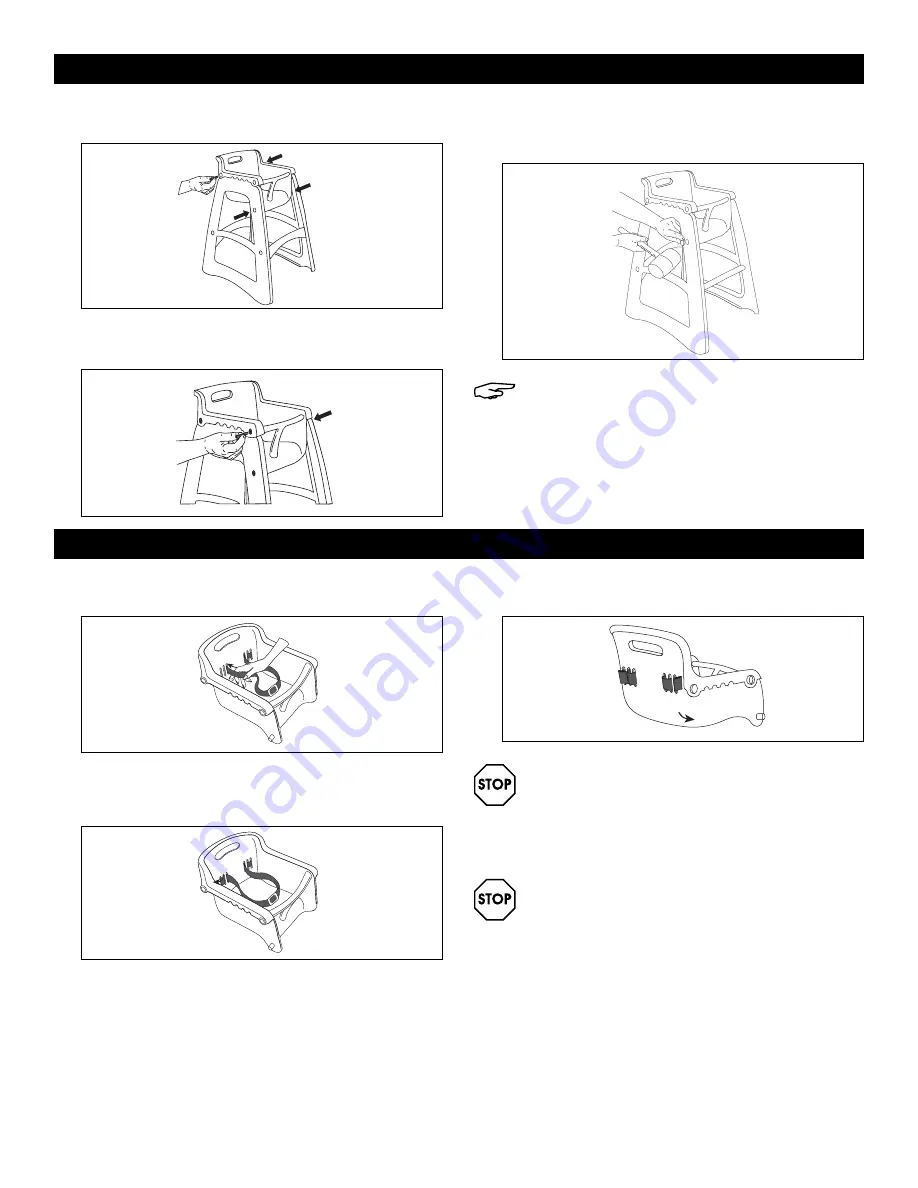
5.  Insert 7/8" screws through the frame and seat as 

shown. Use screwdriver to secure. (See Figure 5)

6.  Insert 1⁄" screws through frame and seat. Use 

screwdriver to secure. (See Figure 6)

7.  Seal screw openings with covers. Use a rubber 

mallet to apply. Wear safety glasses during cover 

application. (See Figure 7) 

NOTE: Check that all screws and fittings are 

correctly and tightly fitted before and during 

use.

Figure 5

Figure 6

Figure 7

SEATBELT INSTALLATION INSTRUCTIONS

1.  Insert each end of the seatbelt into the innermost 

slots of the back of the seat. (See Figure 8)

2.  Weave each end of the seatbelt through 

the remaining slots in the back of the seat.                

(See Figure 9)

3.  Each end of the seatbelt should stick out the back of 

the seat as shown. Pull ends to secure. (See Figure 10)

WARNING! The child should be secured in the high 
chair at all times by the restraining system. The tray 
(not included) is not designed to hold the child 
in the chair. It is recommended that the high 
chair be used only by children capable of sitting 
upright unassisted.
WARNING! Prevent serious injury or death from 
falls or sliding out:

•  Always secure child in the restraint.
•  Always keep child in view while in high chair.
•  Never leave child unattended.
•  Do not use the high chair if any part is 

broken, torn or missing.

•  Do not use high chair unless all components 

are correctly fitted and adjusted.

•  Be aware of the risk of open fire and other 

sources of strong heat, such as electric bar fires, 
gas fires, etc., in the vicinity of the high chair. 

Figure 8

Figure 9

Figure 10

Summary of Contents for H-6493

Page 1: ...crews and screwdriver See Figure 2 3 Connect the seat to the frame by inserting pegs into the top opening of legs See Figure 3 4 Lower the seat to be level with the top of frame See Figure 4 TOOLS NEE...

Page 2: ...eat See Figure 9 3 Each end of the seatbelt should stick out the back of the seat as shown Pull ends to secure See Figure 10 WARNING The child should be secured in the high chair at all times by the r...

Page 3: ...AND MAINTENANCE Wash chair as needed with a mild soap and water solution Do not use solvents or harsh chemical cleaners See Figure 11 Periodically check to ensure that covers are flush with surface F...

Page 4: ...ornillos de 1 y el desarmador Vea Diagrama 2 3 Para unir el asiento al armaz n inserte los pernos en las aberturas superiores de las patas Vea Diagrama 3 4 Baje el asiento hasta nivelarlo con la parte...

Page 5: ...parte posterior del asiento Vea Diagrama 9 3 Cada extremo del cintur n debe sobresalir fuera de la parte posterior del asiento como se muestra Jale los extremos para asegurarlo Vea Diagrama 10 ADVERT...

Page 6: ...lo necesite lave la silla con una soluci n de agua y jab n suave No utilice limpiadores con base de solventes o productos qu micos agresivos Vea Diagrama 11 Revise peri dicamente que las tapas queden...

Page 7: ...o et du tournevis Voir Figure 2 3 Reliez le si ge au cadre en ins rant les chevilles dans les orifices sup rieurs des pieds Voir Figure 3 4 Abaissez le si ge pour qu il soit de niveau avec la partie s...

Page 8: ...la ceinture doit ressortir par l arri re du dossier comme illustr Tirez sur les extr mit s pour bien s curiser Voir Figure 10 ATTENTION Lorsqu assis dans la chaise haute l enfant doit tre en tout temp...

Page 9: ...Au besoin lavez la chaise avec du savon doux et une solution d eau N utilisez pas de solvants ou de nettoyants chimiques agressifs Voir Figure 11 V rifiez p riodiquement que les couvercles sont au ras...

Reviews: