background image

PAGE 3 OF 9 

0521 RH-9424

BATTERY CHARGER VISUAL SIGNALS

NOTE: Refer to Battery Charger manual for full 
instructions. 

(See Instructions)

OPERATING SIGNALS

Red LED Flashing (twice)

Battery charger is set to charge.

Red LED On

First phase of charge in progress.

Yellow LED On

Second phase of charge  in progress.

Green LED On

Charge complete.


TROUBLESHOOTING

Yellow LED Flashing

Unsuitable battery  OR battery not connected

OR output short circuit.

Red LED Flashing

Battery has reached its maximum charging time limit. 

 NOTE:

 This is normal. New batteries require a break-in 

period of approximately 10 charging cycles. Unplug 

unit and use as normal. Charge after use.

MAINTENANCE CONTINUED

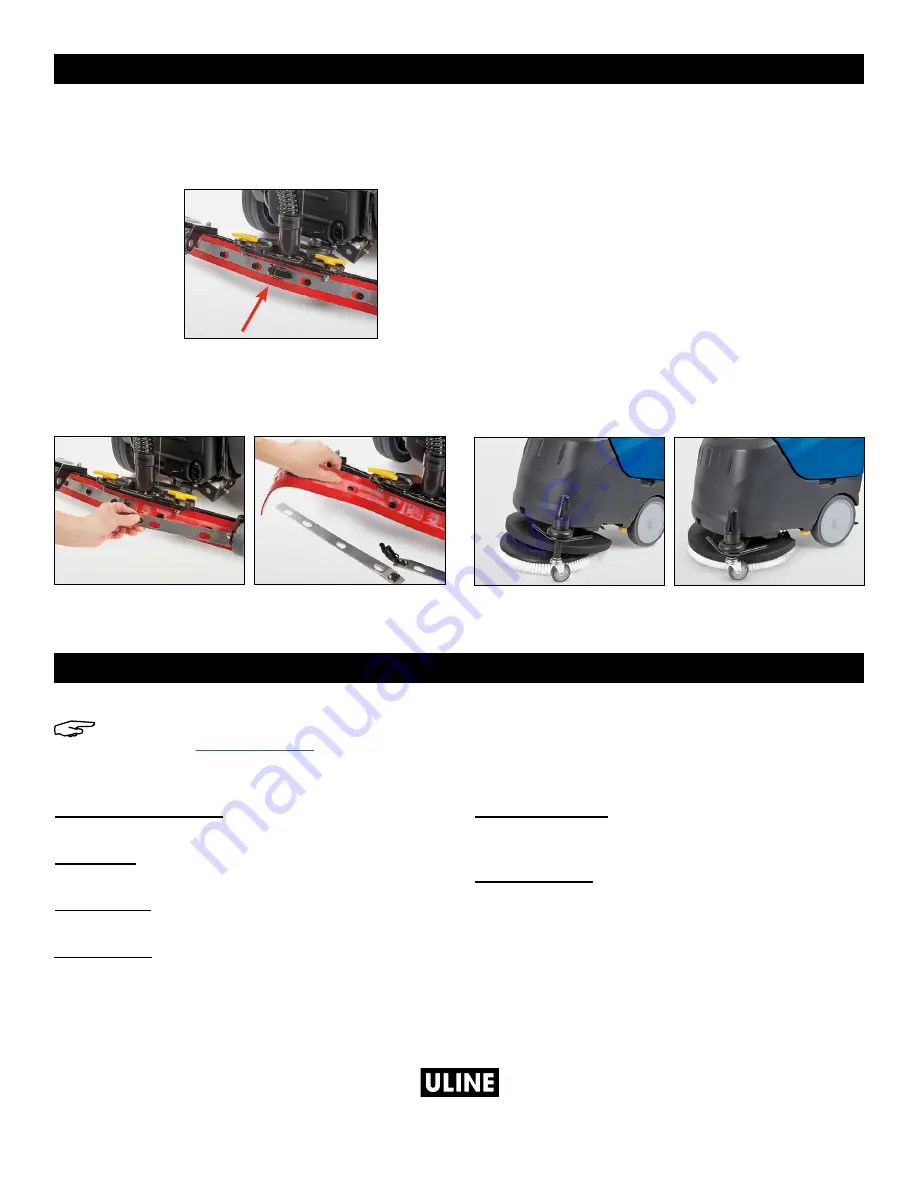
REPLACING THE SQUEEGEE BLADE

1.  Remove the squeegee blade by releasing the 

middle clip. (See Figure 18)

Figure 18

2.  Remove the blade retainers by sliding them toward 

the outside of the squeegee, then pull them off. 

Remove the squeegee blade by pulling it off the 

squeegee body tabs. (See Figures 19 and 20)

Figure 19

Figure 20

3.  Reuse the same blade by reversing the edge in 

contact with the floor. The blades should be reused 

until all four edges are worn out and can be 

replaced at once.

4.  Align the new (or reversed) blades with the tabs on 

the squeegee body and push into place.

5.  Reposition the two blade retainers on the squeegee 

body and fasten the clip.

BRUSH REPLACEMENT

1.  Lay the brush on the floor and position the scrubber 

over it. (See Figure 21)

2.  Activate the scrubber by pulling the drive levers to 

spin on the brush. The brush will spin smoothly when 

properly engaged with the scrubber. (See Figure 22)

Figure 21

Figure 22

1-800-295-5510

uline.com

Summary of Contents for H-9424

Page 1: ...Figure 2 Figure 2 BEGIN WORK 1 Lower squeegee by pushing handle down See Figure 3 Figure 3 2 Turn on unit and press brush button All lights will light up and unit is fully functional See Figures 4 an...

Page 2: ...e See Figures 10 and 11 Figure 10 Figure 11 4 Raise the squeegee and wipe down with a soft cloth Check that it is clean and the blades are not damaged See Figure 12 Figure 12 5 Tilt the scrubber back...

Page 3: ...the squeegee blade by releasing the middle clip See Figure 18 Figure 18 2 Remove the blade retainers by sliding them toward the outside of the squeegee then pull them off Remove the squeegee blade by...

Page 4: ...Vea Diagrama 2 Diagrama 2 EMPIECE A TRABAJAR 1 Baje el jalador empujando el asa hacia abajo Vea Diagrama 3 Diagrama 3 2 Encienda la unidad y presione el bot n del cepillo Todas las luces encender n y...

Page 5: ...10 y 11 Diagrama 10 Diagrama 11 4 Eleve el jalador y l mpielo con un pa o suave Verifique que el jalador est limpio y las hojas no est n da adas Vea Diagrama 12 Diagrama 12 5 Incline la fregadora hac...

Page 6: ...LA HOJA DEL JALADOR 1 Retire la hoja del jalador soltando el clip de en medio Vea Diagrama 18 Diagrama 18 2 Retire los dos retenedores de la hoja presion ndolos hacia afuera del jalador y despu s extr...

Page 7: ...R COMMENCER LE LAVAGE 1 Abaissez la raclette en poussant la poign e vers le bas Voir Figure 3 Figure 3 2 Allumez l appareil et appuyez sur le bouton de la brosse Tous les voyants s allument et l appar...

Page 8: ...gure 11 4 Soulevez la raclette et nettoyez la avec un chiffon doux V rifiez que la raclette est propre et que les lamelles n ont subi aucun dommage Voir Figure 12 Figure 12 5 Inclinez l autolaveuse ve...

Page 9: ...la raclette en rel chant l attache du milieu Voir Figure 18 Figure 18 2 Retirez les dispositifs de retenue de la lamelle en les faisant glisser vers l ext rieur de la raclette pour les sortir Retirez...

Reviews: