background image

QUICK START GUIDE

Door Swing

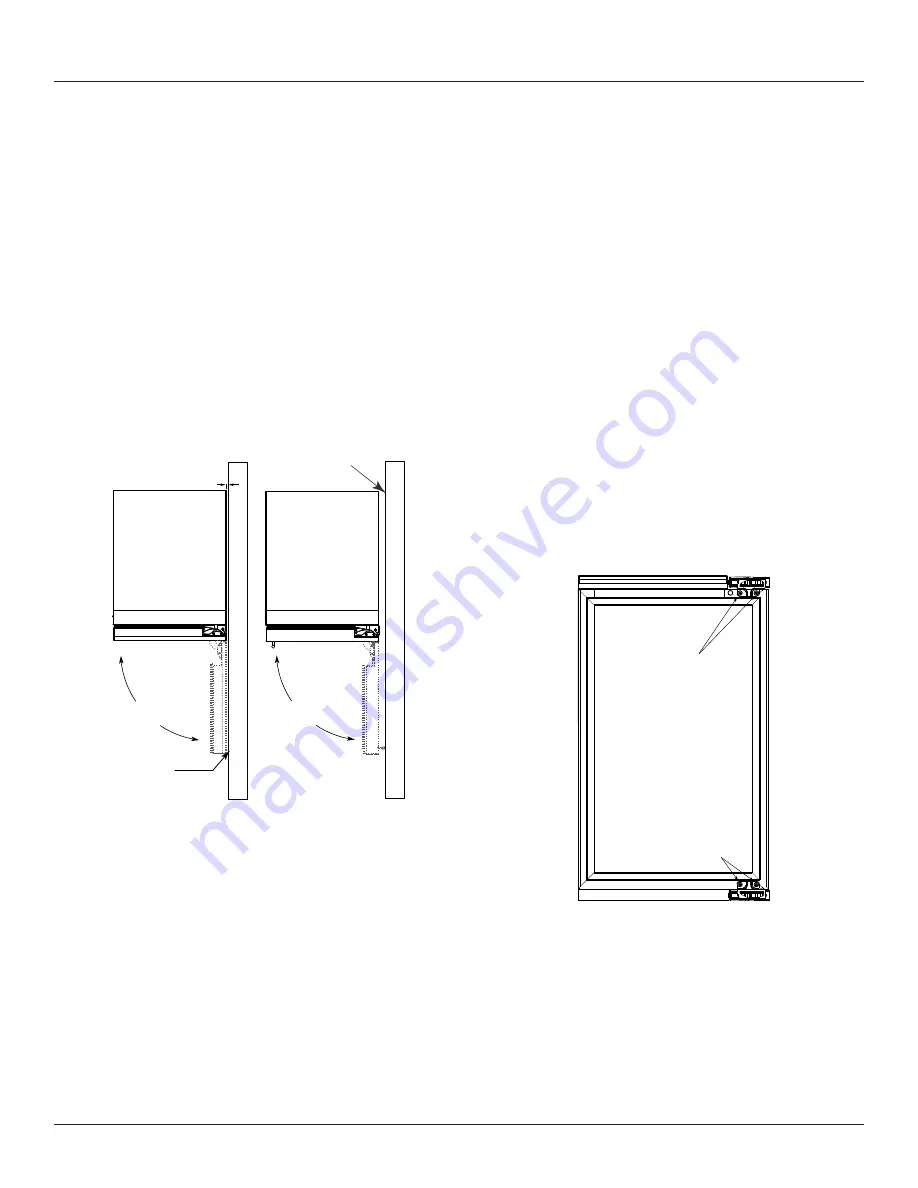
For Integrated models that are installed adjacent to a wall,
1/2” (13 mm) clearance is recommended from wall on
hinge side to allow the door to open 90°. Allow for
additional space for any knobs or pulls installed on the
integrated panel/frame.

Stainless Steel models that are installed adjacent to a wall

require 2-1/4” (57 mm) door clearance on hinge side to

allow for door handle.

Units have a zero clearance when installed adjacent to

cabinets.

Door Adjustments

DOOR ALIGNMENT AND ADJUSTMENT

Align and adjust the door if it is not level or not sealing 
properly. If the door is not sealed, the unit may not cool 
properly, or excessive frost or condensation may form in 
the interior.

NOTICE
Properly aligned, the door’s gasket should be 
firmly in contact with the cabinet all the way 

around the door (no gaps). Carefully examine the 
door’s gasket to ensure that it is firmly in contact 
with the cabinet. Also make sure the door gasket 
is not pinched on the hinge side of the door.

Do not attempt to use the door to raise or pivot 
your unit. This would put excessive stress on the 
hinge system.

Alignment and Adjustment Procedure

1. Open door and remove gasket near the hinges.

2. Using a T-25 Torx bit, loosen each pair of Torx head

screws both the upper and lower hinge plates.

3. Square and align door as necessary.

4. Tighten Torx head screws on hinge.

5. Reinstall gasket into the channel starting at the corner.

T-25 Torx Screw

T-25 Torx Screw

Wall

Wall

90°

Door Swing

90°

Door Swing

Space Required

For any Knobs or Pulls

2-1/4" MIN

(57 mm MIN)

3000 Series 

Integrated

Stainless

1/2" (13 mm)

6

Summary of Contents for HWD524

Page 1: ...QUICK START GUIDE 5 CLASS DUAL ZONE 30616_D...

Page 2: ...re available worldwide U Line RIGHT PRODUCT RIGHT PLACE RIGHT TEMPERATURE PRODUCT INFORMATION Looking for additional information on your product User Guides Spec Sheets CAD Drawings Compliance Documen...

Page 3: ...product on u line com See complete warranty for details CONTENTS Safety and Warning 4 Environmental Requirements 5 Electrical 5 Door Swing 6 Door Adjustments 6 General Installation 7 Anti Tip Bracket...

Page 4: ...ure to follow this safety statement may result in minor or moderate personal injury property or equipment damage This unit contains R600a Isobutane which is a flammable hydrocarbon It is safe for regu...

Page 5: ...r or perform maintenance on the unit until the electricity has been disconnected Never remove the round grounding prong from the plug and never use a two prong grounding adapter Altering cutting or re...

Page 6: ...erior NOTICE Properly aligned the door s gasket should be firmly in contact with the cabinet all the way around the door no gaps Carefully examine the door s gasket to ensure that it is firmly in cont...

Page 7: ...and side edge as shown 2 If the unit is not level adjust the legs on the corners of the unit as necessary 3 Confirm the unit is level after each adjustment and repeat the previous steps as needed INS...

Page 8: ...fit Also test to make sure the door opens and closes freely 3 Remove grille and place a mark on the floor at the front of the unit Also place a mark on the floor in the center of the unit 4 Remove th...

Page 9: ...drill 6 pilot holes into the wood panel 1 2 12 mm deep using the holes in the door frame as a guide NOTICE It is important to ensure that all drilled holes are drilled to the correct depth in order t...

Page 10: ...pen Hide Display Hold and press Display will turn off when door is closed Unit will continue to operate Repeat command to turn on display Adjust light color While holding press and release to scroll t...

Page 11: ...GUIDE Dual Zone Temperature Table 11 Beverage Dual Zone Lower 33 45 Upper 38 65 Minimum Maximum 33 38 53 34 38 54 35 38 55 36 38 56 37 38 57 38 38 58 39 39 59 40 40 60 41 41 61 42 42 62 43 43 63 44 44...

Page 12: ...de Display Hold and press Display will turn off when door is closed Unit will continue to operate Repeat command to turn on display Adjust light color While holding press and release to scroll through...

Page 13: ...unit is progressing towards the selected temperature Time to reach set point varies based upon ambient temperature temperature of product loaded door openings etc U Line recommends allowing the unit t...

Page 14: ...agne and Magnum bottles only fit on wine racks when noted on the product specifications When determining capacities U Line uses typical 12 oz cans 12 oz bottles 750 mL white wine and red wine bottles...

Page 15: ...care when removing rack to avoid scratching interior of unit 5 Once removed retract the slides Note The slides on the rack have a thin coating which is used to block moisture and provide lubrication...

Page 16: ...interior of unit 5 Once removed retract the slides Note The slides on the frame have a thin coating which is used to block moisture and provide lubrication Use care when handling Installation 1 Insert...

Page 17: ...sconnect power to the unit Clean the interior and all removed components using a mild nonabrasive detergent and warm solution applied with a soft sponge or non abrasive cloth Cleaning Rinse the interi...

Page 18: ...improper use maintenance installation service repair acts of God fire flood or other natural disasters The product must be installed operated and maintained in accordance with your product s User Guid...

Reviews: