background image

www.U-LineService.com

6

11/2006

CO1175 — Ice Maker/Refrigerator

Reversing the Door

(CO1175 Black Units Only)

All units may be left-or right-hand opening (All Stainless 
Steel units cannot be field-reversed).

Black Units

Note: 

The grille should not yet be installed. If it has been 

installed, remove it for door reversing. See 

Page


11

.

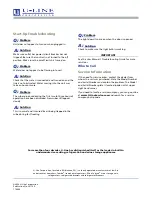
To reverse the door on Black models:

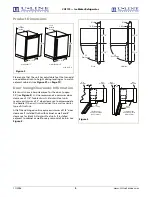
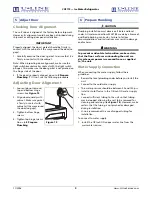
1. Remove top hinge from cabinet (four screws). See 

Figure 4

. Hold door to keep it from falling.

2. Lift the door off the bottom hinge.

3. Remove four plastic plugs in hinge holes, top of cabinet, 

opposite side. See 

Figure 5

.


Be careful not to scratch 

cabinet.

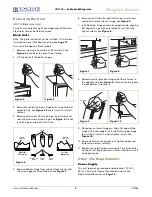
4. Remove pivot screw from top hinge, invert screw and 

reinstall pivot screw in top hinge. See 

Figure 6

. Do not 

install hinge on cabinet at this time.

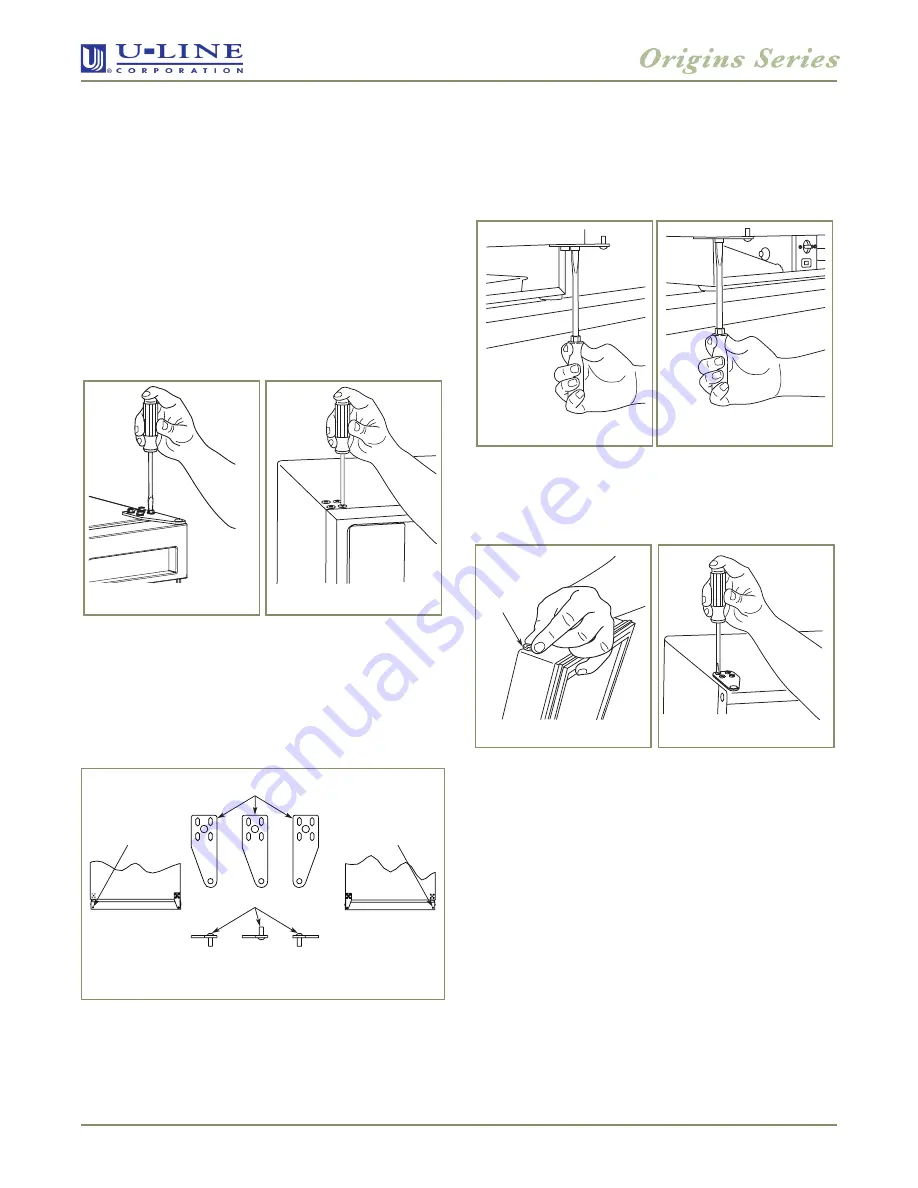
5. Remove bottom hinge from cabinet (four screws) and 

screws on opposite side of cabinet. See


Figure 7

.

6. Remove pivot screw from bottom hinge, invert screw 

and reinstall pivot screw in hinge. See 

Figure 6

.

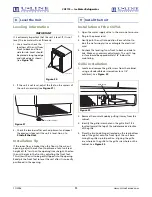
7. Install bottom hinge on cabinet, opposite side, aligning 

flat edge of hinge with outer edge of unit. Partially 
tighten screws. See 

Figure 8

.

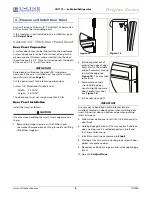
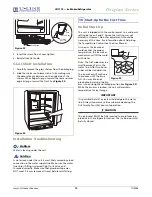
8. Relocate plastic spacer/bushing on bottom of door to 

the opposite side. See 

Figure 9.

 Clean out bushing hole 

in door bottom if necessary.

9. Place door on lower hinge pin. Align flat edge of top 

hinge with outer edge of unit and fasten upper hinge 
to unit (four screws). Partially tighten screws. See


Figure 10

.

10. Adjust door to assure proper seal. Tighten upper and 

lower hinge screws securely. 

11. Replace four plastic plugs removed in Step 4 into holes 

on top of unit. Replace screws in holes in bottom of unit 
on opposite side.

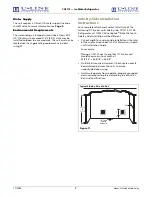
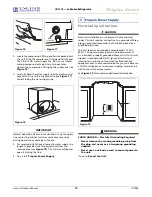
Other Site Requirements

Power Supply

The unit requires a grounded and polarized 115 VAC, 
60 Hz, 15A circuit (normal household current). See 
Electrical Specifications on 

Page


10

.

Figure 4

Figure 5

Plastic

Plug Hole

Plastic

Plug Hole

Hinge

Screw

Right Side

Door Swing

Right Side

Hinge

Invert

Screw

Invert
Hinge

Left Side

Door Swing

Figure 6

Figure 7

Figure 8

Bushing

Figure 9

Figure 10

Summary of Contents for Origins CO1175AS

Page 1: ...rvice com Phone 414 354 0300 FAX 414 354 7905 Service Parts Tech Lines Phone 800 779 2547 FAX 414 354 5696 OnlineService U Line com 2006 U Line Corporation 11 2006 CO1175 Ice Maker Refrigerator Instal...

Page 2: ...is unit requires connection to the water supply Improper hook up can result in substantial property damage If you are unsure of your ability to safely connect the water supply to the unit consult a li...

Page 3: ...ion parts Complete and mail the Product Registration Card or register online at www U LineService com Once your unit is installed keep the User Manual and this Installation Guide in a safe place for f...

Page 4: ...olors or rusting appears clean it quickly with Bon Ami or Barkeepers Friend Cleanser and a non abrasive cloth Always clean in the direction of the grain Always finish this process with Claire Stainles...

Page 5: ...next to a wall or similar type of structure All left hand hinged units require a minimum of 1 4 door clearance if installed flush with cabinet or wall and 8 clearance for Black Stainless Steel units i...

Page 6: ...rt screw and reinstall pivot screw in hinge See Figure 6 7 Install bottom hinge on cabinet opposite side aligning flat edge of hinge with outer edge of unit Partially tighten screws See Figure 8 8 Rel...

Page 7: ...ries units side by side CO1175 1175R Refrigerator or 1175WC Wine Captain Note that each Side By Side Installation will be different Cut out width for a side by side installation is the total of the wi...

Page 8: ...Use care when handling the insert Insert edges may be sharp 1 Remove top hinge screw pin with a Phillips head screwdriver Remove door by tilting forward and lifting off bottom hinge pin 2 Pull door g...

Page 9: ...ttom hinge screws 4 Tighten top hinge screws Go on to 6 Prepare Plumbing CAUTION Plumbing installation must observe all state and local codes All water connections MUST BE made by a licensed qualified...

Page 10: ...5 Go on to 7 Prepare Power Supply Electrical Specifications CAUTION Electrical installation must observe all state and local codes This unit requires connection to a grounded three prong polarized re...

Page 11: ...e unit after it is correctly positioned in the opening Installation of the CO75A 1 Open the water supply valve in the main water source 2 Plug in the power cord 3 Gently push the unit into position Be...

Page 12: ...n 4 and 5 Assure that setting was not altered in shipment No other adjustments should be necessary at this time For information about Adjusting the Temperature Control see the User Manual As soon as t...

Page 13: ...Solution A Check that the water is connected and turned on and the line is not obstructed Water coming into the unit may take an hour or more Problem Q The cubes produced during the first two to three...

Reviews: