background image

u-line.com

27

Troubleshooting

Compressor Information

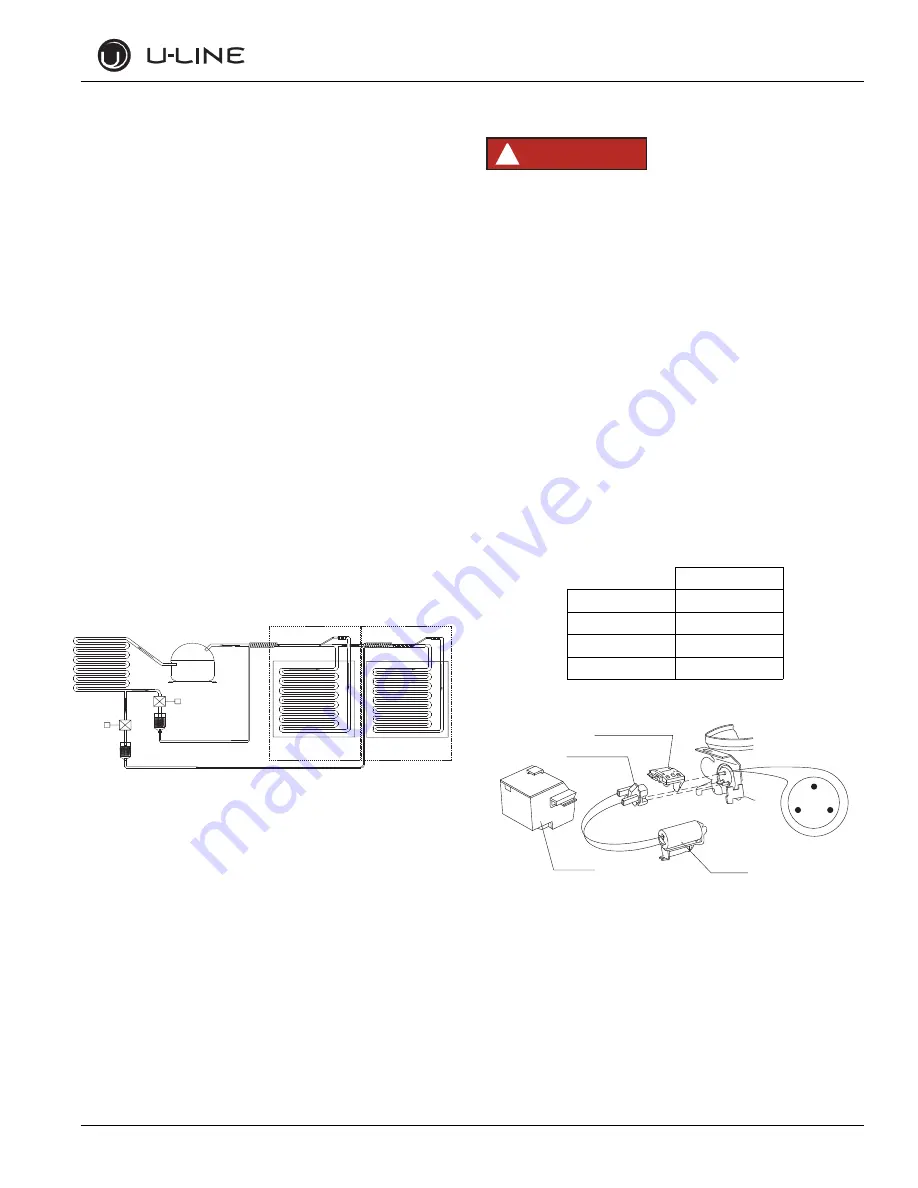
Cooling process

Refrigerant is pumped from the compressor to the condenser as a 
high pressure, high temperature vapor.

As the refrigerant cools in the high pressure condenser, the vapor 
condenses to liquid. During this phase change, a great amount of heat 
is rejected with the help of the condenser fan.

The liquid then flows through the open solenoid valve to the dryer 
where it is strained and filtered.

From the dryer, the refrigerant flows through the capillary tube which 
meters the liquid refrigerant to the evaporator.

The pressure of the refrigerant is reduced to the evaporating or low 
side pressure.

The reduction of pressure on the liquid refrigerant causes it to boil 
or vaporize until it reaches saturation temperature. As the low 
temperature refrigerant passes through the evaporator coil, it 
continues to absorb a lot of heat, causing the boiling action to 
continue until the refrigerant is completely vaporized. It is during this 
phase that the most heat is absorbed (the cooling takes place) in the 
refrigerator.

The refrigerant vapor leaving the evaporator travels through the 
suction line to the compressor inlet. The compressor takes the low 
pressure vapor and compresses it, increasing both pressure and 
temperature. The hot, high pressure gas is pumped out the discharge 
line and into the condenser. The cycle continues.

Compressors

DANGER

!

Electrocution can cause death or serious injury. Burns from hot 
or cold surfaces can cause serious injury. Take precautions when 
servicing this unit.

• Disconnect the power source.
• Do not stand in standing water when working around 

electrical appliances.

• Make sure the surfaces you touch are not hot or frozen.
• Do not touch a bare circuit board unless you are wearing 

an anti-static wrist strap that is grounded to an electrical 

ground or grounded water pipe.

• Handle circuit boards carefully and avoid touching 

components.

To measure the start winding resistance, measure across the C and S 
pins.

To measure the run winding resistance, measure across the C and R 
pins.

Also check S to R and you should get the sum of the run and start 
windings.

To ensure the windings are not shorted, check the S and R to ground.

EMX20CLC

Voltage

230VAC

Frequency

50Hz

Start Winding

34.9 ohms

Run Winding

47.8 ohms

C

S

R

OVERLOAD PROTECTOR

STARTING RELAY

CAPACITOR (IF EQUIPPED) 

RELAY COVER

CAPILLARY TUBE

SOLENOID VALVE

SOLENOID VALVE

DRYER 

CONDANSER

COMPRESSOR

EVAPORATOR

DRYER    

EVAPORATOR

CAPILLARY TUBE

LEFT ZONE

RIGHT ZONE

Summary of Contents for U-3090WCWCOL-00

Page 1: ...COM SERVICE MANUAL MODULAR 3000 SERIES 230V 3090 MODELS U 3090WCWCOL 00 U 3090WCWCS 00 The American Built In Undercounter Leader Since 1962 ALL MODULAR 3000 MODELS ARE INTENDED FOR BUILT IN INSTALLATI...

Page 2: ...he product installation and any alleged property damage 2 Inquire when the problem first appeared any prior problems with the product and provide a brief description of the alleged damages 3 To expedi...

Page 3: ...Select Control 6 Adjusting Temperature Settings 6 Interior Lighting 7 Error Notification 7 Customer Menu 7 Service Menu 9 USB Communication 14 Quick Guide 18 Convection Cooling 20 3000 Series Mainten...

Page 4: ...y your old refrigerator or freezer take off the doors and leave shelves in place so children may not easily climb inside This appliance is not intended for use by persons including children with reduc...

Page 5: ...trip base fascia is free of obstruction Obstructing free airflow can cause the unit to malfunction and will void the warranty Failure to clean the condenser every six months can cause the unit to malf...

Page 6: ...ne 7 C 13 C set point 10 C Red Wine 13 C 18 C set point 13 C Cabinet Configuration Model Door Configuration Left Zone Right Zone U 3090WCWCOL 00 Overlay Glass Doors Wine Racks Wine Racks U 3090WCWCS 0...

Page 7: ...following information on the Labor Invoice Name of the selling dealer Date of purchase installation Sales order or Invoice number Description of verification document i e Store Receipt Closing Papers...

Page 8: ...formation Thermistor Calibration While thermistors generally do not require calibration over time contact corrosion and or element wear may make calibration necessary Calibration To calibrate a thermi...

Page 9: ...h Mode and temperature ranges Mode selection will vary by model The 3090 Models have two independently controlled zones Each zone may have its own Mode and set point 1 In order to adjust set points yo...

Page 10: ...Should the system detect a fault an error notification will be displayed on the user interface See below for a list of errors Customer Menu The 3000 Series of U Line undercounter refrigeration applia...

Page 11: ...Sabbath mode disables system responses to user initiated activities and all external functions including lighting display and audible alarms The unit will still maintain internal temperatures and set...

Page 12: ...toring while settings are restored When restoration is complete Restoring will return to Restore To exit Factory Default use Up to select Return to Menu and press Select to confirm Help To access the...

Page 13: ...r circuit shorted Check connection Replace if necessary R Zone T Short Right Zone thermistor circuit shorted Check display cable Replace if necessary L Evap T Short Left evaporator thermistor circuit...

Page 14: ...h available information To exit the Input Status menu use Up to select Return to Menu and press Select to confirm Outputs Outputs is used to monitor the state of DC outputs To access Outputs 1 Use Dow...

Page 15: ...ic report Any system faults will be displayed under Self test If no errors are present no errors will be displayed and the main control board is functioning properly The main control board is extremel...

Page 16: ...Restore will change to Restoring while settings are restored When restoration is complete Restoring will return to Restore To exit Factory Default use Up to select Return to Menu and press Select to c...

Page 17: ...ly insert a flash disk in to the USB port located above the grille The flash disk activity light located on the flash disk will begin flashing immediately as data is recorded to the drive Data is reco...

Page 18: ...unning the cooling system To toggle showroom mode 1 Use Down to select Showroom Mode 2 Press Select 3 Use Down to select Off and press Select Off will begin to flash 4 Press Up or Down to toggle betwe...

Page 19: ...Differential Right Zone Offset Right Evap Offset L Door Indicator R Door Indicator Relay 1 Indicator Sample Data 0 0 Beverage 34 1 0 0 Field 21 22 23 24 25 26 27 28 29 30 ID Relay 2 Indicator Relay 3...

Page 20: ...C 30 Left LED intensity provided in 10 Left Zone Differential value in F C 31 Right LED intensity provided in 11 Left Zone offset value in F C 32 Energy Saver mode indicator E active 12 Left evaporat...

Page 21: ...ADJUST MODES PRESS AND RELEASE TO SCROLL THROUGH THE MODES 4 3090 ADJUST TEMPERATURE PRESS TO SELECT ZONE PRESS TO SET THE TEMPERATURE 3045 3060 ADJUST TEMP PRESS TO SET THE TEMPERATURE 5 3090 ADJUST...

Page 22: ...H AND RELEASE TO EXIT SERVICE MODE CONFIGURES THE ON BOARD USB PORT FOR FLASH DRIVE OR PC LINK DISPLAYS THE NUMBER OF TIMES AN ERROR HAS OCCURRED SCROLL TO THE END TO ERASE THE ERROR CODES DISPLAYS TH...

Page 23: ...order to operate efficiently the evaporator fan blade and vents should be unobstructed and free of any dust buildup Evaporator Fan Replacement Should the evaporator fan need to be replaced follow the...

Page 24: ...grille lock screws See below 3 Gently pull grille away from unit until it stops 4 Push grille rails towards the center of the unit to lift rails off lock screws 5 Pull grille free from unit Installin...

Page 25: ...over extend or damage it during door alignment Overlay Models Removing Overlay 1 Open door completely 2 Remove gasket 3 Remove six screws seated in gasket pocket Stainless Models Removing Wrap 1 Open...

Page 26: ...ivate with the switching of the relay If it does not see Component Testing on page 24 Inputs The main control monitors a number of thermistor inputs and switch states during operation It would be unli...

Page 27: ...ator fan is used Condition Customer complains of the unit not cooling properly The main screen of the display lists an error L Temp Hi 12H The compressor seems to be functioning properly however the l...

Page 28: ...oblem Airflow through the grill below the door in front cannot be obstructed Also the unit cannot be installed behind a closed door or in a closet The unit is too cold or freezing product Control set...

Page 29: ...er to Quick Chill Section of this manual Control set too cold Refer to Adjusting Temperature Settings Section of this manual Review logged error codes Refer to Fault System Diagnosis Guide Section of...

Page 30: ...ine to the compressor inlet The compressor takes the low pressure vapor and compresses it increasing both pressure and temperature The hot high pressure gas is pumped out the discharge line and into t...

Page 31: ...orce pulls the reed to its contact and closes the circuit which turns the light and display off When the door is open the reed pulls away from the contact and opens the circuit If the door s are left...

Page 32: ...s or damage Repair split or pinched cabling Amb Thrm Short Inspect thermistor cable for pinch points or damage Replace if necessary Inspect wire harness from main control board for pinch points or dam...

Page 33: ...ere no clear guidelines or solutions are evident today The newest Uihlein generation continues to build upon the family s innovative legacy at the Milwaukee Wisconsin based business by providing conti...

Reviews: