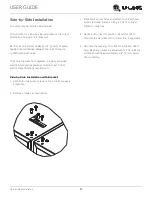
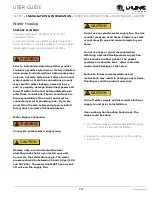
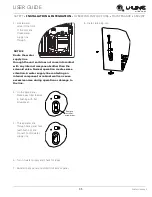
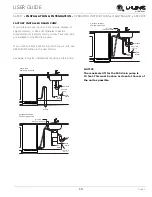
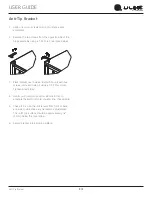
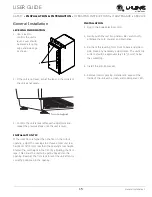
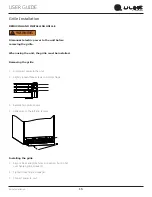
background image

USER GUIDE & SERVICE MANUAL

1 Class 

 UHCP115 

 15” Clear Ice Machine with Pump

Summary of Contents for UHCP115

Page 1: ...USER GUIDE SERVICE MANUAL 1 Class UHCP115 15 Clear Ice Machine with Pump...

Page 2: ...racket General Installation Grille Installation Door Swing Door Adjust Maintenance Cleaning Cleaning Condenser Extended Non Use Operating Instructions First Use Control Operation Ice Airflow and Produ...

Page 3: ...lect products are available worldwide PRODUCT INFORMATION Looking for additional information on your product User Guides Spec Sheets CAD Drawings Compliance Documentation and Product Warranty informat...

Page 4: ...or moderate personal injury property or equipment damage This unit contains R600a Isobutane which is a flammable hydrocarbon It is safe for regular use Do not use sharp objects to expedite defrosting...

Page 5: ...n place so children may not easily climb inside If the unit is being removed from service for disposal check and obey all federal state and local regulations regarding the disposal and recycling of re...

Page 6: ...mperatures may reduce the unit s ability to reach low temperatures and or reduce ice production on applicable models For best performance keep the unit out of direct sunlight and away from heat genera...

Page 7: ...he unit Always keep your working area dry NOTICE Electrical installation must observe all state and local codes This unit requires connection to a grounded three prong polarized receptacle that has be...

Page 8: ...N Unit can NOT be installed behind a closed cabinet door If you would like to align the face of the unit with other adjacent cabinet doors you may need to alter the wall just behind the drain connecti...

Page 9: ...ed according to each unit s electrical specifications requirements Side by Side Installation with Bracket 1 Slide both units out so screws on top of units are easily accessible 2 Remove screws as show...

Page 10: ...ct a licensed plumber Water Supply Connection WARNING Connect to potable water supply only CAUTION Review obey and understand the local plumbing codes before you install your unit Connect to the cold...

Page 11: ...alve Normal operation creates some vibration A water supply line contacting an internal component or cabinet wall can cause excessive noise during operation or damage to the line 4 On the back panel b...

Page 12: ...operty damage NOTICE Drain can NOT be located directly below the unit Unit has a solid base that will not allow the unit to drain below itself There is a possibility that hose connections may have loo...

Page 13: ...o install a P60 drain pump into your unit see DRAIN PUMP section in the User Manual See below for typical installations requiring a drain pump NOTICE The maximum lift for the P60 drain pump is 10 feet...

Page 14: ...ver holes and attach to unit with two screws removed in step 2 using a T 25 Torx driver Tighten screws fully 4 Gently push unit into position Be careful not to entangle the electrical cord or water li...

Page 15: ...ieve a total unit rear height of 1 8 3 mm less than the opening s rear height Shorten the unit height in the front by adjusting the front legs This allows the unit to be gently tipped into the opening...

Page 16: ...unit the grille must be installed Removing the grille 1 Disconnect power to the unit 2 Slightly loosen three screws on bottom hinge 3 Remove two grille screws 4 Slide grille to the left and remove Ins...

Page 17: ...adjacent to cabinets Stainless Steel and black and white models require 2 1 8 54 mm door clearance to accommodate the handle if installed next to a wall Integrated models require 1 4 6 mm clearance i...

Page 18: ...from top of unit 2 Loosen do not remove top and bottom hinge screws using a Torx T 25 screwdriver on the top and a 1 4 socket on the bottom 3 Align door squarely with cabinet 4 Make sure gasket is fi...

Page 19: ...pulling outward exposing the gasket channel 3 Remove the 3 pieces of gasket channel filler and reinstall on the opposite end of door 4 Install gasket into channel beginning at one corner and pressing...

Page 20: ...ine recommends discarding the ice produced during the first two to three hours of operation to avoid possible dirt or scale that may dislodge from the water line When plugged in the unit will begin op...

Page 21: ...r 5 seconds and release The oF oC symbol will flash briefly after 5 seconds Interior light and display will go dark and remain so until user resets mode unit continues to operate Disable Sabbath Mode...

Page 22: ...Control Operations sections for details and other options For more information about BrightShield visit www u line com For more information about Vyv Antimicrobial Light Technology visit www vyv tech...

Page 23: ...bridge becomes thicker the tendency for the cubes to stay together as a slab increases A bridge thicker than 1 8 3 2 mm may cause cubes to overfill the ice bucket 32 ice cubes are formed on a 4 x 8 sl...

Page 24: ...u line com Airflow and Product Loading NOTICE The unit requires proper airflow to perform at its highest efficiency Do not block the front grille at any time or the unit will not perform as expected D...

Page 25: ...r Barkeepers Friend Cleanser and a nonabrasive cloth Always clean with the grain Always finish with Claire Stainless Steel Polish and Cleaner or comparable product to prevent further problems Using ab...

Page 26: ...dpipe into the water trough 6 Clean the Interior Bin as follows Dilute one packet of CLR cleaner into two quarts of water Using a sponge or cloth clean interior of ice bin tubing and door This cleaner...

Page 27: ...aporator assembly ice mold Initially the water flow may not be uniform causing uneven sized cubes or water to spill into the ice storage bin This is a normal situation that will correct itself within...

Page 28: ...nvironmental conditions more or less frequent cleaning may be necessary WARNING Disconnect electric power to the unit before cleaning the condenser NOTICE DO NOT use any type of cleaner on the condens...

Page 29: ...r must remain open to prevent formation of mold and mildew Open door a minimum of 2 50 mm to provide the necessary ventilation WINTERIZATION If the unit will be exposed to temperatures of 40 F 5 C or...

Page 30: ...omponents with a brief description of the normal operating sounds they make NOTE Your product may not contain all the components listed Compressor The compressor makes a hum or pulsing sound that may...

Page 31: ...RELAY EMBRACO COMPRESSOR GREEN W YELLOW GROUND PINK LIGHT BLUE HOT WHITE 115V DARK BLUE 220 240V WHITE 115V DARK BLUE 220 240V PURPLE PUMP BLACK 115V BROWN 220 240V FAN 115 VOLT PLUG CONTROL BOARD BI...

Page 32: ...nt of a part the servicer is authorized to replace the part in question The part that caused the damage must be returned to U Line in its entirety The part must be clearly labeled with the serial numb...

Page 33: ...shes 12 represents the production month In most cases warranty status can be verified by the production date information within the serial number Alternatively a Proof of Purchase or equivalent may su...

Page 34: ...rews 80 54230 00 22 Handle w logo 80 54214 00 23 Hi temp thermistor 80 54070 00 24 Hinges 2 w screws 80 54233 00 25 Hot gas valve and coil 80 54169 00 26 Ice scoop clr 80 54080 00 27 LED light strip a...

Page 35: ...s will be shipped at no charge after U Line confirms warranty status Please provide the model serial number part number and part description Some parts will require color or voltage information If U L...

Page 36: ...Lower than normal Warm near room temperature Hot Warm Warm Extremely cold near inlet Outlet below room temperature Lower than normal Partial Restriction Somewhat lower than normal vacuum Warm near ro...

Page 37: ...tic wrist strap that is grounded to an electrical ground or grounded water pipe Handle circuit boards carefully and avoid touching components To measure the start winding resistance measure across the...

Page 38: ...ons a service mode menu and service menu selection explanations Verification of temperature and thermistor performance can be identified by directly viewing thermistor readings in the service mode Com...

Page 39: ...level unit if needed Low Ice Production Dirty evaporator dirty condenser faulty bin thermistor Clean the evaporator using U Line cleaner clean the condenser coil if needed check bin thermistor reading...

Page 40: ...does not or seems to not power on follow the flow chart below to help diagnose the issue Before beginning it is important to first verify the unit is not simply set to sabbath mode System Condition Su...

Page 41: ...nents have been ruled out as being faulty but the unit continues to have operating issues it is most likely due to a configuration error Configuration errors can be cleared by restoring the unit to it...

Page 42: ...ic grease REED SWITCH A reed switch is used to monitor door state When the door is closed magnetic force pulls the reed to its contact and closes the circuit which turns the light and display off When...

Page 43: ...re Navigates through service menu LED activated with button activation 3 Down Button Decreases temperature Navigates through service menu LED activated with button activation 4 Light Button Activates...

Page 44: ...he light key and the power key for 5 seconds The display will flash once and beep and the degree symbol will begin to flash When the degree symbol is flashing the unit will allow the use of the contro...

Page 45: ...to this model E5 Thermistor 1 shorted E6 Thermistor 2 shorted E7 Thermistor 3 shorted E8 Thermistor 4 shorted Does not apply to this model E9 Door 2 lower open P1 Pump Circuit open Does not apply to t...

Page 46: ...s will show the number of minutes the compressor has run in the prior cycle or current cycle if the compressor was running when service mode was entered 24 ACTIVATE DEFROST HARVEST Turns on the hot ga...

Page 47: ...conds use the up and down arrow buttons to select the appropriate model number See Above Model List 5 Press the light bulb button once 6 The display will blink and then will appear as the programmed d...

Page 48: ...ator Fan Condenser Fan N A N A 2218R N A N A N A N A N A Compressor Light Evaporator Fan Condenser Fan N A N A 2218RGL N A N A N A N A N A Compressor Light Evaporator Fan Condenser Fan N A N A 2218WC...

Page 49: ...you encounter a dirty thermistor connection you should replace the thermistor and the thermistor harness This unit has two thermistors Thermistor one Ice Bin Located along the right hand side wall of...

Page 50: ...on your meter Thermistor Resistance Data Type 2 Temp F Temp C Nominal Resistance OHMS 22 30 177000 13 25 130370 4 20 97070 5 15 72929 14 10 55330 23 5 42315 32 0 32650 41 5 25388 50 10 19900 59 15 157...

Page 51: ...USER GUIDE Defrost 1 u line com SAFETY INSTALLATION INTEGRATION OPERATING INSTRUCTIONS MAINTENANCE SERVICE Defrost These models have no defrost options 51...

Page 52: ...d or other natural disasters The product must be installed operated and maintained in accordance with your product s User Guide The remedies described above for each warranty are the only ones that U...

Reviews: