

Reviews:
No comments
Related manuals for UHNPB315

1200 series
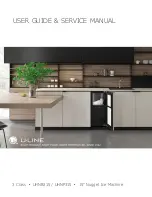
Brand: U-Line Pages: 21

Monogram Refrigerator
Brand: GE Pages: 2

IM-4A
Brand: GE Pages: 8

Monogram Refrigerator
Brand: GE Pages: 12

monogram ZDIC150
Brand: GE Pages: 12

Monogram ZDI15
Brand: GE Pages: 24

UCC15NP
Brand: GE Pages: 84

IM4D
Brand: GE Pages: 12

Ice Maker
Brand: Rangemaster Pages: 8

Q25
Brand: Bartscher Pages: 30

Q25
Brand: Bartscher Pages: 52

ECO Series
Brand: IceTech Pages: 28

ICE20A
Brand: BARMATIC Pages: 32

DSIM100
Brand: Dash Pages: 28

IM Series
Brand: icetro Pages: 50

IC Series
Brand: icetro Pages: 37

Outdoor Series
Brand: U-Line Pages: 28

Petra
Brand: Yonanas Pages: 32


