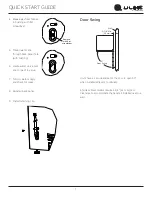
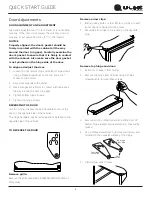
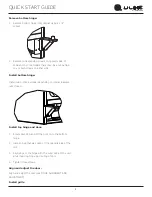
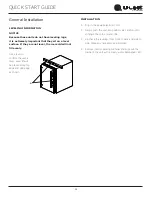
background image

QUICK START GUIDE

30679 Rev_C

1 Class   

   115V   

   21” Refrigerator Ice 

Summary of Contents for UHRI124BS01A

Page 1: ...QUICK START GUIDE 30679 Rev_C 1 Class 115V 21 Refrigerator Ice ...

Page 2: ...sconsin USA and select products are available worldwide PRODUCT INFORMATION Looking for additional information on your product User Guides Spec Sheets CAD Drawings Compliance Documentation and Product Warranty information are all available for reference and download at u line com PROPERTY DAMAGE INJURY CONCERNS In the unlikely event property damage or personal injury is suspected related to a U Li...

Page 3: ...er your product on u line com See complete warranty for details CONTENTS Safety and Warning 4 Environmental Requirements 5 Electrical 5 Water Hookup 6 Door Swing 7 Door Adjustments 8 General Installation 10 Control Operation 11 First Use 11 Airflow Product Loading 12 Interior Adjustments 13 Ice 14 Cleaning 16 Warranty 18 D e s i g n e d engineered and assembled in Milwauk e e W I U S A to be remov...

Page 4: ...ar use Do not use sharp objects to expedite defrosting Do not service without consulting the R600a specifications section included in the User Guide Do not damage the refrigerant circuit Service must be done by factory authorized service personnel Any parts shall be replaced with like components Failure to comply could increase the risk of possible ignition due to incorrect parts or improper servi...

Page 5: ...ever attempt to repair or perform maintenance on the unit until the electricity has been disconnected Never remove the round grounding prong from the plug and never use a two prong grounding adapter Altering cutting or removing power cord removing power plug or direct wiring can cause serious injury fire loss of property and or life and will void the warranty Never use an extension cord to connect...

Page 6: ...he supply line The water line should be looped into 2 coils This will allow the unit to be removed for cleaning and servicing Make certain that the tubing is not pinched or damaged during installation WARNING Connect to potable water supply only CAUTION Do not use any plastic water supply line The line is under pressure at all times Plastic may crack or rupture with age and cause damage to your ho...

Page 7: ...et and connect to valve 7 Turn on water supply and check for leaks 8 Reinstall back panel 9 Install retaining clip Remove ZLWK ɠDW screwdriver USER GUIDE Door Swing Door Swing Units have a zero clearance for the door to open 90 when installed adjacent to cabinets Stainless Steel models require 2 1 8 54 mm door clearance to accommodate the handle if installed next to a wall Wall 90 Door Swing 2 1 8...

Page 8: ...cabinet all the way around the door no gaps 4 Tighten bottom hinge screws 5 Tighten top hinge screws REVERSING THE DOOR Location of the unit may make it desirable to mount the door on the opposite side of the cabinet The hinge hardware will be removed and reinstalled on the opposite side of the cabinet TO REVERSE THE DOOR Remove grille Remove the grille see GRILLE INSTALLATION section of this guid...

Page 9: ...er side Install bottom hinge Install two or three screws depending on model Replace nuts if used Install top hinge and door 1 Rotate door 180o and lift the door on to the bottom hinge 2 Install hinge that was used on the opposite side of the unit 3 Align edge of the hinge with the outer edge of the unit while inserting hinge pin into top of door 4 Tighten three screws Align and adjust the door Ali...

Page 10: ...mold will not fill evenly Use a level to confirm the unit is level Level should be placed along top edge and side edge as shown INSTALLATION 1 Plug in the power electrical cord 2 Gently push the unit into position Be careful not to entangle the cord or water line 3 Re check the leveling from front to back and side to side Make any necessary adjustments 4 Remove interior packing material and wipe o...

Page 11: ... to normal operation Showroom Mode Hold and for 5 seconds Display will show SH for 2 seconds Interior light and display will function normally but the compressor and fans will not energize Repeat command to return to normal operation Display will show EH for 2 seconds This unit is Star K certified See www star k org for more details DOOR ALERT NOTIFICATION When the door is left open for more than ...

Page 12: ...e in many shapes and sizes Not all bottles and cans will fit on every shelf and wine rack Larger diameter champagne and Magnum bottles only fit on wine racks when noted on the product specifications When determining capacities U Line uses typical 12 oz cans 12 oz bottles 750 mL white wine and red wine bottles shown below Airflow and Product Loading Typical Can 12 oz 4 123 mm 66 mm 2 27 32 19 32 Ty...

Page 13: ...e shelf from unit by pulling out 3 Insert the shelves as follows 1 To move to a different position in the unit insert shelf at an angle approximately 15 20 over the rib in the side of the unit where you want to place the shelf Place the shelf into the unit at an angle to clear the door 2 Continue to slide the shelf into the unit at an angle until it clears the door Lower the shelf and push it in c...

Page 14: ...during the unit s operation You may hear the compressor or fan motor the water valve or ice dropping into the ice bucket CAUTION NEVER use an ice pick knife or other sharp instrument to separate cubes Shake the ice bucket instead During periods of limited use or high ambient temperatures it is common for cubes to fuse together Gently shake the bucket to break apart cubes If not using the ice maker...

Page 15: ...CAUTION Too large of an adjustment to the screw can cause the water to overflow the ice maker and can cause property damage 3 Turn the adjusting screw toward the minus sign clockwise for smaller cubes or toward the plus sign counterclockwise for larger cubes 4 Install the ice maker assembly cover ADJUSTING ICE HARVEST 1 Remove the front grille see GRILLE INSTALLATION 2 Using a flat tip screwdriver...

Page 16: ...ning in the stainless steel to become blurred Rust not cleaned up promptly can penetrate the surface of the stainless steel and complete removal of the rust may not be possible Integrated Models To clean integrated panels use household cleaner per the cabinet manufacturer s recommendation INTERIOR CLEANING Disconnect power to the unit Clean the interior and all removed components using a mild nona...

Page 17: ...bly damaging water sensitive flooring the unit must be removed from cabinetry To defrost 1 Disconnect power to the unit 2 Remove all products from the interior 3 Prop the door in an open position 2 in 50 mm minimum 4 Allow the frost to melt naturally 5 After the frost melts completely clean the interior and all removed components See INTERIOR CLEANING 6 When the interior is dry reconnect power and...

Page 18: ...flood or other natural disasters The product must be installed operated and maintained in accordance with your product s User Guide The remedies described above for each warranty are the only ones that U Line will provide either under these warranties or under any warranty arising by operation of law U Line will not be responsible for any consequential or incidental damages arising from the breach...

Reviews: