background image

10

U-Line 1000 Series Maintenance

1

2

1

5 Maintenance

Light bulb Replacement

To replace the light bulb in your U-Line unit:

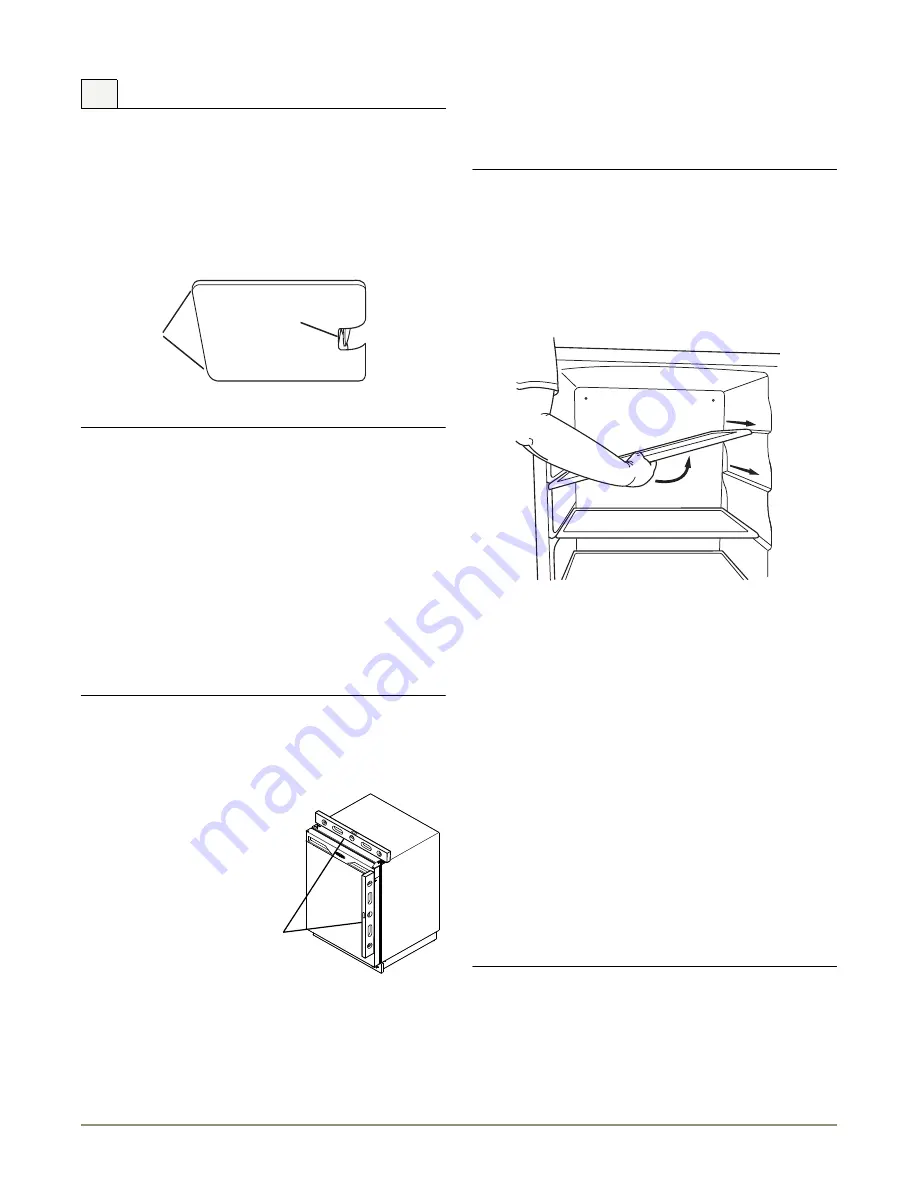
1. Find the light located at the top of the unit. Grasp the edges of 

the light housing lens (1) opposite the exposed tab and gently 
push the lens toward the tab (2).

2. Pull the edge of the lens down (1) and swing it out of the light 

housing.

IMPORTANT

IMPORTANT

ALWAYS use a genuine U-Line replacement 120V 10 watt 
bulb (Part Number 31317) in the light housing. Use of any 
other bulb within the housing will produce excessive heat, 
causing damage to the light housing and cabinet interior, 
and will compromise the precise temperature control of 
the unit.

1. Replace the lens by first inserting the tab side back into the 

housing at a slight angle. 

2. While gently pushing the lens towards the tab end, push the free 

end into the housing, and release when you hear a snap.

For Models with adjustable leveling feet:

1. Use a level to check the 

levelness of the unit from front 
to back and from side to side. 
Place the level along top edge 
and side edge as shown (1).

2. If the unit is not level, rotate 

the adjustable leveling legs to 
raise or lower each corner of 
the unit (5) as necessary.

3. Check levelness after each 

adjustment and repeat the 
previous steps until the unit is 
level.

Leveling

IMPORTANT

IMPORTANT

Unit must be level, for proper door and ice maker (if 
equipped) operation. 

Removing and Installing Interior Shelves

For models equipped with glass shelves having recessed shelf 
supports, remove the shelves as follows:

1. Pull shelf out about 6" (1), until back of shelf clears the “hump” 

on the right-hand side.

2. Tilt up right-hand edge of shelf (2).

3. Remove shelf from unit by pulling out (3).

Insert the shelves as follows:

1. To move to a different position in the unit, insert shelf at an 

angle, approximately 15-20°, over the rib in the side of the unit 
where you want to place the shelf. Place the shelf into the unit 
at an angle to clear the door.

2. Continue to slide the shelf into the unit at an angle until it clears 

the door.

3. Lower the shelf and push it in completely. Ensure the raised edge 

strip is toward the rear of the unit and the decorative graphics, if 
applied, are on the underside of the shelves.

IMPORTANT

IMPORTANT

• Make sure the shelves are inserted fully into the unit.
• The edge strip toward the rear prevents cans and 

bottles from freezing against the cold evaporator.

2

3

1

For Models without adjustable leveling feet:

IMPORTANT

IMPORTANT

The unit must be located on a level surface, for proper 
door and ice maker (if equipped) operation. 

1. Use a level to check the levelness of the unit from front to back 

and from side to side. Place the level along top edge and side 
edge as shown (1).

Summary of Contents for WINE CAPTAIN U-1075WCS-00

Page 1: ...ounter Leader Since 1962 U LINE COM U 1075WCS 00 U 1075WCS 02 U 1075WCS 13 U 1075WCS 15 U 1075BEVS 00 U 1075BEVS 02 U 1075BEVS 13 U 1075BEVS 15 ULN 29RB 00 ULN 29RWH 02 ULN 29RB 02 ULN 29RWH 06 ULN 29...

Page 2: ...s while the 2000 Series offers upscale features advanced technology and specialized product families U Line s approach to its breadth of products multiple price points and features allows a choice and...

Page 3: ...lections Suggestions 6 Ideal Wine Storage Considerations 7 Wine Stocking Recommendation 8 Wine Rack Removal and Installation 8 Wood Trim Finishing 9 5 Maintenance 10 Light bulb Replacement 10 Leveling...

Page 4: ...HAZARD Electrical Grounding Required Never attempt to repair or perform maintenance on the unit until the electricity has been disconnected Never remove the round grounding prong from the plug and ne...

Page 5: ...bottles Four or eight wine bottle capacity 0 75 L on each rack Stable temperatures Stable consistent temperatures provide longer term storage capability Built in Provides custom look No additional cle...

Page 6: ...are preset at the factory Initial startup requires no adjustments IMPORTANT IMPORTANT U Line recommends allowing the unit to run overnight before loading refrigerator or freezer with product Control...

Page 7: ...The time the internal light is illuminated This mainly affects product on the top rack or shelf The front grille or condenser are obstructed 1 2 Adjusting Air Temperature IMPORTANT IMPORTANT Adjust th...

Page 8: ...y Frency Hungary Beerenauslese Sauternes Tokay Medium Bodied Semi Sweet California Germany Gewurtztraminer Liebfraumilch Light Bodied Off Dry Germany Rhine Mosel Riesling Matching Food and Wine Althou...

Page 9: ...overpowered with an oaky taste Tannin Tannins are extracted from the grape skins and stems and are necessary for a well balanced red wine Tannins are easily identified in wine tasting as the drying s...

Page 10: ...allation To remove a rack from the cabinet 1 Remove any bottles stored on the rack 2 Grasp the end of the rack and gently slide it out until it stops 3 Press the left rack release lever down At the sa...

Page 11: ...stle brush or a foam applicator Allow stain to penetrate about three minutes Before the stain is dry take a stain dampened rag and remove any excess stain remaining Wipe towards the grain with medium...

Page 12: ...ious steps until the unit is level Leveling IMPORTANT IMPORTANT Unit must be level for proper door and ice maker if equipped operation Removing and Installing Interior Shelves For models equipped with...

Page 13: ...raphics if applied are on the underside of the shelves Removing and Installing Grille WARNING Disconnect electric power to the unit before removing the grille WARNING DO NOT touch the condenser fins 4...

Page 14: ...eversible Stainless steel models with glass doors without locks are field reversible Stainless steel models without glass doors must be ordered right or left hand hinged Reversing the Door The hinge h...

Page 15: ...Be sure to only remove the two screws holding the actuator to the door Reinstall the actuator 4 on the opposite end of the door where the nameplate was removed 8 Install new nameplate where the actuat...

Page 16: ...e blurred Rust not cleaned up promptly can penetrate the surface of the stainless steel and complete removal of the rust may not be possible 7 Cleaning Interior Cleaning Disconnect power to the unit C...

Page 17: ...eath or electrical shock IMPORTANT IMPORTANT If the ambient temperature is expected to drop below 50 F turn off and unplug unit and drain all water from the unit to prevent freezing damage not covered...

Page 18: ...y to reflect normal appliance operating noises Listed below are common refrigeration components with brief description of the normal operating sounds they make NOTE Your product may not contain all th...

Page 19: ...ne product collection includes Ice Makers Wine Captain Models Combo Models a Refrigerator Freezer Refrigerators Drawers and Beverage Centers The U Line brand offers products in the 1000 Series 2000 Se...

Reviews: