background image

12 


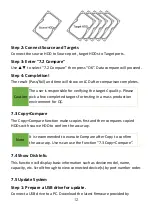
Step 2: Connect Source and Targets 

Connect the source HDD to Source port, target HDDs to Target ports. 


Step 3: Enter "7.2 Compare" 

Use 

▲▼

 to select “7.2 Compare” then press “OK”. Data compare will proceed. 


Step 4: Completion! 

The result (Pass/Fail) and time will show on LCD after comparison completes. 


Caution 

The user is responsible for verifying the targets’ quality. Please 
pick a few completed targets for testing in a mass production 
environment for QC. 


7.3 Copy+Compare 


The Copy+Compare function makes copies first and then compares copied 

HDDs with source HDD to confirm the accuracy. 
 

Note 

It is recommended to execute Compare after Copy to confirm 
the accuracy. Users can use the function “7.3 Copy+Compare”. 


7.4 Show Disk Info. 


This function will display basic information such as device model, name, 
capacity, etc. Scroll through to view connected device(s) by port number order. 


7.5 Update System 
Step 1: Prepare a USB drive for update. 

Connect a USB drive to a PC. Download the latest firmware provided by 

Summary of Contents for SAS Series

Page 1: ...SAS Series 1 to 1 SAS SATA Sanitizer and Duplicator User Manual v A 02...

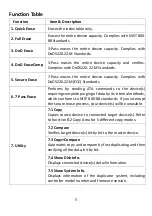
Page 2: ...Statement 2 Notice Symbols 3 Product Overview 4 Function Table 5 Function Introduction 8 1 Quick Erase 8 2 Full Erase 8 3 DoD Erase 9 4 DoD Erase Compare 9 5 Secure Erase 9 6 7 Pass Overwrite 9 7 Util...

Page 3: ...of our product and or software program or hardware issues can cause loss of data defective formatting or data loading The manufacturer will make efforts to resolve or repair any issues recognized by c...

Page 4: ...power cord for 2 minutes for discharging l Use product only in a clean dry dust free and ventilated area Liquids or foreign debris can severely damage your duplicator l It is typical for the machine t...

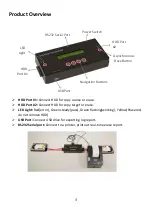
Page 5: ...Red error Green steady pass Green flashing working Yellow Powered do not remove HDD USB Port Connect USB drive for exporting log report RS232 Serial port Connect to a printer print out real time erase...

Page 6: ...g ATA commands to the device s requiring complete purging of data by its internal methods which conforms to NIST 800 88 standards If you interrupt the secure erase process your device s will be unusab...

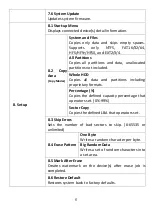
Page 7: ...HDD Copies all data and partitions including proprietary formats Percentage Copies the defined capacity percentage that operators set 0 99 Sector Copy Copies the defined LBA that operators set 8 3 Sk...

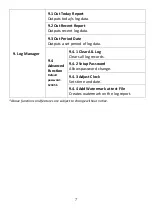
Page 8: ...ts a set period of log data 9 4 Advanced Function Default password 123456 9 4 1 Clear ALL Log Clears all log records 9 4 2 Setup Password Allows password change 9 4 3 Adjust Clock Sets time and date 9...

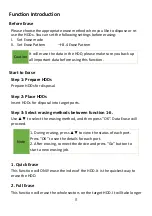
Page 9: ...HDDs for disposal Step 2 Place HDDs Insert HDDs for disposal into target ports Step 3 Select erasing methods between function 1 6 Use to select the erasing method and then press OK Data Erase will pr...

Page 10: ...1 The erasing duration of DoD Erase mode is 3 times longer than full erase mode 2 The duration of DoD EraseComp is 4 times longer than full erase mode 5 Secure Erase This function sends an ATA Secure...

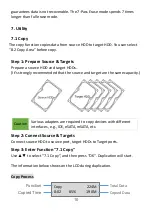
Page 11: ...rongly recommended that the source and target are the same capacity Caution Various adapters are required to copy devices with different interfaces e g IDE eSATA mSATA etc Step 2 Connect Source Target...

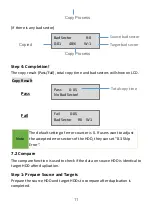
Page 12: ...of the HDD they can set 8 3 Skip Error 7 2 Compare The compare function is used to check if the data on source HDD is identical to target HDD after duplication Step 1 Prepare Source and Targets Prepar...

Page 13: ...testing in a mass production environment for QC 7 3 Copy Compare The Copy Compare function makes copies first and then compares copied HDDs with source HDD to confirm the accuracy Note It is recommend...

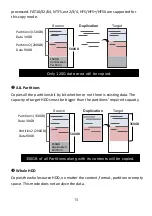
Page 14: ...2 Copy Area Users can set the copy area of source HDD Appropriate copy area can greatly reduce operation time and provide better efficiency u System and Files Quick Copy data area only This setting w...

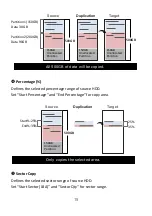
Page 15: ...hole HDD Copies the whole source HDD no matter the content format partition or empty space This mode does not analyze the data Only 120G data area will be copied Source Duplication Target 500GB 150GB...

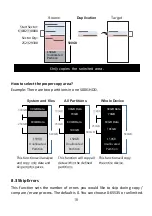
Page 16: ...HDD Set Start Sector LBA and Sector Qty for sector range All 500GB of data will be copied Source Duplication Target 500GB 150GB Unallocated Partition 150GB Unallocated Partition 150GB Unallocated Par...

Page 17: ...Data System and files 100GB 250GB 500GB 60GB Data 150GB Unallocated Partition All Partitions 70GB 190GB 30GB Data 100GB 250GB 500GB 60GB Data 150GB Unallocated Partition Whole Device 70GB 190GB 30GB...

Page 18: ...ter erase job is completed This watermark will show when executing 7 4 Show Disk Info and can be printed out when connecting to a thermal printer 8 6 Restore Default Select to go back to the manufactu...

Page 19: ...Adjust Clock Change time and date 9 4 4 Add Watermark at text File Creates watermark on the log report The log report can be checked by software iSecuLog exe to prevent modifying Specifications subjec...

Reviews: