background image

37

EMP

Installation & Service Manual

109529-03 - 11/19

A .


ALWAYS  INSPECT  INSTALLATION  
BEFORE STARTING  BURNER .

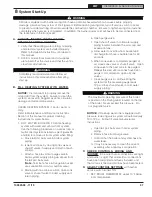
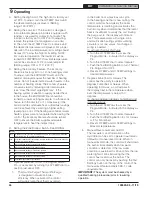
1.  Verify that the venting, water piping, oil piping, 

and electrical system are installed properly.  

Refer to Installation Instructions contained in 

this manual.

2.  Confirm all electrical, water and oil supplies 

are turned off at the source and that the vent is 

clear from obstructions.

  WARNING


Completely read, understand and follow all 

instructions in this manual before attempting 

start up.

B

 .


FILL  HEATING  SYSTEM  WITH  WATER .


NOTICE:  

It is important to properly remove the 

oil and dirt from the system.  Failure to clean the 

system can result in clogged air vents, circulator 

damage and seized zone valves.


CLEAN  HEATING  SYSTEM  if boiler water is 

dirty.


Refer to Maintenance and Service Instructions 

Section of this manual for proper cleaning 

instructions for water boilers.
1.  HOT  WATER  BOILERS.  Fill entire heating 

system with water and vent air from system.  

Use the following procedure on a series loop or 

multi-zoned system installed as per Figures 9A 

and 9B, to remove air from system when filling:
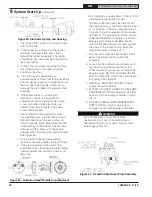
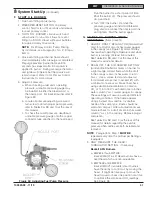
a.  Close full port ball valve in boiler system 

piping.

b.  Isolate all zones by closing zone valves or 

shut-off valves in supply and return of each 

zone(s).

c.  Attach a hose to vertical purge valve in 

boiler system supply piping up stream from 

the full port ball valve.

 (

Note

 - Terminate hose in five gallon bucket 

at a suitable floor drain or outdoor area).

d.  Starting with one zone at a time, open zone 

valve or shut-off valve in boiler supply and 

return piping.

e.  Open purge valve.
f.  Open shut-off valve in cold water supply 

piping located  between the air scoop and 

expansion tank.

g.  Allow water to overflow from bucket until 

discharge from hose is bubble free for 30 

seconds.

h.  When zone valve is completely purged of 

air, close zone valve or shut-off valve.  Open 

zone valve to the next zone to be purged.  

Repeat this step until all zones have been 

purged.  At completion, open all zone 

valves.

i.  Close purge valve, continue filling the 

system until the pressure gauge reads 

12 psi. Close shut-off valve in cold water 

supply piping.

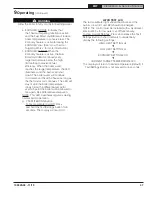
  WARNING


The maximum operating pressure of this boiler 

is posted on the Rating Label located on the top 

of the boiler.  Never exceed this pressure.  Do 

not plug relief valve.


NOTICE:  

If make-up water line is equipped with 

pressure reducing valve, system will automatically 

fill to 12 psi.  Follow fill valve manufacturer's 

instructions.

j.  Open full port ball valve in boiler system 

piping.

k.  Remove hose from purge valve.
l.  Confirm that the boiler and system have no 

water leaks.

m. It may be necessary to clean the air vent 

assembly after a few days of operation.

C .


CHECK  CONTROLS,  WIRING  AND  
BURNER  

to be sure that all connections are tight 

and burner is rigid, that all electrical connections 

have been completed and fuses installed, and 

that oil tank is filled and oil lines have been tested.

D .


ADJUST CONTROL SETTINGS

  with burner 

service switch turned “ON”.
1.  SET  ROOM  THERMOSTAT  about 10°F below 

room temperature.

8

 System Start-Up 

  WARNING


All boilers equipped with burner swing door have a potential hazard which can cause severe property 

damage, personal injury or loss of life if ignored.  Before opening swing door, turn off service switch to boiler 

to prevent accidental firing of burner outside the combustion chamber.  Be sure to tighten swing door fastener 

completely when service is completed.  In addition, the burner power cord will have to be disconnected from 

the receptacle in the front jacket.

!

!

!

Summary of Contents for EMP Series

Page 1: ...Direct Vent 140E thru 224E Models EMP84E EMP115E EMP140E EMP182E EMP224E TO THE INSTALLER Affix these instructions adjacent to boiler TO THE CONSUMER Retain these instructions for future reference 970...

Page 2: ...ler is valid only if the boiler has been installed maintained and operated in accordance with these instructions Surface rust on cast iron sections may be attributed to the manufacturing process as we...

Page 3: ...the installing contractor to see that all controls are correctly installed and are operating properly when installation is complete including verifying that the limit sensor is fully installed seated...

Page 4: ...r or smokepipe joints may be signs of condensing flue gases Flue gas condensate is corrosive which requires special consideration and must be addressed immediately Refer to Natural Draft Venting Chimn...

Page 5: ...5 EMP Installation Service Manual 109529 03 11 19 Figure 1 EMP Water Boiler NOTE This Dimension increases and is controlled by smoke pipe arrangement...

Page 6: ...MBH 3 AFUE Minimum Chimney Recommendations Direct Vent System GPH MBH 1 Round In Dia Rectangle In x In Height Ft Model Vent Connector Dia Inch EMP84E 0 60 84 74 64 87 6 8 x 8 15 N A N A EMP115E 0 80 1...

Page 7: ...t Panel 24 for servicing burner 24 for flueway cleaning EMP84E 140E 30 for flueway cleaning EMP182E 36 for flueway cleaning EMP224E b Clearance from Jacket Side Panels 19 for burner swing door if open...

Page 8: ...nces in space If the result is greater than or equal to 50 ft3 1000 BTU per hour then it is considered an unconfined space If the result is less than 50 ft3 1000 BTU per hour then the space is conside...

Page 9: ...utomatically during equipment operation D DIRECT VENT CONFIGURATIONS requires 1 Beckett NX Burner 2 Direct Vent Conversion Kit 3 Double Wall Flex Oil Vent Pipe FOVP Horizontal ducts Minimum free area...

Page 10: ...the deck boards Step 5 Remove skid from underneath the boiler Step 6 Lower pipe handles until front adjustable legs touch floor If necessary place wooden blocks under front legs before lowering to pr...

Page 11: ...cket holes 2 Perform routine inspection service or cleaning as necessary 2 Packaged Boiler Assembly Trim continued 1 TO OPEN BURNER SWING DOOR see Figures 4A and 4B Step 1 Loosen but do not remove lef...

Page 12: ...12 EMP Installation Service Manual 109529 03 11 19 Figure 4B Top View Burner Swing Door Mounted to Cast Iron Block Assembly Jacket Removed for Clarity 2 Packaged Boiler Assembly Trim continued...

Page 13: ...crew first Use an alternating tightening method from right side tap bolt to left side tap bolt to tighten door equally until sealed without applying excessive torque Never tighten left side flange bol...

Page 14: ...y sealant to the 2 NPT injector threads Insert injector into 2 Figure 5 Return Manifold and Relief Valve Assembly Details NPT upper rear tapping on rear section Thread 2 NPT x 1 1 2 Reducing Elbow ont...

Page 15: ...in Step a NOTE Based on access for servicing and location of sewer or floor drain when tightening these fittings determine if drain valve is to be located on the left or right side Tighten nipple and...

Page 16: ...flueway baffle in 3rd pass flueway on right side of boiler hold baffle with word Right readable at the top Slide baffle in flueway until position tab touches fins on right side of 3rd pass flueway To...

Page 17: ...P182E and EMP224E To install flueway baffle in 2nd pass flueway on left side of boiler hold baffle with word Left readable at the top Slide baffle in flueway until position tab touches fins on right s...

Page 18: ...constant boiler pressure of 12 PSI WARNING Do not operate boiler below minimum volumetric flow rates B CONNECT SYSTEM SUPPLY AND RETURN PIPING TO BOILER See Figures 9A and 9B Also consult I B R Insta...

Page 19: ...19 EMP Installation Service Manual 109529 03 11 19 Figure 9A Recommended Water Piping for Circulator Zoned Heating Systems 3Water Boiler Piping continued...

Page 20: ...20 EMP Installation Service Manual 109529 03 11 19 Figure 9B Recommended Water Piping for Zone Valve Zoned Heating Systems 3Water Boiler Piping continued...

Page 21: ...ected for integrity as well as for proper draft and condensate control Some jurisdictions require the use of a liner when changing fuel types Some jurisdictions require the use of a liner even when th...

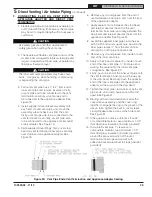
Page 22: ...nt Pipe Arrangement and Chimney Requirements Figure 11 Proper and Improper Locations of Draft Regulator 4 Natural Draft Venting continued 5 Draft Regulator the draft regulator supplied with the boiler...

Page 23: ...d must be remedied immediately C DRAFT 1 The natural draft generated through a chimney is dependentonseveralfactorsincluding chimney height temperature of flue gases cross section area of chimney chim...

Page 24: ...he burner from outdoors providing that the criteria for chimney vent connector and minimum stack temperature outlined in this section can be maintained ONLY AVAILABLE WITH BECKETT BURNER Refer to Sect...

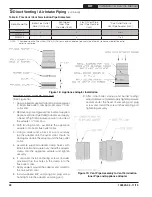
Page 25: ...inimum clearance to combustible material is 0 4 Maximum wall thickness that FDVS vent termination may be installed through is 12 Figure 13 Vent Terminal Location WARNING This venting system must be in...

Page 26: ...rate the vent hood tee from the vent hood body and set aside for later use 5 After determining the location of the venting system termination cut the square hole in the wall sized according to L dimen...

Page 27: ...ipment and NFPA 211 Standard for Chimney Fireplaces Vents and Solid Fuel Burning Appliances latest editions For installations in Canada follow requirements of CSA B139 Installation Code for Oil Burnin...

Page 28: ...ru four holes in the clamp into the flue outlet collar 7 Apply sealant around the adapter end mated to the flue outlet collar 8 Install supplied 3 8 sampling port plug screw hand tight into the adapte...

Page 29: ...ipe onto the vent termination inner pipe all the way up to the stop bead Secondly push the opposite end of the inner vent pipe onto the appliance adapter all the way up to the stop bead 12 Tighten the...

Page 30: ...eter galvanized single wall vent pipe cut off the crimped pipe end below stop bead 6 Insert one end of the vent pipe thru the outside air duct bracket opening and firmly push onto the outside air adap...

Page 31: ...cross the pivot point and plumb Refer to the vacuum relief valve manufacturer s instructions for details 14 Install remainder of air intake piping to Direct Vent Termination air intake collar securing...

Page 32: ...it will be influenced by drafts hot or cold water pipes lighting fixtures television rays of the sun or near a fireplace Keep large furniture away from thermostat so there will be free movement of roo...

Page 33: ...ll operate as long as the thermostat is calling for heat If the thermostat is not satisfied and the operating high limit is reached the circulator will continue to operate and the burner will stop unt...

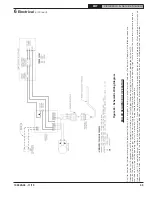
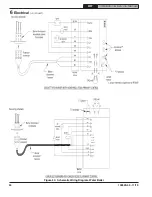
Page 34: ...34 EMP Installation Service Manual 109529 03 11 19 Figure 24 Schematic Wiring Diagram Water Boiler 6 Electrical continued...

Page 35: ...3 8 OD copper tubing Copper tubing shall have a 032 minimum wall thickness WARNING Under no circumstances can copper with sweat style connectors be used NOTICE Some jurisdictions require the use of a...

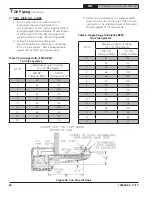
Page 36: ...tions on the proper connections for a two pipe system Some manufacturers require the insertion of a bypass plug 3 Under no circumstances is a manual shutoff valve to be located on the return line of a...

Page 37: ...expansion tank g Allow water to overflow from bucket until discharge from hose is bubble free for 30 seconds h When zone valve is completely purged of air close zone valve or shut off valve Open zone...

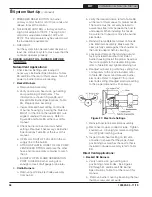
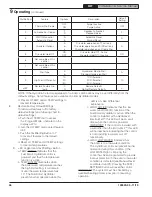
Page 38: ...l g SLIGHTLY OPEN FLAME OBSERVATION PORT COVER on burner swing door enough to insert draft gauge probe later 3 Carlin Burners a Remove nozzle line electrode assembly from burner b Verify the desired n...

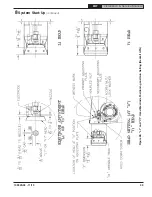
Page 39: ...39 EMP Installation Service Manual 109529 03 11 19 Figure 28 L1 and V1 Head Electrode Positioning and Gun Setting Beckett AFG 8 System Start Up continued...

Page 40: ...e assembly reverse procedure outlines in steps f thru b k Upon reinstallation of the nozzle line assembly check that head air plate setting number pointer line up with a number on the scale which matc...

Page 41: ...TING flame present 1 ADJUST DRAFT REGULATOR Natural Draft only for a draft of zero inches water gauge in the canopy see Figure 15 after chimney has reached operating temperature and while burner is ru...

Page 42: ...nes and filters The R7284 can be placed in a purge routine by pressing and releasing the up arrow button during the Trial For Ignition Pump Prime is shown on the oil primary display along with the tim...

Page 43: ...ood If not install new cell Close hand valve in oil supply line Failure occurs device enters Recycle Mode Figure 34 Cad Cell Location K CHECK HIGH LIMIT 1 Adjust system thermostat s to highest setting...

Page 44: ...Recommended setting for Four zone systems 5 Recommended setting for Five zone systems HI Provides highest level of fuel savings E Optional Features NOTE The Program Mode Pro is accessed by turning the...

Page 45: ...s to desired temperatures 6 Setting the Well Type Elctro Well vs Standard Immersion Well When used to replace older temperature only controls the HyrdroStat can be installed on the existing well The H...

Page 46: ...EMP dial to select feature dEF c Push the Test Setting Button to Y to reset all features to the default settings d Reset LO TEMP and HI TEMP settings to desired temperatures 9 LED Legend and Test Sett...

Page 47: ...Smart HydroStat will reduce boiler temperature to conserve fuel The Economy feature is activated using the ECONOMY dial See How Thermal Targeting Works for more information f ECONOMY TARGET When the E...

Page 48: ...tting clothing that is sufficiently tight around potential entry points for RCF dust 3 Gloves 4 Eye protection such as goggles safety glasses with side shields or full facepiece Take steps to assure a...

Page 49: ...mpany 4 Make pH or Alkalinity Test After boiler and system have been cleaned and refilled as previously described test the pH of the water in the system This can easily be done by drawing a small samp...

Page 50: ...er is shut down for an extended period of time 3 To recondition the heating system in the fall season after a prolonged shut down follow the instructions outlined in Section VIII WARNING This boiler c...

Page 51: ...bustion chamber and smoke box B CLEAN THE COMBUSTION CHAMBER Use a wire or fiber bristle brush to clean the surfaces of the combustion chamber Vacuum all of the loose debris in the bottom of the combu...

Page 52: ...sult if the boiler is connected to a dirty or inadequate chimney The interior of the chimney flue must be inspected and cleaned before the start of the heating season and should be inspected periodica...

Page 53: ...amounts will stall the fuel pump Water in the fuel in smaller amounts will cause excessive wear on the pump but more importantly water doesn t burn It chills 8 COLD OIL If the oil temperature approach...

Page 54: ...oil to burner b Shorted electrodes c Nozzle clogged d Airflow too high e Ignitor module defective f CAD cell defective g Oil valve stuck open or closed Note The Safety Monitoring Circuit SMC is design...

Page 55: ...l If either LWCO LED lights are illuminated and the control is installed on a standard immersion well this is false reading caused by a loss of continuity between the sensor and the inside of the well...

Page 56: ...p Active LED will be on at all times when the control is powered Check for 120 VAC on terminals L1 and L2 YES Is the Red LED LOW WATER On YES NO Is the Yellow LED HI TEMP On YES The Control is Sensing...

Page 57: ...rmally NO The burner will continue to fire when there is a call from the thermostat or external zone Is the External Zone ZC ZR Calling for Heat YES The Control is Operating Normally NO Is the Low Lim...

Page 58: ...ny Wholesale distributor Should you require assistance in locating a U S Boiler Company Distributor in your area or have questions regarding the availability of U S Boiler Company products or service...

Page 59: ...54 02 1 1 109554 03 1 109554 04 1 109554 05 1 1B Smoke Box Includes Sealant and Hardware 109555 01 1 1 1 1 1 1C Burner Swing Door Assembly Includes Hinge and Hardware 109556 01 1 1 1 1 109557 01 1 1D...

Page 60: ...60 EMP Installation Service Manual 109529 03 11 19 Jackets and Trim 13 Service Parts continued...

Page 61: ...2E Electro Well 1 2 NPT x 3 1 4 109566 01 1 1 1 1 1 2F Harness 109562 01 1 1 1 1 1 2G Burner Recepticle 109570 01 1 1 1 1 1 2H Baffle Kit 109991 01 1 109992 01 1 109561 01 1 1 1 2J Injector Kit 10282...

Page 62: ...40E EMP182E EMP224E Not Shown Beckett Natural Draft 104506 02 1 104507 02 1 104508 03 1 104509 04 1 104510 05 1 Direct Vent 103896 03 1 103897 04 1 103898 05 1 Carlin Natural Draft 110109 02 1 110110...

Page 63: ...amp FDVS 6 Half 100235 02 2 2 7 Appliance Clamp FDVS 7 Half 100235 03 2 5D Cover Sleeve Assembly FDVS 5 100236 02 2 2 Cover Sleeve Assembly FDVS 6 100236 03 2 5E Cover Ring Assembly FDVS 5 100237 02 2...

Page 64: ...64 EMP Installation Service Manual 109529 03 11 19 Beckett AFG Burner 13 Service Parts continued...

Page 65: ...Clamp Screw 4219 4219 4219 4219 4219 Electrode Insulator Assembly 5780 5780 5780 5780 5780 Spider Spacer Assembly 5503 5503 5503 5503 5503 Escutcheon Plate 3493 3493 3493 5941 5941 Adjusting Plate Ass...

Page 66: ...66 EMP Installation Service Manual 109529 03 11 19 Beckett NX Burner 13 Service Parts continued...

Page 67: ...Electrodes Insulator Kit 51811U 10 Fuel Unit Single Stage A2EA6520N621L 2184404U Fuel Unit Two Stage 51975U Mounting Screws 1 4 20 x 7 8 4189 11a Gasket Igniter Baseplate 51942U 11b Gasket Igniter Bas...

Page 68: ...tion and Operating Instructions for Packaged Heating Burner Units Carlin Elite EZ LF and EZ 66 Oil Burners Form CCT 569A for an exploded view of the burner and a list of spare parts For replacement Ca...

Page 69: ...eadjusted to settings shown above during burner start up Table 9a Beckett AFG Burner Specifications Chimney Vent Table 9b CARLIN EZ Burner Specifications Chimney Vent Boiler Model Burner Input GPH Bur...

Page 70: ...1 25 45 B Hago 180 11 5 2nd 23 0 07 0 0 06 0 02 Notes 2 The increased stack temperature with the baffles removed is an approximation based on a constant supply temperature of 180 F and 11 5 CO2 Actual...

Page 71: ..._____________________________________________ __________________________________________________________________________________________________ _______________________________________________________...

Page 72: ...72 EMP Installation Service Manual 109529 03 11 19 U S Boiler Company Inc P O Box 3020 Lancaster PA 17604 1 888 432 8887 www usboiler net...

Reviews: