background image

SKU 92252         For technical questions, please call 1-800-444-3353         PAGE 6

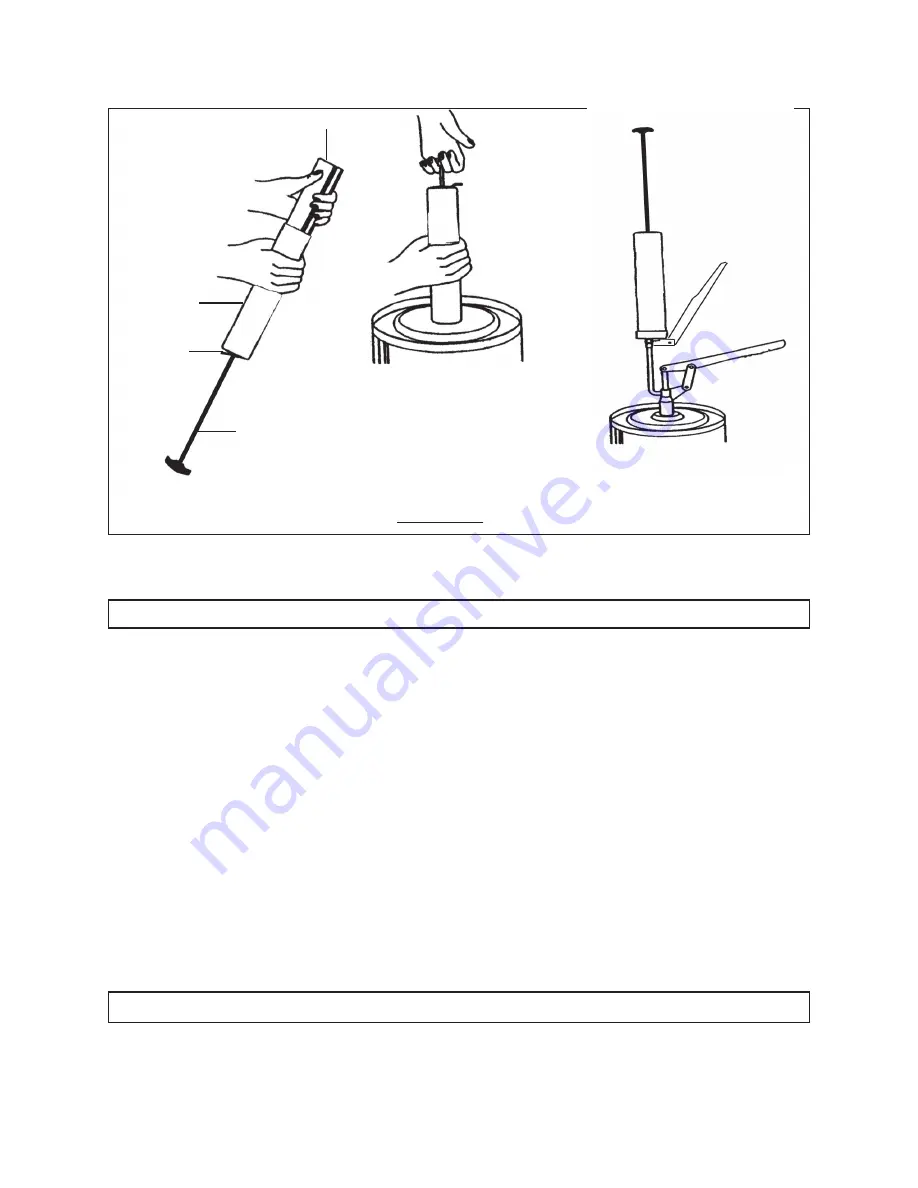
TO FILL THE GREASE GUN BY SUCTION FILLING

1.

Unscrew and remove the Head (6) from the Barrel (3).  (See Figures A and B.)

2.

Insert the open end of the Barrel (3) into the lubricant.  Depress the Release
Latch (8), and slowly pull the Plunger Rod (7) back while pushing the Barrel
deeper into the lubricant to prevent air pockets from being pulled into the Barrel.
(See Figures A and B.)

3.

When the Plunger Rod (7) is fully extended, remove the Barrel (3) from the
lubricant.  Wipe the exterior of the Barrel clean of lubricant.  Then, screw the
Head (6) back onto the Barrel.  (See Figures A and B.)

5.

Depress the Release Latch (8), and push the Plunger Rod (7) back into the
Barrel (3).  (See Figures A and B.)

TO FILL THE GREASE GUN USING A FILLER PUMP

FILLER PUMP FILLING

SUCTION FILLING

CARTRIDGE FILLING

BARREL

(3)

PLUNGER ROD

(7)

RELEASE

LATCH

(8)

CARTRIDGE

1.

Depress the Release Latch (8), and pull back on the Plunger Rod (7) until the
Plunger Rod is extended only 

halfway.  (See Figures A and B.)

FIGURE B

Summary of Contents for 92252

Page 1: ...right 2004 by Harbor Freight Tools All rights reserved No portion of this manual or any artwork contained herein may be reproduced in any shape or form without the express written consent of Harbor Freight Tools For technical questions or replacement parts please call 1 800 444 3353 TO PREVENT SERIOUS INJURY READ AND UNDERSTAND ALL WARNINGS AND INSTRUCTIONS BEFORE USE ...

Page 2: ...jury SAVE THESE INSTRUCTIONS WORK AREA 1 Keep your work area clean and well lit Cluttered benches and dark areas invite accidents SKU 92252 For technical questions please call 1 800 444 3353 PAGE 2 UNPACKING When unpacking check to make sure all the parts shown on the Parts List on page 9 are included If any parts are missing or broken please call Harbor Freight Tools at the number shown on the co...

Page 3: ...eld Non skid safety shoes heavy duty work gloves and a hard hat should be worn under appropriate conditions SKU 92252 For technical questions please call 1 800 444 3353 PAGE 3 TOOL USE AND CARE 1 Do not force the tool Use the correct tool for your application The correct tool will do the job better and safer at the rate for which it is designed 2 Store idle tools out of reach of children and other...

Page 4: ...ools for a replacement 2 When using the Grease Gun always maintain a firm grip on the tool with both hands 3 Keep the outer body of the Grease Gun dry clean and free from oil and grease 4 Industrial applications must follow OSHA requirements 5 Make sure to read and understand all instructions and safety precautions as outlined in the manufacturer s manual for the vehicle or object you are lubricat...

Page 5: ...lease Latch 8 and pull the Plunger Rod 7 all the way back See Figure A 3 Remove the pull tab from a grease cartridge not included and insert the cartridge closed end first into the Barrel 3 See Figures A and B next page 4 Screw the Head 6 back onto the Barrel 3 See Figure A 5 Depress the Release Latch 8 and push the Plunger Rod 7 all the way forward to its original position See Figure A HANDLE 1 P...

Page 6: ...arrel See Figures A and B 3 When the Plunger Rod 7 is fully extended remove the Barrel 3 from the lubricant Wipe the exterior of the Barrel clean of lubricant Then screw the Head 6 back onto the Barrel See Figures A and B 5 Depress the Release Latch 8 and push the Plunger Rod 7 back into the Barrel 3 See Figures A and B TO FILL THE GREASE GUN USING A FILLER PUMP FILLER PUMP FILLING SUCTION FILLING...

Page 7: ...ETS IN THE BARREL 1 Depress the Release Latch 8 and slowly push the Plunger Rod 7 forward toward the Barrel 3 While pushing the Plunger Rod forward depress the Air Release Valve 9 on the Grease Gun This allows excess air to escape from the Barrel See Figure A 2 Continue pushing the Plunger Rod 7 forward while depressing the Air Release Valve 9 until all excess air is expelled from the Barrel 3 The...

Page 8: ...not use solvents to clean the Grease Gun Do not immerse the Grease Gun in any liquids 3 When storing always keep the Grease Gun in a clean dry safe location out of reach of children PLEASE READ THE FOLLOWING CAREFULLY THE MANUFACTURER AND OR DISTRIBUTOR HAS PROVIDED THE PARTS LIST AND ASSEMBLY DIAGRAM IN THIS MANUAL AS A REFERENCE TOOL ONLY NEITHER THE MANUFACTURER OR DISTRIBUTOR MAKES ANY REPRESE...

Page 9: ... illustration purposes only and are not available individually as replacement parts Part Description Qty Part Description Qty 1 Handle 1 6 Head 1 2 Extension Pipe 1 7 Plunger Rod 1 3 Barrel 1 8 Release Latch 1 4 Plunger Handle 1 9 Air Release Valve 1 5 Coupler 1 10 Loader Fitting 1 ASSEMBLY DIAGRAM 1 2 3 4 5 6 7 8 9 10 ...

Reviews: