background image

120VAC GROUNDING INSTRUCTIONS

This machine must be grounded. If it should electrically malfunction, grounding provides a path of least
resistance for electric current to reduce the risk of electric shock. This appliance is equipped with a cord
having an equipment-grounding conductor and grounding plug. The plug must be plugged into an appropriate
outlet that is properly installed and grounded in accordance with all local codes and ordinances.

DANGER!

Improper connection of the equipment-grounding conductor can result in a risk of electric shock. Check with a
qualified electrician or service person if you are in doubt as to whether the outlet is properly grounded. Do not modify
the plug provided with the appliance. If it will not fit the outlet, have a proper outlet installed by a qualified electrician.

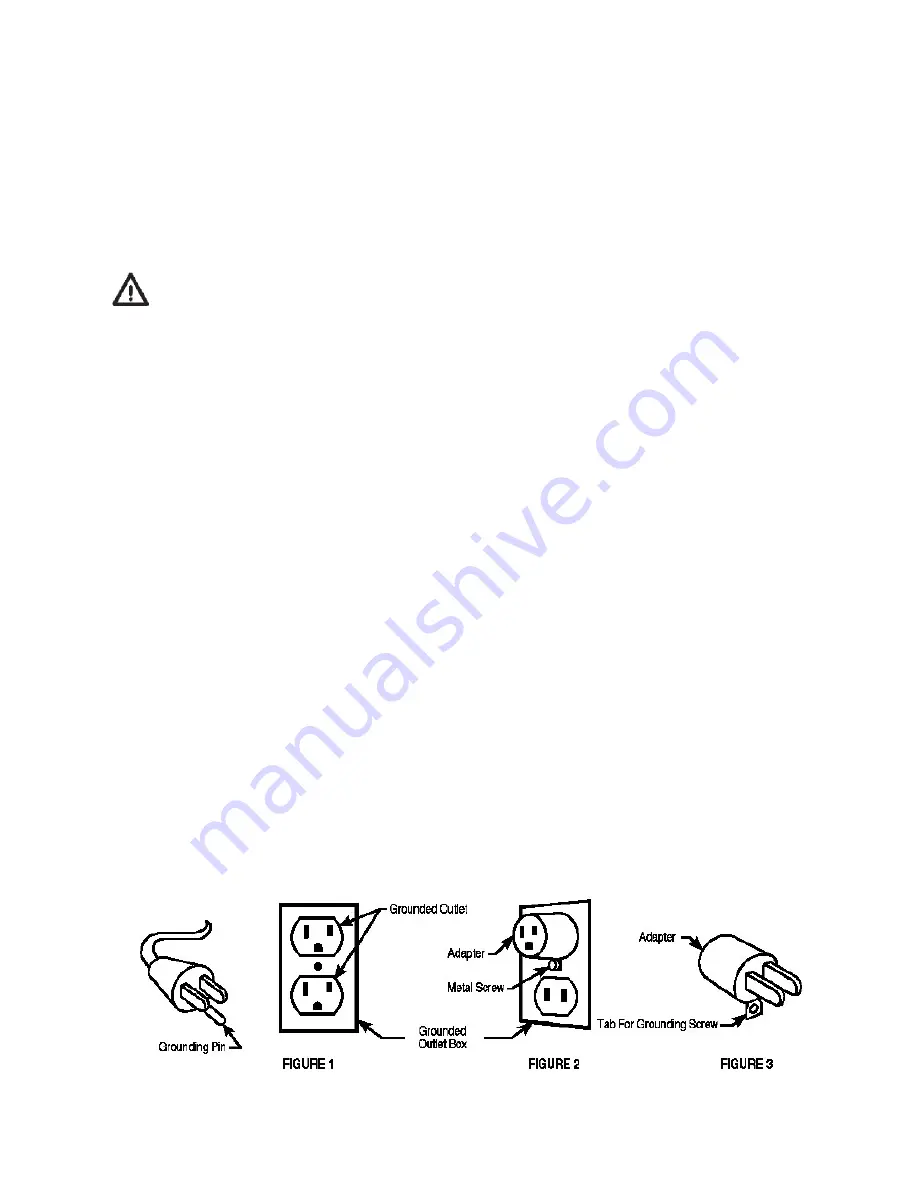
This appliance is for use on a nominal 120-volt circuit, and has a grounding plug that looks like the plug illustrated
in Figure 1 below. A temporary adapter illustrated in Figures 2 and 3 may be used to connect this plug to a 2-pole
receptacle as shown in Figure 2 if a properly grounded outlet is not available. The temporary adapter should be used
only until a properly grounded outlet (Figure 1) can be installed by a qualified electrician. The green-colored  rigid ear,
tab, or the like extending from the adapter must be connected to a permanent ground such as a properly grounded
outlet box cover. Whenever the adapter is used, it must be held in place by a metal screw.  Grounding adapters are
not approved for use in Canada.

Replace the plug if the grounding pin is damaged or broken.

The Green (or Green/Yellow) wire in the cord is the grounding wire.  When replacing a plug, this wire must be
attached to the grounding pin only.

Extension cords connected to this machine should be 12 gauge, three-wire cords with three-prong plugs and
outlets.  DO NOT use extension cords more than 50 feet (15 m) long.

PLEASE NOTE:  FOR NORTH AMERICA ONLY

Summary of Contents for COBRA-H2

Page 1: ...arly monthly or more often to prevent a build up of minerals or chemicals in the pump and heat systems Follow the flush with a clear water rinse to remove any particles and to rinse the acid from the...

Page 2: ...hair fingers and all parts of body away from openings and moving parts Do not pick up anything that is burning or smoking such as cigarettes matches or hot ashes or any health endangering dusts Turn o...

Page 3: ...has a grounding plug that looks like the plug illustrated in Figure 1 below A temporary adapter illustrated in Figures 2 and 3 may be used to connect this plug to a 2 pole receptacle as shown in Figu...

Page 4: ...where the vacuum hose attaches to the machine Latch 6 Open the latches to access the base compartment which contains the motors and heater Drain Gate 7 Open this gate to drain the recovered solution...

Page 5: ...nutes to reach operating temperature 6 Turn the pump on Turn the vacuum on NOTE the pump has a built in pressure switch the pump runs only when you are spraying 7 Begin cleaning using the correct hose...

Page 6: ...seals are damaged Internal vacuum hose is cracked Recovery tank lid is not closed is cracked or gasket is damaged Recovery tank is warped or cracked Debris impeding air movement on vac motor impellor...

Page 7: ...1 22 40 41 42 43 44 45 46 47 53 48 55 49 58 50 51 52 62 69 14 16 66 67 68 COBRA H2 CSA 08 10 2007 19 56 24 11 12 13 14 33 28 32 35 63 38 37 30 65 61 60 59 58 69 57 55 54 53 36 31 34 22 25 26 29 27 31...

Page 8: ...Heat Exchanger complete 36 5 Bolt 1 4 20 X 3 4 37 8 Lock nut 1 4 20 38 455 Bracket heater mount 39 76 Hose Clamp 40 270 Bolt 1 4 20 X 5 41 137 Washer split lock 42 136 Nut finish 1 4 43 14 Washer fla...

Page 9: ...les mois ou plus souvent pour emp cher le d p t de min raux ou de produits chimiques dans les syst mes de pompe et de chauffage Rincer apr s le lavage avec de l eau claire pour liminer les particules...

Page 10: ...les cheveux les doigts et tout autre partie du corps loin des ouvertures et des pi ces mobiles Ne pas ramasser quoi que ce soit qui br le ou qui fume comme des cigarettes allumettes ou cendres chaudes...

Page 11: ...connecter cette fiche une prise p les comme le montre la Figure 2 si une prise correctement mise la terre n est pas disponible Il faut utiliser l adaptateur temporaire uniquement jusqu au moment o un...

Page 12: ...tion 5 C est l que le tuyau flexible d aspiration est fix la machine Loquet 6 Ouvrir les loquets pour acc der au compartiment inf rieur qui contient les moteurs et l l ment chauffant Opercule du drain...

Page 13: ...eindre la temp rature de fonctionnement 6 Mettre la pompe en marche Mettre l aspiration en marche NOTE La pompe dispose d un pressostat int gr elle ne fonctionne que lorsque vous vaporisez 7 Commencer...

Page 14: ...mpl tement ferm ou les joints d tanch it sont endommag s Le tuyau flexible int rieur d aspiration est fendu Le couvercle du r servoir de r cup ration n est pas ferm est fendu ou le joint d tanch it es...

Page 15: ...425 322 0133 800 257 7982 FAX 425 322 0136 11015 47th Ave W Mukilteo WA 98275 VISIT US AT http www usproducts com...

Reviews: