background image

Additional support

Setup videos & tutorials

uturnaudio.com/learn

Email

support@uturnaudio.com

Phone

(781) 451-1445

3-year warranty

We stand by our products with a 3-year 

warranty that covers any defects in  

materials or workmanship.

You can view our full warranty policy at 

uturnaudio.com/warranty.

If you need warranty service, please  

contact us at support@uturnaudio.com  

or by phone at (781) 451-1445.

© 2022 U-Turn Audio, Inc.

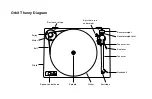
Summary of Contents for Orbit Theory

Page 1: ...Orbit Theory Setup Guide ...

Page 2: ...1 Getting started Remove foam block from spindle Remove foam ring and twist tie from tonearm Place platter on spindle Connect power adapter and plug in RCA cables A B ...

Page 3: ...lt along the platter s back edge with your right hand Keeping your right hand in place use your left hand to guide the belt into the groove around the platter Change speeds 33 or 45 RPM using speed control knob 2 Install belt Pulley A A B B C C ...

Page 4: ...op of plinth If the bubble is not centered adjust the height of the feet to level turntable Turn bottom of foot to raise or lower it A B Bubble level Bubble position Adjustment Turntable is level Lower back foot or raise front feet Raise front left foot or lower front right and back foot Raise Lower ...

Page 5: ...unterweight will click into place Remove stylus guard Pinch tab on the bottom of stylus guard to release and remove it Do not touch stylus A B Counterweight Indicator line Stylus guard Tab Rest Important Follow all steps for balancing the tonearm Incorrect balancing may cause damage to the stylus or your records For help visit uturnaudio com learn ...

Page 6: ...5 Tonearm setup continued Lower cue lever before balancing tonearm Make sure anti skate is turned off To do so lift the anti skate rod up until it clicks into place A B Cue lever Anti skate rod Off On ...

Page 7: ...stylus to touch the platter 6 Balance tonearm Adjust counterweight While holding the headshell rotate the entire counterweight backwards until tonearm is balanced and floating horizontally when headshell is released A B Headshell Stylus should be floating just above platter without making contact ...

Page 8: ...ng force value on the dial Set tracking force to 1 75 g for Ortofon 2M cartridges 7 Set tracking force Calibrate counterweight dial Place tonearm in rest While holding the counter weight so it does not move turn only the dial so the 0 marking lines up with the indicator line A B Dial Rotate counterweight and dial together ...

Page 9: ...d rests on the tonearm base Adjusting anti skate force To adjust anti skate force move the anti skate weight to the desired setting on the anti skate rod Anti skate force comes pre set to the medium setting 30 g for Ortofon 2M cartridges A B Anti skate weight Anti skate rod High 35 g Medium 30 g Low 25 g Off On ...

Page 10: ...er Slide the dust cover onto the hinges Using the built in phono preamp if equipped The preamp is enabled when the preamp LED light is on To turn preamp on or off press the bypass switch A B Preamp bypass switch RCA jacks Preamp LED ...

Page 11: ...it Theory Diagram Dust cover hinge Anti skate rod and weight Counterweight Counterweight dial Tonearm rest Cue lever Tonearm Headshell Pulley Motor Belt Plinth Speed control knob Spindle Platter Cartridge ...

Page 12: ...1445 3 year warranty We stand by our products with a 3 year warranty that covers any defects in materials or workmanship You can view our full warranty policy at uturnaudio com warranty If you need warranty service please contact us at support uturnaudio com or by phone at 781 451 1445 2022 U Turn Audio Inc ...

Reviews: