UAV-1001101-001
Page
11 | 26
Verify the area is clear of vehicle structural elements or electronics in the
area immediately below the desired Vektor installation point.
Use masking tape to cover an area 100 mm by 200 mm on the exterior of
the roof at the desired installation location.
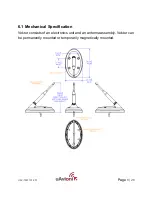
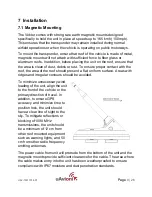
Using the hole pattern in the drawing
below and four #8 flat-head screws of
the appropriate length to fasten
Vektor to the vehicle, mark the
location of the four bolt penetrations
and that of the cable opening. Ensure
proper alignment of the unit to the
direction of travel.
Use appropriate power tools to create
penetrations through the vehicle roof
for the four mounting bolts and cable
entry.
Remove protective tape from the roof of the car, exposing the openings.
Remove all traces of glue and dust from the roof and allow to dry before
continuing to next step.
Place a bead of silicone sealant around the base of the unit, ensuring that a
complete ring of silicone is made on the bottom of the unit.
Pass the units wiring harness through the center opening and position the
unit to align the four mounting bolts to the four bolt openings on the roof.
Lower the unit to the roof evenly ensuring that an even seal is made
between the Vektor unit and the roof of the car with silicone between them.
Tighten the enclosed bolts and washers from the underside of the vehicle
roof to a force of 15 Nm.
Apply a thin bead of silicone around the entire base of unit and the roof and
smooth with a slightly damp finger to remove excess.
To allow for proper curing of silicone based sealants. Installation should be
performed when weather conditions will remain free of rain, fog or


