


Pool Filter 400 / 500 / 600 - Pool Filter Sets 400-4m
3
/h / 400-6 m³/h / 500-9 m³/h / 600-13 m³/h
1
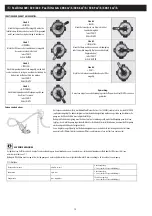
3a - HYDRAULIC CONNECTIONS
1- To screw the threaded connection on„ PUMP„ outlet of the multichannel valve, while having beforehand covered the threading with a score of
Teflon turns. This connection can be fixed to the PUMP-VALVE connection pipe. In this case, it is necessary to separate it from the pipe.
2- To add the connection pipe on the end previously positioned and screw it to connection.
3- To screw to other„ RETURN„ and„ WASTE„ outlets the threaded connections while not forgetting to position the O ring
on the screw thread.
”RETURN” - Outlet to discharge tubes
”PUMP” - Inlet filter, corresponding to discharge of the pump
”WASTE” - Waster outlet
4- To then connect the other end of the connection pipe to the pump. Not to generate too much constraint in the connection
pipe, it can be necessary to make the multichannel valve swivel around its vertical axis.
5- To finally tighten the screws of the pipe clamp. The valve is now interdependent of the tank and sealing is assured.
6- To connect the pump suction (horizontally on the pump) to the skimmer and the „ RETURN„ outlet valve to the discharge tube.
According to model of swimming pool, to do so use either a grooved nozzle and flexible tubes with a 38 mm diameter, or nozzles to stick and the pipe
of 50 mm in diameter. In the case of the flexible tubes, to ensure the sealing with clamps.
To envisage a drainage pipe (not provided) on the„ WASTE„ outlet for waste water.
It is possible to also envisage on installation a stop valve to the skimmer and another on the reversal of the swimming pool flow, in order to be able to insulate the filtration plate of
the pool (in particular for the cleaning of the pump basket and wintering)..
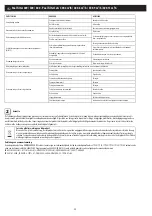
AJUSTMENT OF PRESSURE GAUGE:
IIt is advisable to regularly look at the pressure stated on the pressure gauge. It indicates the level of saturation of filter.
The more the filter is clogged, the greater the pressure.
The pressure gauge is provided with a removable arrow making it possible to indicate the pressure rating.
Beyond 0,5 bar of overpressure, to carry out washing of filter.
3
b
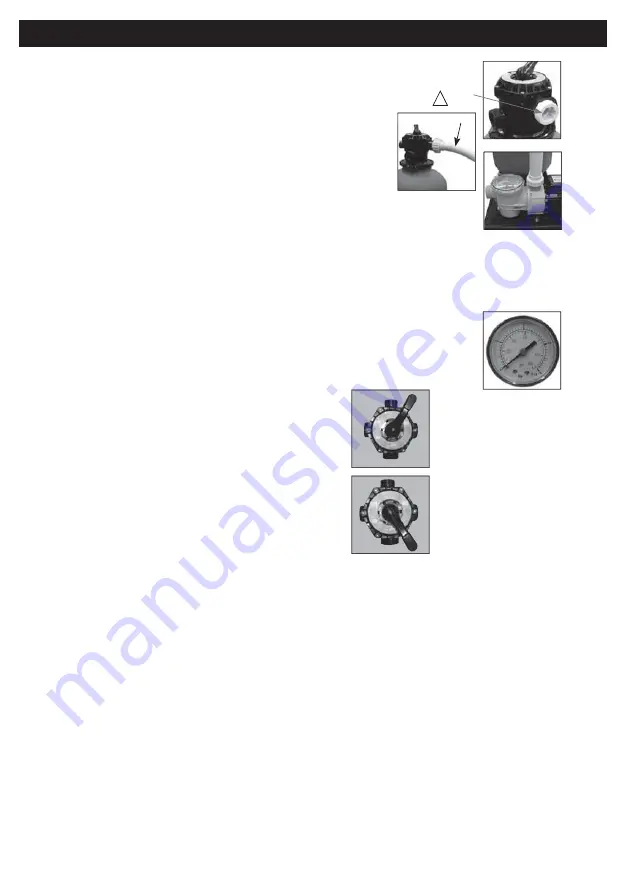
- STARTUP
The first operation consists in removing all the dust contained in the sand.
1 - To place the valve in„ WASHING„ position.
2 - To activate the pump for a few minutes until the muddying indicator is clean.
(to make sure that water circulates normally and that the pump has correctly started).
3 - To stop the pump.
4 - To place the valve in the„ RINSING„ position
5 - To activate the pump for 20 seconds approximately.
6- To stop the pump.
The filtration group is ready to function.
4-OPERATION
ORIFICE
PUMP
!
IMPORTANT: NEVER ACTIVATE THE VALVE WHILE THE PUMP IS OPERATING.
NEVER REMOVE PARTS IF THE FILTER IS PRESSURISED.
CHECK THE UNCLOSING SUCTION NOZZLE.
5
5
1. FILTRATION
- Set the valve at“FILTRATION”.
- Start the pump.
Water will be filtered through the sand.
NOTE:
Note and record the pressure reading shown on the pressure gauge the first time the system is in operation.
This reading will be your future reference pressure“P1”for regular operation.
2. RINSING THE FILTER
If the operating pressure exceeds the reference pressure“P1”by more than 0.5 bar, the sand must be rinsed.
(1) Stop the pump.
(2) Set the valve to“RINSE”.
(3) Start the pump and let it run until the cloudiness status indicator signals that the necessary cleanliness has been achieved.
(4) Stop the pump.
(5) Set the valve at“FLUSH”. (Flushes the lines and discharges into the sewer system.)
6) To activate the pump during 20 seconds.
Stop the pump and return to„ FILTRATION„ mode.
(7) Start the pump, the P operating pressure must from now get closer to P0
Re
c
ommendations for filtration:
1) It is essential to check that the suction openings are not obstructed;
2) It is advisable to stop the filtration during maintenance operations on the filtration system;
3) Regularly monitor the filter clogging level;
Summary of Contents for Pool Filter 400
Page 1: ...P Poo ool lFilter Pool Filter 400 500 600 Pool Filter Set 400 500 600...
Page 2: ......
Page 40: ......


