background image


READ AND SAVE THESE INSTRUCTIONS 

Installer: Leave this manual with the homeowner. 


WARNING


TO REDUCE THE RISK OF FIRE, ELECTRIC SHOCK, OR INJURY TO PERSONS, OBSERVE 
THE FOLLOWING:   

1.  Use this unit only in the manner intended by the manufacturer. If you have questions, contact the 

customer service staff. 

2. Before servicing or cleaning unit, switch power off at service panel and lock service panel to 

prevent power from being switched on accidentally. When the service disconnecting means 
cannot be locked, securely fasten a prominent warning device, such as a tag, to the service 
panel.  

3.  Installation work and electrical wiring must be done by a qualified technician in accordance with 

all applicable codes and standards, including fire-rated construction codes and standards.   

4.  Sufficient air is needed for proper combustion and exhausting of gases through the flue (chimney) 

of fuel burning equipment to prevent back drafting. Follow the heating equipment manufacturer’s 
guidelines and safety standards such as those published by the National Fire Protection 
Association (NFPA), and the American Society for Heating, Refrigeration and Air Conditioning 
Engineers (ASHRAE), and the local code authorities.   

5. When cutting or drilling into wall or ceiling, do not damage electrical wiring and other hidden 

utilities.  

6.  Ducted fans must always be vented to the outdoors.   
7.  Do not use this unit with any separate solid-state speed control device.   
8.  To reduce the risk of fire, use only metal ductwork.   
9.  This unit must be grounded.   
 
TO REDUCE THE RISK OF A RANGE TOP GREASE FIRE:   

A.  Never leave surface unit unattended at high settings. Overheating may cause smoking and 

greasy spillovers that may ignite. Heat oils slowly on low or medium settings. 

B.  Always turn hood ON when cooking at high heat or when flambéing food (i.e. Crepes 

Suzette, Cherries Jubilee, Peppercorn Beef Flambé). 

C.  Clean ventilating fans frequently. Grease should not be allowed to accumulate on fan or 

filter. 

D.  Use proper pan size. Always use cookware appropriate for the size of the surface element. 


WARNING                                                                                                 

TO REDUCE THE RISK OF INJURY TO PERSONS IN THE EVENT OF A RANGE TOP GREASE 
FIRE, OBSERVE THE FOLLOWING:*   

1.  SMOTHER FLAMES with a close-fitting lid, cookie sheet, or metal tray, then turn off the burner. 

BE CAREFUL TO PREVENT BURNS. If the flames do not go out immediately, EVACUATE AND 
CALL THE FIRE DEPARTMENT.   

2.  NEVER PICK UP A FLAMING PAN - You may be burned.   
3.  DO NOT USE WATER, including wet dishcloths or towels - violent steam explosion will result.   
4.  Use an extinguisher ONLY if:   

A. You know you have a Class ABC extinguisher and you already know how to operate it.   

B. The fire is small and contained in the area where it started.   
C. The fire department has been called.   
D. You can fight the fire with your back to an exit.   
* Based on “Kitchen Fire Safety Tips” published by NFPA.   


Summary of Contents for 22275000

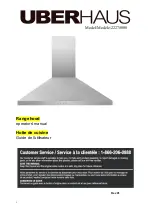
Page 1: ...1 Model Mod le 22275000 Range hood operators manual Hotte de cuisine Guide de l utilisateur Rev 01...

Page 2: ...ed fans must always be vented to the outdoors 7 Do not use this unit with any separate solid state speed control device 8 To reduce the risk of fire use only metal ductwork 9 This unit must be grounde...

Page 3: ...h will automatically shut off the motor if it becomes overheated The motor will restart when it cools down If the motor continues to shut off and restart have the hood serviced 7 For best capture of c...

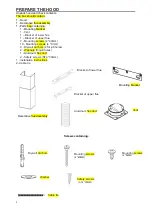
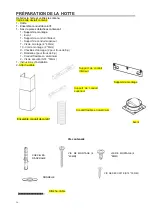
Page 4: ...ing screws 4 40mm 10 Mounting screws 4 8mm 9 Drywall anchors 2 for 8 holes 2 Washers for 8 holes 1 Aluminum flex duct 2 Safety screws ST4 30mm 1 Installation instructions 2 Cable tie Screws containing...

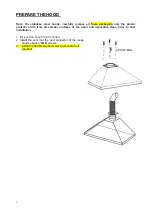
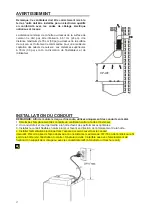
Page 5: ...use only metal ductwork 1 Decide where the ductwork will run between the hood and the outside 2 A straight short duct run will allow the hood to perform most efficiently 3 Install the aluminum flex d...

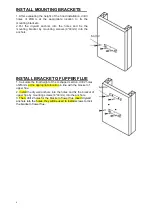
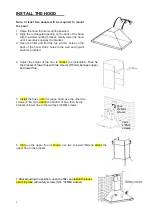
Page 6: ...he anchors INSTALL BRACKET OF UPPER FLUE 1 Calculate the final height of the U shaped section drill 2 holes of 8mm at the appropriate location in line with the bracket of upper flue 2 Install the dryw...

Page 7: ...ic protective film from all exterior surfaces of the hood and decorative flues prior to final installation 1 Pick out the hood from the carton 2 Install the vent into the duct connector of the range h...

Page 8: ...nchors provided 4 Adjust the height of the flue to finalize the installation Then fix the bracket of lower flue with two screws 4 8mm between upper and lower flue 5 Install the flues onto the range ho...

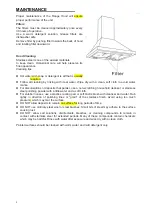
Page 9: ...its that persist use a non scratching household cleanser or stainless steel polishing powder with a little water and a soft cloth For stubborn cases use a plastic scouring pad or soft bristle brush wi...

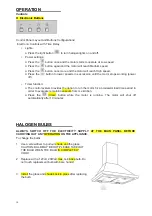
Page 10: ...nction o The control system provides the option to run the motor for a predetermined time period in order to evacuate remaining vapours from me kitchen o Press the timer button while the motor is runn...

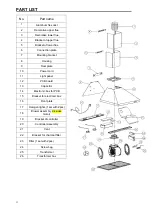
Page 11: ...t 8 Housing 9 Rear plate 10 Power cord 11 Light panel 12 PCB board 13 Capacitor 14 Electronic box for PCB 15 Bracket for electronic box 16 Front plate 17 Halogen lights 1 set with 2pcs 18 Blower assem...

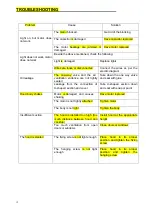
Page 12: ...way valve and seal with glue Leakage from the connection of U shaped section and cover Take U shaped section down and seal with soap or paint Hood body shakes Motor is damaged and causes shaking Have...

Page 13: ...other than an authorized dealer or service center Labour service transportation and shipping charges for the removal of defective parts and for installation of a replacement part beyond the initial 1...

Page 14: ...er vers l ext rieur 7 Ne pas utiliser cette unit avec une commande de vitesse semi conducteur 8 Afin de r duire le risque d incendie utilisez uniquement des conduits en m tal 9 Cette unit doit tre mis...

Page 15: ...sitif de protection contre la surcharge qui arr tera automatiquement le moteur s il surchauffe Le moteur red marrera apr s avoir refroidi Si le moteur continue s arr ter et red marrer faites r parer l...

Page 16: ...ntage 4 40mm 10 Vis de montage 4 8mm 9 Chevilles d ancrage 2 pour trous de 8 2 Rondelles pour trous de 8 1 Conduit flexible en aluminium 2 Vis de s curit ST4 30mm 1 Instructions d installation 2 Attac...

Page 17: ...LATION DU CONDUIT REMARQUE Afin de r duire le risque d incendie utilisez uniquement des conduits en m tal 1 D terminez l emplacement des conduits de ventilation entre la hotte et l ext rieur 2 Un cond...

Page 18: ...LATION DU SUPPORT DU CONDUIT SUP RIEUR 1 Calculez la hauteur finale de la section en forme de U percez 2 trous de 8mm un endroit appropri align avec le support du conduit sup rieur 2 Placez les chevil...

Page 19: ...sse et la pellicule de protection en plastique des surfaces ext rieures de la hotte et des conduits d coratifs avant l installation finale 1 Sortez la hotte de la bo te 2 Installez l vent dans le racc...

Page 20: ...les chevilles d ancrage fournies 4 R glez la hauteur du conduit afin de fixer l installation Fixez ensuite le support du conduit inf rieur avec deux vis 4 8 mm entre le conduit sup rieur et le condui...

Page 21: ...usage domestique non abrasif ou une poudre de polissage en acier inoxydable avec un peu d eau et un chiffon doux Pour les taches tenaces utilisez un tampon r curer en plastique ou une brosse souple a...

Page 22: ...nction de minuterie o Le syst me de contr le dispose d une option permettant de faire fonctionner le moteur pendant une dur e pr d termin e afin d vacuer les vapeurs restantes de la cuisine o Appuyez...

Page 23: ...ri re 10 Cordon d alimentation 11 Tableau des voyants 12 Carte de circuit imprim 13 Condensateur 14 Bo tier lectronique pour carte de circuit imprim 15 Support pour bo tier lectronique 16 Plaque avant...

Page 24: ...lle et r parez la avec de la colle Fuite provenant de la connexion de la section en forme de U et du couvercle Enlevez la section en forme de U et rebouchez avec du savon ou de la peinture Le corps de...

Page 25: ...ons effectu es par des personnes autres qu un revendeur ou un centre de r paration agr Les frais de main d uvre de service de transport et d exp dition pour le retrait des pi ces d fectueuses et pour...

Reviews: