background image

4

English

Installing Your Refrigerator

Unpacking Your Refrigerator

1.  Remove all packaging material. This includes the foam base and all adhesive 

tape holding the refrigerator accessories inside and outside. 

2.  Inspect and remove any remains of packing, tape or printed materials before 

powering on the refrigerator.

Leveling Your Refrigerator

t

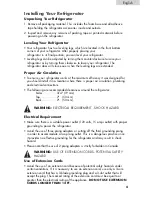
 Your refrigerator has two leveling legs, which are located in the front bottom 
corners of your refrigerator. After properly placing your 
refrigerator in its final position, you can level your refrigerator.

t

 Leveling legs can be adjusted by turning them counterclockwise to raise your 
refrigerator or by turning them clockwise to lower your refrigerator. The 
refrigerator door will close easier when the leveling legs are extended.

Proper Air Circulation

t

 To ensure your refrigerator works at the maximum efficiency it was designed for, 
you should install it in a location where there is proper air circulation, plumbing 
and electrical connections.

t

 The following are recommended clearances around the refrigerator: 
 

Sides……………3/4" (19 mm) 


Top....................2"   (50 mm) 


Back..................2"   (50 mm)

WARNING:

 ELECTRICAL REQUIREMENT - SHOCK HAZARD

Electrical Requirement

t

 Make sure there is a suitable power outlet (120 volts, 15 amps outlet) with proper 
grounding to power the refrigerator. 

t

t

 Avoid the use of three prong adapters or cutting off the third grounding prong 
in order to accommodate a two prong outlet. This is a dangerous practice since 
it provides no effective grounding for the refrigerator and may result in shock 
hazard.

WARNING:

 USE OF EXTENSION CORDS- POTENTIAL SAFETY 

HAZARD

Use of Extension Cords

t

 Avoid the use of an extension cord because of potential safety hazards under 
certain conditions. If it is necessary to use an extension cord, use only a 3-wire 
extension cord that has a 3-blade grounding plug and a 3-slot outlet that will 
accept the plug. The marked rating of the extension cord must be equal to or 
greater than the electrical rating of the appliance. 

DO NOT USE EXTENSION 

CORDS LONGER THAN 12 FT.

Please note that the use of 2-prong adapters is strictly forbidden in Canada.

Summary of Contents for 65405002

Page 1: ...65405002 BCD 88 2 Door Refrigerator Freezer R frig rateur cong lateur 2 portes Questions 1 866 283 2239...

Page 2: ...eplace immediately all electric service cords that have become frayed or otherwise damaged Do not use a cord that shows cracks or abrasion damage along its length the plug or the connector end 6 If yo...

Page 3: ...we strongly recommend that said service be provided by a certified technician 11 Do not operate your refrigerator in the presence of explosive fumes SAVE THESE INSTRUCTIONS DANGER Risk of child entrap...

Page 4: ...r Alignment 5 Reversing the Door 5 Refrigerator Features and Use 7 General Features 7 Refrigerator Interior Shelves 7 Using Dispense A Can 7 Crisper 7 Defrosting Your Refrigerator 8 Food Storage Infor...

Page 5: ...perature Control 3 Refrigerator Shelves 4 Crisper 5 Front Leveling Legs 6 Refrigerator Door Shelves 7 Dispense A Can Storage 8 Freezer Door Shelf 9 Ice Cube Tray 10 Ice Scraper English Parts And Featu...

Page 6: ...plumbing and electrical connections t The following are recommended clearances around the refrigerator Sides 3 4 19 mm Top 2 50 mm Back 2 50 mm WARNING ELECTRICAL REQUIREMENT SHOCK HAZARD Electrical...

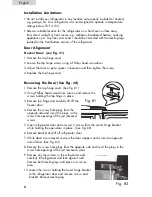
Page 7: ...cover 4FF Fig Using Phillips IFBE TDSFXESJWFS loosen and remove UIF screws holding the top hinge in place Remove top hinge and carefully lift off UIF freezer door Remove the screw hole plugs from UIF...

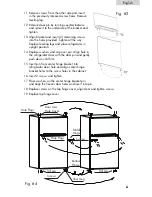
Page 8: ...and cap over pin Align hole in the refrigerator door with the door pin and gently push down until firm 15 Insert pin from center hinge bracket into refrigerator door hole and align center hinge bracke...

Page 9: ...ore than 5 days t If ice cube tray freezes to the bottom of the compartment pour a little warm water around it to loosen it Do not use boiling water which can damage plastic parts or sharp metal objec...

Page 10: ...sh food that is not prepackaged be sure to wrap or store GPPE in airtight and moisture proof material unless otherwise noted This will FOTVSF proper shelf life and prevent the transfer of odours and t...

Page 11: ...oper Refrigerator Care and Cleaning Cleaning and Maintenance WARNING To avoid electric shock always unplug your refrigerator before cleaning Ignoring this warning may result in death or injury CAUTION...

Page 12: ...ed replug power cord to AC PVUMFU WARNING IF OUTAGE IS FOR A PROLONGED PERIOD INSPECT AND DISCARD SPOILED OR THAWED FOOD IN FREEZER AND REFRIGERATOR CLEAN REFRIGERATOR BEFORE REUSING Vacation and Movi...

Page 13: ...frigerator runs too frequently t This may be normal to maintain constant temperature during high temperature and humid days t Doors may have been opened frequently or for an extended period of time t...

Page 14: ...d slightly Be sure the floor can adequately support the refrigerator Level the refrigerator by putting wood or metal shims under part of the refrigerator t The refrigerator is touching the wall Re lev...

Page 15: ...ne at 1 866 283 2239 Monday to Friday from 8 AM to 6 PM Eastern time Normal wear and tear including accessory wear is not covered under this warranty The product is guaranteed for 12 months if used fo...

Page 16: ...la prise 5 R parer ou remplacer imm diatement tout cordon lectrique effiloch ou autrement endommag Ne pas utiliser un cordon fissur abras ou dont la prise ou le connecteur est endommag 6 Si le r frig...

Page 17: ...echnicien certifi 11 Ne pas utiliser le r frig rateur en pr sence d manations explosives VEUILLEZ CONSERVER CES INSTRUCTIONS DANGER Les enfants pourraient se retrouver coinc s dans votre r frig rateur...

Page 18: ...ientation de la porte 7 Caract ristiques et utilisation du r frig rateur 9 Caract ristiques g n rales 9 Clayettes int rieures 9 Distributeur de cannettes Dispense A Can 9 Bac l gumes 9 D givrage du r...

Page 19: ...2 Contr le de temp rature 3 Tablettes de r frig rateur 4 Bac l gumes 5 Pattes de mise niveau avant 6 Tablettes de porte de r frig rateur 7 Distributrice Dispense A Can 8 Tablette de porte de cong lat...

Page 20: ...FT indications suivantes concernent l espace recommand autour du r frig rateur C t s 3 4 po 19 mm Dessus du r frig rateur 2 po 50 mm Arri re 2 po 50 mm ATTENTION EXIGENCES LECTRIQUES RISQUE DE CHOC L...

Page 21: ...up rieur Changement de l orientation de la porte Voir figure 4 Retirez le cache charni re sup rieur Voir figure l aide d un tournevis Phillips desserrez FU retirez les vis d attache de la charOJ SF TV...

Page 22: ...ou de la porte du r frig rateur avec la goupille de la porte et appuyez d licatement dessus jusqu ce qu elle soit fermement en place 15 Ins rez la goupille du support de charni re centrale dans le tro...

Page 23: ...on s re durant plus de 5 jours t Si le bac gla ons reste coll au bas du cong lateur versez un peu d eau chaude autour et il se d collera N utilisez pas de l eau bouillante car elle peut endommager les...

Page 24: ...F WPVT que ces EFrniers TPOU DPSSFDUFNFOU FNCBMM T ou QMBD T EBOT EFT DPOUFOBOUT herN UJRVFT M QSFVWF EF M IVNJEJU FU EF l air Vous parWJFOESF conserver vos BMJNFOUT plus MPOHUFNQT sans BMU SBUJPO EF...

Page 25: ...r viter les risques d lectrocution toujours d brancher le r frig rateur avant de le nettoyer Le non respect de cette mesure peut entra ner des blessures graves ou mortelles PR CAUTIONS Avant d avoir r...

Page 26: ...POOFMMFT QFVWFOU TVrWFOJS DBVTF EhVO PSBHF VOF UFNQ UF PV BVUSFT DPOEJUJPOT 3FUJSFS MF DPSEPO E BMJNFOUBUJPO EF MB QSJTF CA QFOEBOU UPVUF MB EVS F de MB DPVQVSF EF DPVSBOU PSTRVF MF DPVSBOU MFDUSJRVF...

Page 27: ...off arr t et nettoyer le r frig rateur ainsi que les joints de porte en suivant les proc dures du chapitre intitul Nettoyage g n ral Faire en sorte que la porte reste ouverte de mani re ce que l air...

Page 28: ...t Il peut s agir de l activit normale pour maintenir VOF UFNQ SBUVSF constante MPSTRVF la temp rature ext rieure ou le taux d humidit dans l air sont lev s t Les portes ont t ouvertes trop fr quemmen...

Page 29: ...TU MF DBT MF S GSJH SBUFVS TF CBMBODFSB M H SFNFOU EhBWBOU FO BSSJ SF TVS MF TPM TTVSF WPVT RVF MhFNQMBDFNFOU EV S GSJH SBUFVS TPJU BTTF TPMJEF QPVS TPVUFOJS MF QPJET EF MhBQQBSFJM 1MBDF MhBQQBSFJM OJ...

Page 30: ...283 2239 du lundi au vendredi de 8h 18 h heure normale de l Est L usure normale incluant l usure des accessoires n est pas couverte par cette garantie Ce produit est garanti durant 12 mois si utilis d...

Reviews: