background image

UBI EasyCoder 401 Linerless – Installation Instructions

3

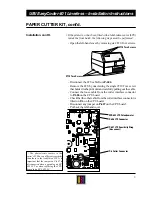
• Tilt the cutter unit upwards until it locks into place. If the cutter

does not lock properly, the hinges of the cutter unit may need to
be adjusted using a #T10 Torx screwdriver.

• Switch on power. The cutter will perform an idle cycle in order to

occupy its home position.

• Use e.g. the Terminal Setup in UBI Shell or setup files to change

the startadjust value to -294 and the stopadjust value to +250.
Setup files should be composed like this:

"DETECTION,FEEDADJ,STARTADJ,-294"

"DETECTION,FEEDADJ,STOPADJ,250"

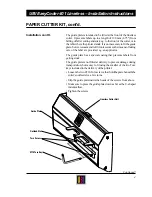
• Tilt down the cutter and thread the paper through the cutter unit

between the paper guides (see illustration above). Then tilt up the
cutter again and lock it in closed position. Check that the printhead
is lowered. Now the printer is converted to EC 401 LLC standard
and is ready for operation after the guide plate has been installed,
as described on next page.

Note!

If the cutter do not operate properly after installation,

check the instructions on page 5.

PAPER CUTTER KIT, cont'd.

Continued!

Installation, cont'd.

Hinge

Hinge

Paper Guides

Summary of Contents for EasyCoder 401

Page 1: ...it from operating when the anvil shear is open The cutter kit consists of One Linerless Cutter Unit One Guide Plate This Installation Instructions leaflet Maximum paper thickness is 175 m 175 grammes...

Page 2: ...s to the left so as to disengage the hinges Remove the hatch completely Fitthecutterunittothevacanthinges Makesurethatthelocking plate snaps into the groove of the right hand hinge and that the angled...

Page 3: ...padjust value to 250 Setup files should be composed like this DETECTION FEEDADJ STARTADJ 294 DETECTION FEEDADJ STOPADJ 250 Tilt down the cutter and thread the paper through the cutter unit betweenthep...

Page 4: ...the label are provided e g an applicator The guide plate has a special coating that prevents labels from getting stuck The guide plate is not fitted at delivery to prevent damage during transportatio...

Page 5: ...the following steps must be performed Open the left hand cover by removing six T10 Torx screws Disconnect the LTS cable from P 606 Remove the LTS by unscrewing the single T10 Torx screw that holds it...

Page 6: ...two purposes to prevent a new label being printed beforethepreviousonehasbeenremoved andtodetectpaperjams If the label taken sensor does not operate properly it may need to be adjusted MakeasimpleUBIF...

Page 7: ...ddoor Thenthe printer is ready for operation The built in LTS can be used for detecting paper jams by means of a few lines in a UBI Fingerprint program as illustrated by the following example IMMEDIAT...

Page 8: ...ilbladeisin open position SoakacottonswabwithWD 40multi spray orsimilar 1 andrub it against the cutting edge of the anvil blade to dissolve any adhesive residue Inspect the interior of the cutter for...

Reviews: