background image

3. Basic Installation  

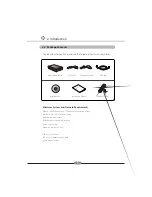
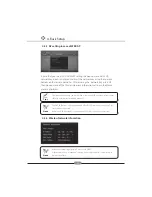
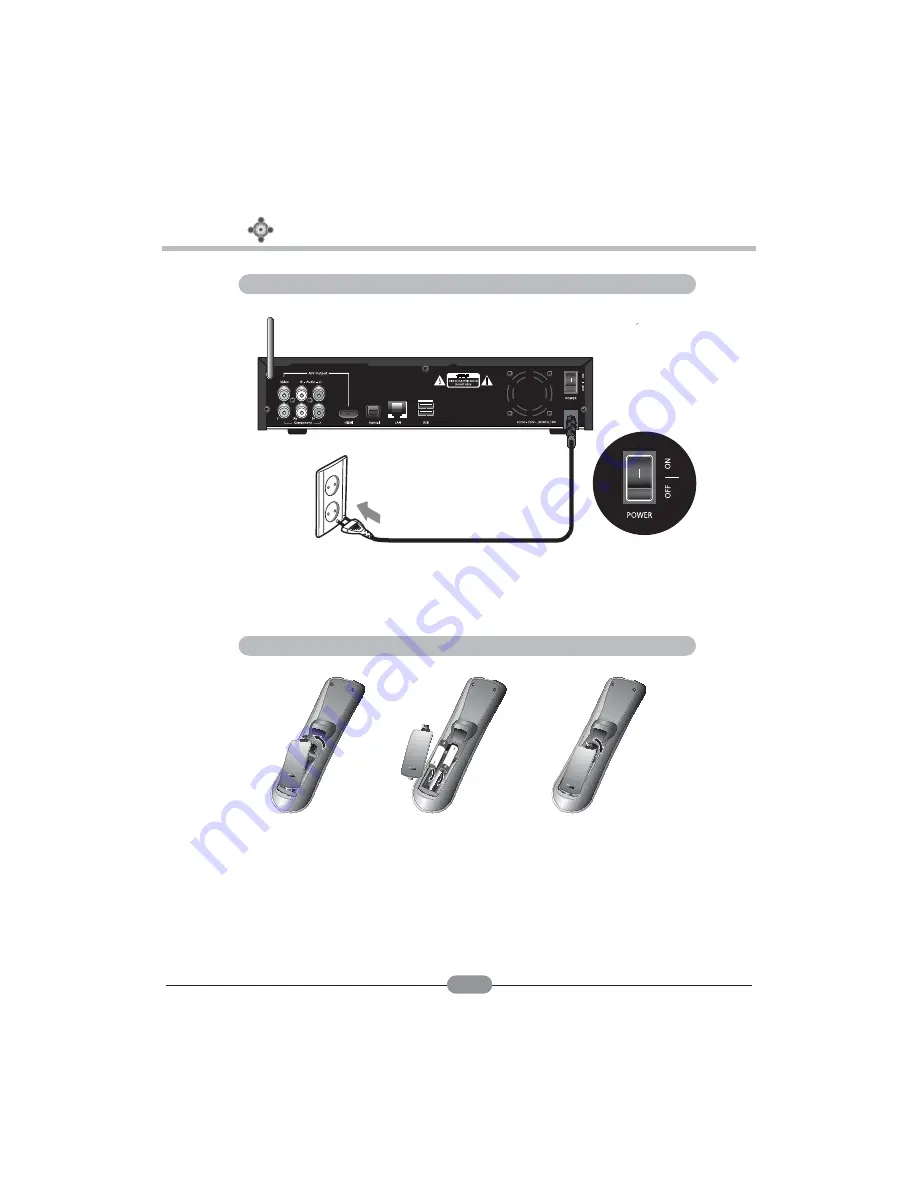
3.6. Powering – up your Media Player 

3.7 Inserting Batteries in the remote control 

15

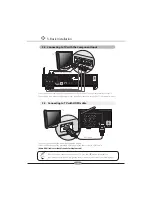
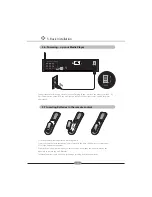
Connect the power cord to an electrical outlet. After plug in and switch on, the player is in stand – by.  

Press Power button on the RCU, the blue light on the front of the player comes on, and the player 

gets started. 

1. Open the battery compartment by removing the lid 

2. Insert the batteries with the right polarity ( marked on the base of the battery compartment ) 

3. Close the battery compartment  

If the player no longer reacts properly to remote control commands, the batteries may be flat. 

Make sure to remove the used Batteries. 

The manufacturer accepts no liability for damage resulting from leaking batteries

Summary of Contents for MP-8000HD

Page 1: ...MP 8000HD USER S MANUAL ...

Page 2: ...vices 3 5 Connecting your Media player to Home Network 3 6 Powering up your Media player 3 7 Inserting Batteries in the remote control 3 8 Installing an internal Hard Disk Drive 3 9 Formatting the Hard Disk 4 Basic Setup 4 1 Video setting 4 2 Network setting 4 3 Wireless Network setup 4 3 1 Wireless Network setup 4 3 2 Wireless Network Search 4 3 3 AP setting in case of WEP AP 4 3 4 Wireless Netwo...

Page 3: ...g Bono File Manager 7 2 7 Log in Bono File Manager 7 2 8 Icons in Toolbar of Bono File Manager 7 2 9 File management using Bono File Manager Download 7 2 10 File management using Bono File Manager Upload 38 38 38 39 40 40 40 41 41 42 43 44 45 47 47 47 49 50 51 51 52 52 53 53 8 Firmware Update 8 1 Firmware Update by downloading the firmware 8 2 Firmware Update by Network 54 54 5 Media Playback 5 1 ...

Page 4: ...es Do not expose the player to water oil dust or magnetic materials Do not attempt disassembling or remodeling the player Do not drop the player from height This might cause irreversible damage to the player Do not touch the power plug with wet hands It may cause electric shocks or fire Do not mix batteries with old and new or carbon and alkaline in the remote control Keep the player away from the ...

Page 5: ...ia player While your media player supports dozens of file formats and codec they are not interested to work with every codec variation Your media player provides limited support to standardized versions of codec as stated in the technical specifications of this manual We do not have any warranty or responsibility for data loss in the HDD and we strongly recommend backing up your data or media files s...

Page 6: ...tions are Convenient direct decoding and Bookmarking of multiple files with hot key on the remote controller tt Audio Jukebox The Bono Media player supports multiple image formats such as MP3 AC3 WMA DTS with digital audio output and down mixing capability tt Digital Photo Album The Bono Media player supports multiple image formats You can enjoy the digital photo slide show on the big screen TV tt ...

Page 7: ...0 Windows XP Windows Vista operating systems Pentium 4 over 1GHz processor speed 256MB or above memory 100MB or above free hard disk space Sound card 16 bit Graphics Card 24 bit color Cable or DSL modem 256 Kbps upstream network speed Home network router 6 Bono Media Player Installation CD Instruction Manual Remote Control A V Cable Component Cable LAN Cable ...

Page 8: ...P HL AP L3 Audio containers AAC M4A MPEG audio MP1 MP2 MP3 MPA WAV WMA FLAC OGG Audio codecs AC3 DTS WMA WMA Pro AAC MP1 MP2 MP3 LPCM FLAC Vorbis Audio pass through DTS AC3 DTS HD MA DTS HD HR Dolby True HD Dolby Digital Plus Photo formats JPEG BMP PNG GIF Other formats ISO IFO Subtitle formats SRT SMI Chipset Sigma Designs SMP8635 Memory 256MB DDR SDRAM 32MB Flash Audio Video outputs HDMI v1 3a u...

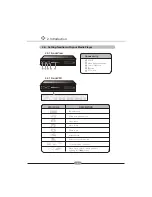
Page 9: ...VFD POWE R Menu Navigation button Select OK button E X T button VFD screen 1 2 3 4 5 VFD ICONS DESCRIPTION H DD embedded Wired network connected Video in use Music in use Photo in use USB connected Wireless network connected Currently setting TV output When Movie music photo playback lighting in S10 S9 S8 S1 order ...

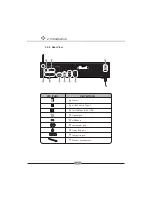
Page 10: ... 9 2 4 3 Rear View VFD ICONS DESCRIPTION Power USB 2 0 Host A Type 2 10 100 Mbps RJ45 LAN Optical port HDMI port Component port Stereo RCA port Composite port Wireless Antenna Jack 9 6 5 4 3 2 8 7 1 1 2 3 4 5 6 7 8 9 ...

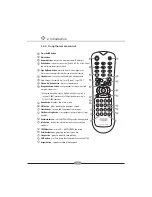
Page 11: ...4X 64X FF REW functions Menu button displays the main menu EXIT button goes back to the previous screen Color buttons selects the functional sub menus Play Pause Stop button starts playback pauses playback stops playback Bookmark button sets the BOOKMARK during the video playback Info button displays the information for the currently playing media file FF REW buttons use in 4X 64X FF REW function ...

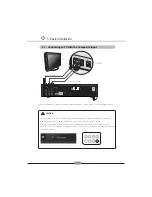
Page 12: ...mposite cable CAUTION Default setting of TV OUT in Media player is Component and in the event that you connect the Media player to the TV with the Composite cable there is no display on TV screen After you connect the composite cable press STAR button repeatedly on your remote control until PAL NTSC composite is displayed on VFD Then after 5 seconds you can get the Main menu of the Media player GO...

Page 13: ...cking Contents HDMI INPUT After you connect the video cable to your TV press the button repeatedly on your remote controller until you get the initial screen or main menu of your Media player HDMI Cable TV TV Audio Red White Cable Component Cable AUDIO IN VIDEO IN COMPONENT L R Y Pb Pr Connect component cable between component output of your Media Player and component input of the TV Connect audio...

Page 14: ...you can enjoy 5 1CH highquality sound through the optical cable Connect the optical cable between your Media player and the other audio devices Notice Optical cable are excluded in the Packing contents This connection is for digital 5 1 CH Amplifier and 6 speakers with your Media player DIGITAL Amplifier Optical Cable Home Theater ...

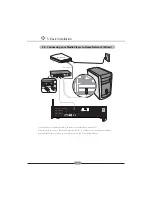
Page 15: ...r Wired or Wireless to connect the Media Player and your PC Use LAN cables to connect the Media Player and your PC to your Router for sharing the media files residing Within folders or drives on your wired networked PC with Media Player Ethernet Cable DC 5V CONSOLE LAN PHONE LINE DSL Modem Router ...

Page 16: ...on the front of the player comes on and the player gets started 1 Open the battery compartment by removing the lid 2 Insert the batteries with the right polarity marked on the base of the battery compartment 3 Close the battery compartment If the player no longer reacts properly to remote control commands the batteries may be flat Make sure to remove the used Batteries The manufacturer accepts no l...

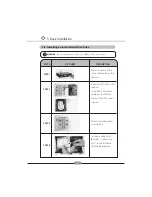
Page 17: ...op case STEP 2 Place the HDD and a HDD support included in the acces sory b ox as the picture and put the HDD upon a support STEP 3 After turning them over screw 4 points STEP 4 Connect a cab le with 2 b lack lines 1 yellow line and 1 red line into the matching connector WARNING B efore installing the internal HDD you M U ST plug out the media player ...

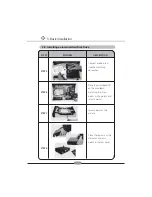
Page 18: ...PTION STEP 5 Connect a cab le in red into the matching connector Close the top case as the picture and screw 3 points in the rear panel STEP 6 Place the assemb led HDD on the main b oard matching the screw points as the picture and screw 3 points STEP 7 STEP 8 Screw a point as the picture ...

Page 19: ...rmat the HDD for full usage in Media player Go to System tab in Setup menu and select HDD Format Confirmation message will displayed in popup window and select Yes Then HDD format gets started Note After installing the internal HDD by yourself you should format the HDD regardless of new or used one ...

Page 20: ...he video out is changed according to the NTSC PAL or 24Hz format t TV Ratio Select the TV screen ratio between 16 9 and 4 3 t Video Output The default video setting is Component Select the video port you connected among Composite Component HDMI t Resolution Select this when you connect the video through a component or HDMI cable තGHDMI Auto EDID 480i 576i 480P 576P 720P 1080i 1080P 1080i is recomm...

Page 21: ...FO 1 BOE 4UBUJD 1 තG 1 FGBVMU TFUUJOH තG4UBUJD 1 G ZPV DBOOPU BDDFTT WJB XJUI 1 VTF UIF 4UBUJD 1 TFUUJOH 8IFO ZPV TFMFDU 4UBUJD 1 OFUXPSL TFUUJOH XJOEPX JT EJTQMBZFE OUFS UIF 1 BEESFTT 4VCOFU BTL BUFXBZ BOE 4 4FSWFS NBOVBMMZ XJUI UIF OVNFSJD LFZT PO UIF SFNPUF DPOUSPMMFS BOE QSFTT 0 CVUUPO t FUXPSL JOGPSNBUJPO PV DBO DIFDL UIF OFUXPSL JOGPSNBUJPO PG ZPVS FEJB 1BZFS ...

Page 22: ...for searching your AP or AP Router After the interval of searching in the event that the Wi Fi network is successfully searched you can see the AP list and select the AP you want to get connected with 4 3 1 Wireless Network Setup 4 3 2 Wireless Network Search Tips You can see the AP with a lock icon meaning WEP Wired Equivalent Privacy setting and the AP with a unlocked icon meaning non WEP settin...

Page 23: ...AP setting in case of WEB AP 4 3 4 Wireless Network Infomation Tips The secured network key can be checked or set in the WEP Key menu of your router Refer to your router s Instruction manual Note The WEP 64 Bit key is only supported and WPA Wi Fi Protected Access or RADIUS Server are not supported In addition HEXA key input is supported but ASCII key input is not supported Note In the event that u...

Page 24: ... set the U Server Enable in Network tab of Setup menu Then Media player will detect the U Server installed locally connected PC and display the files of the PC in the screen Select the one of 3 Network disks and set it Enable 1 Network disk selection For U Server installation refer to 7 2 Using the U Server 4 4 1 UPnP using U Server 4 4 2 Samba NAS Tips Maximum 3 PCs can be connected with Media pla...

Page 25: ...share and set the Sharing 2 IP and folder name setting 3 Setting the folder to be shard PCs connected using Samba NAS are displayed first and shown as Network disk 1 or Network disk 2 in the list Then PCs connected using UPnP are displayed in the list and shown as the local PC name 4 4 3 The displaying order of PCs in the PC tab of Movie Music and Photo ...

Page 26: ... SFDPNNFOE UIF PSNBM NPEF t Subtitle Color IBOHF UIF DPMPS PG UIF TVCUJUMF t Font 4FMFDU UIF GPOU CFUXFFO VMJN BOE PEJD t Screen Saver 4FMFDU UIF TDSFFO TBWFS OBCMF PS JTBCMF O UIF FWFOU PG i OBCMF i TDSFFO TBWFS XJMM XPSL XIFO UIF QBVTF TUBUVT PS QMBZCBDL PG BVEJP XJUIPVU TMJEF TIPX t Slide Show deley 4FU UIF 4MJEF TIPX UJNF JOUFSWBM TFD ...

Page 27: ...FS BOE 1SPEVDU BD EESFTT t HDD Information PV DBO DIFDL UIF TUBUVT PG JOUFSOBM 4UPSBHF PG UIF FEJB QMBZFS t HDD Format PV DBO GPSNBU UIF JOUFSOBM TUPSBHF PG UIF FEJB QMBZFS Warning O UIF FWFOU UIBU 4UPSBHF JT GPSNBUUFE BMM DPOUFOUT XJMM CF QFSNBOFOUMZ EFMFUFE BOE VOSFDPWFSFE t Firmware update PV DBO VQEBUF UIF mSNXBSF BGUFS DIFDLJOH UIF WFSTJPO SFGFS UP IBQUFS ...

Reviews: